Follow the steps below to create and import a simple load file.
-
Prepare your documents and folder structure.
Gather the documents you want to import and organize them into a clear folder structure on your local machine. Check out this topic to generate a file directory that looks like this: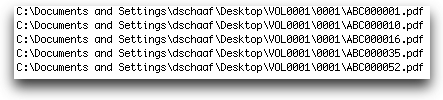
Tip: Organize your files into a single top-level folder (for example, VOL0001) before upload. This makes relative pathing and import setup much easier. -
Confirm relative file paths.
Nextpoint expects relative file paths in load files.
If your directory listing includes extra parent folders or local system paths, use Find and Replace in a text editor to remove unnecessary pathing. For example, if your load file will live inside the VOL0001 folder, paths should look like: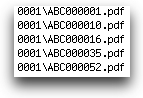
-
Create a new spreadsheet.
Open Excel (or another spreadsheet application) and create a new workbook. -
Add column headers.
In the first row, add column headers for the fields you want to include. At a minimum, you will typically need:image_file – the relative path to the document image
bates_start – if the files are named by starting Bates number
You may also want to include additional headers such as native_file (for native document files) and text_file (for extracted text files) -
Populate the load file.
Each subsequent row should represent a single document.
Copy the relative file path for each document into the image_file column and populate the bates_start column if applicable. It should look something like this: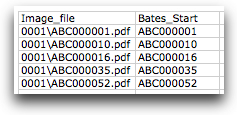
-
Save the file as CSV.
Save the spreadsheet as a .csv file.
Place the CSV file in the same top-level folder as your documents (for example, inside VOL0001).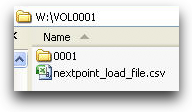
-
Upload the folder to the File Room.
Upload the entire folder (including the documents and the CSV load file) to the File Room in Nextpoint. You can drag and drop the folder or use the upload option. -
Start the import.
Once the upload is complete, initiate the import by clicking Import next to the folder in the File Room, or by navigating to Data > Imports and selecting Import Files.
Nextpoint will launch the guided import workflow and detect the presence of a load file automatically. -
Configure the import settings.
Name the import and select an optional custodian or destination folder. Review the available import settings and proceed to the next step.Once these settings are confirmed, Nextpoint will move you into the load file mapping stage if a load file is present.
-
Map the load file fields.
Nextpoint will open the Load File Mapper, where you can map fields from the CSV or DAT load file to database fields.Required fields will be flagged, some fields may auto-map when names match, and you can create or adjust mappings as needed. For more detailed steps on using the field mapper, check out our article on How to Import Produced Data with a Load File.
Once complete, your documents will be available in the Review/Documents tab with images, metadata, and Bates information applied.
Comments
Please sign in to leave a comment.