Upload and Import
Nextpoint File Room
- Request Files from your Nextpoint File Room
- How to Delete Folders in Your File Room
- Using Cloudberry for Uploads to Your File Room
- File Room Import Indicators
- Cloud Storage Integration; Dropbox, Zoom, Direct Links, and OneDrive
- Uploading with the Amazon s3 Command Line Interface (CLI)
Native Imports and Settings
- How to Import Data in Nextpoint
- Generating a File Listing for Load File Creation
- Understanding Deduplication
- Collection Best Practices & Checklist
- Import Types, Import Data Settings & Deduplication
- DeNIST Settings
Produced Data Imports
- Produced Data Import Required Specifications
- Mapping Date and Time Fields for Produced Data Imports
- Nextpoint Default and Protected Fields
- How to Import a CSV Overlay
- How to Import Produced Data with a Load File
- How to Import Produced Data for Manual Import Type
Import Troubleshooting
Nextpoint File Room
In any Nextpoint database, you can securely Request Files from any third party (clients, counsel, etc...) from your database File Room. It is a simple process in which you ("requestor") request files from a specified third-party, the "recipient" of that request receives a secure link to upload their respective files, and then you can access the uploaded files right away.
Take a closer look below at the three easy steps to request, upload, and access third-party files in your Nextpoint File Room.
Requesting Files from your File Room
- Navigate to DATA File Room Request Files.
- Click "Request Files", and you will be prompted to enter the recipient's Name, recipient's Email Address, the Folder Name to be created (for the recipient's upload), any enclosure message, and set the expiration date for your request files link.
-
Click "Request Files" to finalize your request.
The recipient will receive an email from Nextpoint indicating you initiated a request for them to upload files. When requesting files from an individual who is not a user in your Nextpoint database, you (as the requestor) will be CC'd on the recipients email as to ensure receipt.Note:
The named folder is created when the request is made and the recipient will be redirected to the specific upload location
Once the request has been sent, the recipient's upload link will expire based on the expiration time selected
Uploading Files as a Request Recipient
- When the requestor finalizes the "Request Files" above, you will receive an email from Nextpoint stating the particular requestor has provided access to upload files.
- Click the orange "Upload Files" button in the email verify your email address click "Upload Files".
-
You will be brought to a secure File Room location in which you will only be able to see files you have uploaded.
Note:
Recipients will only be able to see files they have uploaded and do not have access to any other existing data in the File Room.
- Simply drag and drop your files to the designated space in the File Room or click "Upload Files" and navigate to the folder on your local drive which you would like to upload. The preferred format is an unzipped folder of files (vs. zipped) and/or pst or mbox file(s).
The recommended size for a single upload is 20GB. The maximum size for a single upload is 52GB.
We also highly recommend reviewing the File Room section of the File Room Best practices Checklist linked here prior to uploading any files to the File Room. - Once your upload is complete, you can exit from the File Room location and the requestor will receive an email notification stating the files are being uploaded.
Accessing Files uploaded by Recipients
- Once the recipient has started to upload files, the requestor will receive an email confirmation.
- Access uploaded files via DATA File Room folder created via the initial request.
FAQ: How do I request multiple upload batches to the same File Room folder?
If you are making supplemental upload requests to a third party and need those files uploaded to the same original folder from your first request, it is recommended you take the following steps:
- Before your first request for files, create a parent folder via "Create Folder" in your Nextpoint File Room.
- Navigate into your newly created folder within your File Room.
- Initiate your file request by clicking "Request Files" and create your first subfolder.
Each request is required to make a new folder to prevent data overflow. That is why the creation of said subfolders is necessary.
Request Files from your Nextpoint File Room
If you have folders in your File Room that you need to delete, you will have to remove all of the contents within the folder prior to being able to delete the folder itself. This is for security reasons, as once a document is deleted from the fileroom, it is NOT recoverable. We recommend only doing so if you have copies of these files elsewhere, you've incidentally uploaded it in the wrong database, or you've placed it in the wrong folder and you'd like to start over.
1. Select the checkbox next to any document within the folder you'd like to delete.
2. Select "All" if you want to include every file contained within this folder.
3. Select "Trash Files".
Once the individual files have been deleted, you will be prompted with the "Delete Folder" option. This only shows up if the folder is completely empty. If you have many subfolders, you will have to clear those contents the same way.
How to Delete Folders in Your File Room
Installation
This guide walks you through installing and configuring CloudBerry for use with your Nextpoint File Room.
To start, download and install the CloudBerry for Amazon S3 client.
Licensing Information
CloudBerry offers a free version that supports uploads up to 5 GB. A paid license is required for larger transfers.
Setting Up CloudBerry
- Open CloudBerry.
- From the main menu, select "Tools" > "Options", then open the "Copy/Move" tab.
- Change the Permissions Inheritance dropdown to "Do not inherit".
- Click "OK".
- In the right-hand window, open the dropdown menu and select "New Storage Account", then choose "Amazon S3".
-
Complete the "Add new Amazon S3 account" form. These credentials can be found in Nextpoint under Settings > Import.
For more details on requesting and managing credentials, see our Managing AWS S3 Credentials article.
Credential Field Reference
- Display Name: Enter a name that will help you identify this account later.
- Access Key: Corresponds to the Access Key ID value in Nextpoint.
- Secret Key: Corresponds to the Secret Access Key value in Nextpoint.
- Enable the "Use SSL" checkbox.
- Open the Source dropdown and select the Display Name created in the previous step.
-
Replace the "root" value directly beneath the Source dropdown with the File Room path value found on the Import settings page in Nextpoint, then press Return.
Optional Tip
To make this account easier to access in the future, click the blank star icon in the root folder window to save it as a favorite. This prevents the need to re-enter the folder path during future sessions.
- On the left side of the interface, select the "My Computer" tab.
- You are now connected to your File Room and can begin transferring files.
- Select a file or folder, then click "Copy". The selected items will begin uploading to the File Room.
Using Cloudberry for Uploads to Your File Room
Within your file room, you are able to tell which files and folders you've imported and which ones you haven't. This can be helpful as you amass data in your file room to avoid both importing items duplicative and missing entire data sets.
- When you import a folder, a checkmark in a blue circle will appear to the right of the folder name.
Note
If you only import individual files within a folder or update the folder with additional files after importing, the checkmark will disappear.
- If you mouse over this checkbox, you will see information about the import including its date and the user who initiated it.
- Individual files at your level in the file room will contain the same checkmark with the same information as a folder if they have been imported.
FAQ
What happens if I re-import a folder/file?
- The previously imported icon will always show the latest date and person who imported it most recently.
If I cancel an import will the icon show?
- No, the icon will be removed as soon as the import is canceled
File Room Import Indicators
Nextpoint has the capability to directly connect several different external account types to your file room to ease the upload process and avoid risks of spoliation by minimizing data handling requirements. Select the external account type you want to link:
To upload files from your Dropbox account, first select the Dropbox icon.
Then you will need to click on the "Connect to Dropbox" button.
When connecting Nextpoint and Dropbox for the first time, you will be prompted to input your Dropbox credentials within a secure Dropbox window, rather than on Nextpoint's platform. This window is part of the Dropbox authentication process, ensuring that your login details are kept confidential and that only you can grant access to your Dropbox data. You may receive a warning message confirming that you trust Nextpoint as this is a new feature.
When you click the "Continue" button, you can add your Dropbox credentials or log in via a connected Google or Apple account.
You will also need to verify your account via two factor authentication to verify your credentials.
Once you have confirmed your login information, the folders in your Dropbox account will appear in the upload window in your file room.
Note
Only you will have access to your Dropbox even if there are other users within your database. Other users will not see or be able to access files from your Dropbox account that you do not upload to your file room.
Now that your external account is connected, select the folder(s) and/or file(s) you want to upload to your file room. If you want to add the files/folders to a specific folder in your file room, navigate to that folder first. You can also create a new folder by clicking the green create button.
Once you are where you want the files to go in your file room, check the folder(s) or file(s) you want to upload and click the "Select #" button that indicates the number of files or folders you are uploading. Once you click that button, your upload will begin. The progress bar at the bottom of the upload window will indicate the upload's progress. When the upload is complete, your files should appear in your file room. Click the "Done" button on the bottom right corner of the upload window return to the original upload window.
How will Nextpoint maintain the file path of my data if I upload a nested folder?
When bringing in data from a nested location in a cloud storage location, Nextpoint will bring in the folder structure above that subfolder. No files but that contained in the uploaded subfolder will be added to your file room, but the folders above the nested folder will be recreated so that the file path will extract accurately.
If I have a shared premium/team Dropbox, what steps do I need to take to upload my data?
To add data from within a premium/team Dropbox account, you will either need to copy files into your personal folder for upload or share them with your personal folder in order to select them in the Nextpoint Dropbox window.
If part of my upload fails, what should I do?
If part of your upload fails, you can retry only the files that failed to upload by clicking on the orange "Retry" button on the bottom right of your upload window. This will avoid the need to upload the successfully added files to your file room again.
Are there limits to the number of files/folders I can upload at one time with Cloud Storage Integration?
Currently, there is a 15,000 file limit to Dropbox uploads,
but we are actively working on increasing it.
There is also a known issue that affects searching within
very large folders that contain a number of files and/or
nested folders. In order to select all of the files/folders
you may need to scroll down, wait for the set to load,
scroll
down again and wait for the set to load until you get
to
the end of the folder. This workaround should only be
required
temporarily.
To upload files from your Zoom account, first select the Zoom icon.
Then you will need to click on the "Connect to Zoom" button.
When you click the "Continue" button, you can add your Zoom credentials or log in via a connected Google or Apple account.
You will then need to "allow" Zoom (via an UppyLocal connection) to connect to your Nextpoint account. This permission is required by Zoom to allow you to view and upload files available in your Zoom account directly to your File Room.
Once you have confirmed your login information, the folders in your Zoom account will appear in the upload window in your file room.
Note
Only you will have access to your Zoom even if there are other users within your database. Other users will not see or be able to access files from your Zoom account that you do not upload to your file room.
Now that your external account is connected, select the folder(s) and/or file(s) you want to upload to your file room. If you want to add the files/folders to a specific folder in your file room, navigate to that folder first. You can also create a new folder by clicking the green create button.
Important Note
Only recordings that are saved to the Zoom cloud are available to upload into your file room via Zoom connection. Whether a recording is saved to the cloud or locally to a computer is determined when you start recording a meeting. Recordings saved locally need to be uploaded with the normal file upload process.
Once you are where you want the files to go in your file room, check the folder(s) or file(s) you want to upload and click the "Select #" button that indicates the number of files or folders you are uploading. Once you click that button, your upload will begin. The progress bar at the bottom of the upload window will indicate the upload's progress. When the upload is complete, your files should appear in your file room. Click the "Done" button on the bottom right corner of the upload window return to the original upload window.
When you finish uploading the necessary files from your Zoom account, you may log out by clicking on the "log out" link in the upper right corner of your upload window.
What should I do if I have trouble signing into my Zoom account?
This support article may help you troubleshoot Zoom sign-in issues.
How can I find my recordings in the file room after I upload them?
The default names of Zoom recordings may not be descriptive enough to help you identify a specific one and the foldering within the Zoom categorizes recordings by month. If you want more descriptive names for your recording you can change them from within Zoom prior to upload.
If part of my upload fails, what should I do?
If part of your upload fails, you can retry only the files that failed to upload by clicking on the orange "Retry" button on the bottom right of your upload window. This will avoid the need to upload the successfully added files to your file room again.
Uploading from a Direct Link
At times, you may need to upload an image or file from a webpage to your File Room for import. Nextpoint makes it easy to push files embedded in a webpage directly to your file room without handling them. Here is how it works:
Navigate to the file room and to the folder in which you would like the file to appear. On the right hand side of the screen under the section labelled "Import files directly from a 3rd party location below" select the direct link icon.
After
selecting the icon you will be prompted to enter a link.
You
can find the direct link to any object on a webpage by right clicking
on the image and selecting the option to "Copy image address." You
can
check if your link is a direct link by copying and pasting it into
your
browser. If the link is a "direct link" the browser will start downloading
a file instead of loading a webpage.
Additionally, single files from Google Drive that are accessible
to "Anyone
with the link" can be uploaded directly by modifying their share
link.
You can check a file's accessibility and copy the share link by clicking
on the 3 dots next to any google drive file.
Then you can modify the share link by copying the "FILEID" from the share link and pasting it into the address template below, replacing the characters "FILEID"
https://drive.google.com/uc?export=download&id=FILEIDWarning
Some zip files are flagged by Google Drive as "potentially dangerous" which will prevent you from uploading it via the direct link.
Once
you
have entered the link to the file you'd like to upload, then select
import.
Once importing is complete select Done.
Now you will find your image listed in the File Room, and will be able to import into review. Please note, if you'd like to import the image into a specific folder, then please navigate to that folder prior to uploading the image.
Uploading from OneDrive
1.Navigate to the File Room. On the right-hand side, you will see various 3rd party import options. Select OneDrive.
2. Then select Connect to OneDrive. After which you will be prompted to sign into your OneDrive account.
3. Once you have successfully logged in, you will be returned to the File Room where you will be able to view any documents/folders available in your OneDrive.
4. Choose the document/folder you would like to import by selecting the check box, and then press the Select button to import.
5. Once your selection has finished importing you can select Done on the bottom right-hand side.
6. Your selection will now be available in the file room.
Note: At this time there is a 1k file limit for OneDrive uploads. A workaround for this would be to upload in batches of 1k. If you have any questions please reach out to support@nextpoint.com
Cloud Storage Integration; Dropbox, Zoom, Direct Links, and OneDrive
- Download and install the aws cli:
-
Set AWS Credentials:
- Open a command prompt.
- Type in the command: “aws configure”
- Copy and paste your Access Key ID. (This can be found in your database via the steps in this support article.)
- Copy and paste your Secret Access Key ID. (This can be found in your database via the steps in this support article.)
- Hit the <Enter> key twice to leave the "Default Region Name" and "Default Output Format" fields empty.
- Open the folder in the “File Explorer” or other folder browser.
- Copy the address of the folder or drive you want to navigate to.
-
Type “cd “ and paste in the path to the folder. Hit the <enter> key. If you are navigating to a drive that begins with a different letter than your command line begins with, type in the letter of the drive, a colon, and <enter> to “CD” to that drive (e.g. “D:”). You should now see the path to the folder followed by a “>”.
-
Enter the aws s3 command:
-
Upload from Computer to the File Room:
aws s3 cp ./ s3://trialmanager-case-folders/case-100000001/"Name of File Room Folder"/ --recursive --no-follow-symlinks
-
Download from File Room to Computer:
aws s3 cp s3://trialmanager-case-folders/case-100000001/"Name of File Room Folder"/ ./ --recursive --no-follow-symlinks
-
Move from folder to folder within file room:
aws s3 mv s3://trialmanager-case-folders/case-100000001/"Name of Original File Room Folder"/ s3://trialmanager-case-folders/case-100000001/"Name of New File Room Folder"/ --recursive --no-follow-symlinks
-
The components of an aws s3 script are as follows:
Note: You do not need to create folders/sub-folders in your database prior to running an s3 script. The script will create any folders referenced/required when you run it.
-
7. Hit the <Enter> Key. You should begin to see your task (e.g. copy, move...) scroll through for each file affected. Be sure to confirm your file counts after the task completes and your command line shows the folder path and the ">" symbol.
Uploading with the Amazon s3 Command Line Interface (CLI)
Native Imports and Settings
This article covers importing data in both NextGen and Legacy databases. Use the tabs below to switch between instructions.
Which database type should I follow?
If you see in the top left next to the name of your database, follow the NextGen steps below. Otherwise, switch to the Legacy tab.
How to Import in NextGen Databases
Table of Contents
- Upload data to Nextpoint File Room
- Select files for import from Nextpoint File Room
- Import details
- Initiate import
- Review import results
Imports available to users with Advanced user permissions, only.
1. Upload Data to Nextpoint File Room
The first step is to upload your data to the File Room, which is a secure data repository with a high-speed multi-file uploader.
To get started, upload your data to the File Room:
It is important to note, if you are importing Produced Data, before uploading to the File Room, we recommend you follow our similar topic which covers How to Import Produced Data with a Load File
-
Navigate to the File Room: In Discovery databases, via DATA → File Room. In Litigation, via MORE → Data → File Room.
-
Upload your files to the File Room via:
Upload a folder of files via Drag & DropThe primary, and recommended, function for uploading data to your File Room.
Select the folder(s) on your desktop, thumb drive, or other location, and Drag & Drop into your File Room. All contents and subdirectory information will be maintained.
Upload loose files via Drag & DropWithin the File Room, click the green Create Folder name your folder and select OK.
Click into your newly created folder, and drag and drop your loose files into the folder location.
Maintaining an organizational system for your data uploads will help ensure you can best track your various imports as time progresses.
Request file upload from third partyYou can securely Request Files from any third party (clients, counsel, etc...) from your Nextpoint File Room. It is a simple process in which you ("requestor") request files from a specified third-party, the "recipient" of that request receives a secure link to upload their respective files, and then you can access the uploaded files right away.
Read more on requesting from third parties here >>
-
After initiating your upload, the status of the upload will be displayed on-screen. Important: do not navigate away during an active upload. Interrupted uploads must be deleted and restarted.
Need to keep working on other action items? Open a new tab, or duplicate your current tab and you are set!
Read our File Room Best Practices here >>
2. Select Files for Import
Once uploaded, select your data from the File Room to start the guided import sequence.
- Click the blue Import button next to any folder, or
- Check boxes next to individual files and click Import Selected.
Alternative option for selecting files for import
While selecting files for Import from the File Room, as described above, is the recommended workflow for initiating your imports, you may also initiate your import via DATA -> Imports -> New Import:
The difference you will notice in starting from this location will be the added Import Type selection in Step 1.
Read more on Import Types here >>
3. Import Details
Once your files have been selected for import, you will be navigated to the Import Details page. Here, you will verify and/or outline settings applicable to your current import.
Importing Produced Data with a Load File? Reference our topic on importing produced data here >>
Import Data Settings include the following:
- Type of Import: If you initiated your import from the File Room, verify the Type of Import selected. To modify the import type, click the Back button and you will be returned to Step 1 of the sequence to make your selection.
-
Selected Files for Import: If you initiated your import from the File Room, verify the selected files. To modify your selection, click the folder icon
to access the pop-up file picker which is populated by the File Room contents.
- Batch Name: Recommended for most efficient tracking once the data has been imported.
-
Assign Custodian on Import: Search list of existing custodians or add new via the profile + icon
.
-
Add to Folder on Import: Search list of existing folders or add new via the folder + icon
.
-
Deduplication and DeNIST Detection: Pre-set recommendations for Deduplication and DeNIST settings will be populated based on which type of data is detected from the File Room.
If you would like to modify the recommended settings, make sure the applicable toggle is turned onand click the gear to open the settings pop-up.
Complete list of Import Types and associated Deduplication + DeNIST settings outlined below:
| Import Type | Deduplication Setting | DeNIST Setting |
|---|---|---|
| Manual | Dedupe - OFF | DeNIST - OFF |
| Single Mailbox | Dedupe - ON , File Match - ON , Context - ON | DeNIST - OFF |
| Multiple Files | Dedupe - ON , File Match - ON , Context - ON | DeNIST - ON , Tag-ON |
| Production with load file | Dedupe - OFF | DeNIST - OFF |
Read more on Import Data Settings here >>
4. Initiate Import
Click the blue Import button to start the import. Monitor progress on the Batch Details page. You will receive an email notification when complete.
5. Review Import Results
- If you imported produced data: run Family Linking.
- Check import status & resolve any processing errors. If issues exist, resolve early to avoid later complications.
- Verify folder assignment: If no Bates numbers exist, files will be foldered in date/family order.
How to Import in Legacy Databases
Table of Contents
- Upload data to Nextpoint File Room
- Select files for import from Nextpoint File Room
- Confirm Import data settings
- Initiate import
- Review import results
Imports available to users with Advanced user permissions, only.
1. Upload Data to Nextpoint File Room
The first step to importing in Nextpoint, is to upload your data to the File Room. File Room is a secure ‘data-bank’ for storing all your confidential files in your database, and comes with a built-in, high-speed, multi-file uploader to get data into Nextpoint quickly and efficiently.
To get started, upload your data to the File Room:
It is important to note, if you are importing Produced Data, before uploading to the File Room, we recommend you follow our similar topic which covers How to Import Produced Data with a Load File.
-
Navigate to the File Room: In Discovery databases, via DATA File Room. In Litigation via MORE Data File Room.
-
Upload your files to the File Room via one of the four following options:
Upload a folder of files via Drag & DropThe primary, and recommended, function for uploading data to your File Room.
Select the folder(s) on your desktop, thumb drive, or other location, and Drag & Drop into your File Room. All contents and subdirectory information will be maintained.
Upload loose files via Drag & DropWithin the File Room, click the green Create Folder name your folder and select OK.
Click into your newly created folder, and drag and drop your loose files into the folder location.
Maintaining an organizational system for your data uploads will help ensure you can best track your various imports as time progresses.
Request file upload from third partyYou can securely Request Files from any third party (clients, counsel, etc...) from your Nextpoint File Room. It is a simple process in which you ("requestor") request files from a specified third-party, the "recipient" of that request receives a secure link to upload their respective files, and then you can access the uploaded files right away.
Read more on requesting from third parties here >>
-
After you initiate your upload in the step above, the data will begin to upload and the status of the upload will be displayed on your screen.
It is important you do not navigate away from the File Room during an active upload. This will cancel the ongoing upload, and you will need to delete all files from the File Room which were interrupted during upload and begin again.
Need to keep working on other action items? Open a new tab, or duplicate your current tab and you are set!
Read our File Room Best Practices here >>
2. Select Files for Import
Once your data has been successfully uploaded to the File Room, you can select that data directly from the File Room to initiate the guided import sequence.
To select your data for import:
- Click the blue Import button next to any folder in the File Room, or
-
Check boxes next to individual files and click Import Selected.
When initiating your import from the File Room, Nextpoint will detect the type of data you selected (single mailbox, loose files, or produced data with a load file) and will automatically set such in the first step of the guided import sequence.
Alternative option for selecting files for import
While selecting files for Import from the File Room, as described above, is the recommended workflow for initiating your imports, you may also initiate your import via DATA Imports.
The difference you will notice in starting from this location will be the added Import Type selection in Step 1. After making this selection, you will meet the 'Import from File Room' sequence at Step 2, Import Data Settings.
Read more on Import Types here >>
3. Import Data Settings
Once your files have been selected for import, you will be navigated to the second step of the import sequence, Import Data Settings. Here, you will verify and/or outline settings applicable to your current import.
Importing Produced Data with a Load File? Reference our topic on importing produced data here >>
Import Data Settings include the following:
-
Type of Import: If you initiated your import from the File Room, verify the Type of Import selected. To modify the import type, click the pencil icon
and you will be returned to Step 1 of the sequence to make your selection.
-
Selected Files for Import: If you initiated your import from the File Room, verify the selected files. To modify your selection, click the folder icon
- Batch Name: Recommended for most efficient tracking once the data has been imported.
-
Assign Custodian on Import: Search list of existing custodians or add new via the profile + icon
-
Add to Folder on Import: Search list of existing folders or add new via the folder + icon
-
Deduplication and DeNIST Detection: Pre-set recommendations for Deduplication and DeNIST settings will be populated based on which type of data is detected from the File Room (or selected in Step 1).
If you would like to modify the recommended settings, make sure the applicable toggle is turned on
Complete list of Import Types and associated Deduplication + DeNIST settings outlined below:
| Import Type | Deduplication Setting | DeNIST Setting |
|---|---|---|
| Manual | Dedupe - OFF | DeNIST - OFF |
| Single Mailbox | Dedupe - ON , File Match - ON , Context - ON | DeNIST - OFF |
| Multiple Files | Dedupe - ON , File Match - ON , Context - ON | DeNIST - ON , Tag-ON |
| Production with load file | Dedupe - OFF | DeNIST - OFF |
Read more on Import Data Settings here >>
5. Initiate Import
After the aforementioned steps are complete, click blue Import button at the bottom right of the Import Data Settings page.
This will initiate import processing and navigate you to the Batch details page. You will receive email when processing of the import is complete.
5. Review Import Results
Prior to beginning work with your imported data, it is strongly encouraged you review and verify your import results once you receive the email notification that your import is complete.
- If you imported produced data, first run Family Linking on the import batch. This will ensure any parent emails and their attachments are associated in the database.
- Check import status & resolve any processing errors. Making sure to resolve any issues as early as possible will mitigate a lot of clean up later on when you may be in a time crunch.
- Verify any folder assignment outlined in the Import Data Settings was accurately applied. To do so, navigate to the REVIEW or DOCUMENTS tabs (in Discovery and Litigation, respectively), and ensure the document count is expected and files are in Bates order. If no Bates, files should be organized in the folder in chronological order.
Import FAQs
- What file types does Nextpoint accept?
- Is there a restriction on the size of my files?
- Do I have to load by custodian?
- Import times seem to vary, why is that?
- How do I check my import’s status?
- What does my error mean?
- Why are my email times displayed in UTC (Coordinated Universal Time) when imaged in Nextpoint?
- Why is there a load file in my File Room after I imported loose files?
How to Import Data in Nextpoint
OPTION A (If all files are in a single folder):
- Navigate to the source folder in Windows Explorer.
- Press Ctrl+A to select all the items.
- Hold down the Shift key, right-click on the selection and choose Copy as Path.
- Open your spreadsheet program and, paste (Ctrl+V) the list to it
OPTION B:
- Open a command prompt on your computer
- CD into the folder with the files (or the folder that contains subfolders of files) by typing “cd “ and pasting in the path to the folder from the File Explorer.
- Type the command:
dir /a /s /b > FILES.csvGenerating a File Listing for Load File Creation
Deduplication at the time of import prevents existing documents and email families from entering your database multiple times. The deduplication settings selected in the import workflow determine the definition of 'Duplicate' for the import batch at-hand.
When deduplication is turned off at the time of import, no deduplication will occur and all files will be imported.
NextGen Deduplication Experience
Deduplication has been simplified in NextGen processing. Instead of configuring file match and context criteria, you now only choose whether deduplication is on or off during import.
- Deduplication OFF: All copies of files (including duplicates already in the database) are imported as separate documents. Exact copies can still be viewed in the Related Documents panel.
- Deduplication ON: Files are evaluated using MD5 hash matching. Emails are checked by MD5 hash or Message ID. Matching files are treated as duplicates and only one copy is retained in the database.
- Family-level deduplication: Attachments are deduplicated within their family. If the same attachment exists under a different parent email, it will be treated as a new document.
- Metadata handling: When duplicates are merged, select file path and mailbox metadata fields are concatenated. Other metadata and custom fields remain unchanged.
- Optional BCC merge: A BCC merge option allows blind-copy recipients from duplicate emails to be combined into a single record (the document image will still only display the initial BCC value).
The information below reflects the legacy deduplication experience and may differ from what you see in NextGen databases.
How do I set Deduplication Settings?
When importing data via, Nextpoint will make pre-set recommendations for Deduplication settings in Step 2 of the import workflow. The dedupe selections will be populated based on which type of data is detected from the File Room (or selected in Step 1).
If you would like to modify the recommended settings, make sure the applicable toggle is turned ON and click the gear to open the settings pop-up.
Location of Deduplication Settings
How to Modify Recommended Deduplication Settings
Upon clicking on the gear icon , you will be presented with the option to toggle File match criteria and Context Criteria ON
or OFF
. Read more below on how File Match and Context Criteria factor into the deduplication process.
Default Deduplication Settings per Import Type
Outlined below is a list of the various import types and their associated deduplication settings:
| Import Type | Deduplication Setting | Image from Import Data Settings |
|---|---|---|
| Manual | Dedupe - OFF | |
| Single Mailbox | Dedupe - ON , File Match - ON , Context - ON |
|
| Multiple Files | Dedupe - ON , File Match - ON , Context - ON |
|
| Production with load file | Dedupe - OFF |
How does Deduplication work?
FIGURE 1
INITIAL PROCESSING
1 | First, you queue your files for processing by initiating an import. See the three different file types queued for processing on the far left in Figure 1 (above).
2 | Once you initiate an import, Nextpoint begins processing by extracting files from their containers (zips, pst, box), extracting any attachments from their parent emails, and extracting metadata.
FILE MATCH CRITERIA
3 | Next, is the First Deduplication Pass on all three file types where we look for a matching expansive hash for all the file types.
- If a loose file, expansive hash is the MD5 hash value.
- If an email family, expansive hash is formulated from the MD5s of all members of the email family.
Once an expansive hash is identified, we compare to other files being processed and existing in the database. Any matches are placed in a Dedupe Queue. Loose files without a match are imported.
4 | Also during the First Deduplication Pass, all remaining email files not placed in the dedupe queue due to matching expansive hash are checked for matching Message ID's.
Again, we look for matches against what already exists in the database and other files currently being processed. If we find a matching set, we add to the Dedupe Queue. If no match is found, the file is imported.
Note: Turn File Match Criteria ON for more aggressive deduplication using expansive hash and email message ID, as describe below. Turn OFF
to deduplicate more conservatively and only consider Content Hash matches duplicates.
CONTEXT CRITERIA
5 | Next, we address the Dedupe Queue.
- If Context is OFF, we take everything in the Dedupe Queue and merge field values which may conflict (e.g. file_path of file A is different than file B). We keep the first copy of the file which entered the database and discard the other(s).
-
If Context is ON, we take any sets of duplicates* and handle field value conflicts accordingly:
-
If fields from our Conflict Field List do not match in a set of duplicates, we keep both files, remove from the Dedupe Queue and import both.
If there are no conflicts present in the Conflict fields: - We evaluate fields from our Merge Field List. If any Merge Field does not match in a set of duplicates*, we keep one copy of the file, merge the mismatched values into the respective field, and discard the last copy to enter the database.
- We evaluate fields from our Ignore Field List. If any Ignore Field does not match in a set of duplicates, we do nothing with the fields and only keep the first copy of the file which entered the database.
-
If fields from our Conflict Field List do not match in a set of duplicates, we keep both files, remove from the Dedupe Queue and import both.
*Duplicates can be considered two files within the same import OR a single file in an import being compared to a file existing in the database.
| author | document_last_author | email_sent |
| bcc | document_subject | email_subject |
| created_date_time | email_author | last_print_date |
| document_author | email_message_id | modified_date_time |
| document_date | email_reply_id | key_document |
| cc | file_path | recipients |
| custodians | mailbox_file | root_folder |
| file_name | mailbox_path | shortcut |
All User Generated Fields
Default Fields not on Merge/Conflict Lists
| app_name | confidentiality_status | expansive_hash | privileged_status |
| batch_id | created_on | has_markups | redaction_notes |
| bates_end | delete_at_gmt | highlight_notes | relevancy_status |
| bates_range_end | document_title | id | supported_filetype |
| bates_range_start | document_properties | npcase_id | title |
| bates_stamped | document_type | number | updated_at_gmt |
| bates_start | email_received | page_notes | user_id |
| billing_size | encrypted | prefix | verified_page_count |
Note: All deduplication is considered at a family-level. If after a loose file is added to your case, that same file is added, but as part of a larger email family (or vice versa), no deduplication will occur.
Note: Turn Context Criteria ON for more conservative deduplication using the context. Turn OFF
to deduplicate more aggresively using content hash match duplicates.
Understanding Deduplication
Data collection can be the most complex and technically rigorous of all eDiscovery phases.
It involves the extraction of potentially relevant electronically stored information from its native source into a separate, secure repository for review. The collection process should be comprehensive without being over-inclusive. It should preserve the integrity of the data, the chain of custody and authenticity of the documents - all while not disrupting the organization or individual’s operations.
Managing Modern Data Collections
Don't begin ediscovery collections without this comprehensive, strategic guidebook.
General Considerations for Collections
- Consider and understand your source(s): Identify your key custodians, where their data is located, and the accessibility of that information (e.g. do you need a username and password to access?). Certain source types may require special considerations when collecting to ensure you collect the entirety of the data set. For example, when collecting emails, you may want to collect both server and local copies to ensure all emails are collected.
-
Consider your collection method: In conjunction with the above consideration of the who, what and where for your different sources, it is also important to consider how you will collect from each source. Outlined below are three different approaches for collections:
- Employee self-collection (riskiest): Most employees aren’t technically savvy and are highly likely to make errors or overlook key documents. Several courts have also questioned whether employee self-collection constitutes a ‘defensible’ eDiscovery response.
- IT collection: Understand the data and technology landscape and possess the technical skill to extract everything needed, but ensure they are provided with clear guidance from the legal team on what specifically to target (otherwise, more likely to collect very broadly)
- External collection: An outside expert is likely to have proven procedures and the necessary tools and skill to perform a collection that will withstand the highest levels of judicial scrutiny.
- Collect only what you need: More data collected means more data to process, and ultimately to review. And that all adds up to more money spent on eDiscovery. Instead, develop strong preservation and early case assessment processes, and target your collections so that you are only collecting the potentially relevant ESI—nothing more or less.
- Be Proactive: It’s always in your best interest—financially and procedurally—to be proactive in assessing your needs and determining if outside resources will be needed. Even if outside assistance or experts ultimately are not needed, it’s important to give your internal IT team early notice that a big project is potentially looming, so they can plan resources accordingly.
- Phase Your Collections: In a phased collection strategy, data is prioritized so that only the highly relevant data is collected immediately. Less relevant data is collected only when absolutely needed.
- Avoid Collecting Archived Mailboxes: Whenever possible, you should try to avoid collecting from mailboxes in an archived state as doing so can produce unexpected email metadata information, especially when coming from Microsoft 365. For example, if a sender's email address is jsmith@microsoft.com, it could be reflected incorrectly in an archived state as jsmith@microsoftexchange.com instead.
Tactical Best Practices
- Collected Mailbox File Size: Nextpoint recommends keeping your collected mailbox files (e.g. PST, Mbox, etc..) under 10 GB when possible, with a maximum file size of 20GB. Doing so will speed up processing, lesson chances of corruption, and improve error correction when needed. If you have more than the recommended size to collect, it is suggested the data is segmented into smaller sets prior to or during collection.
- If the client is self-collecting, it is recommended they do not forward data to you via email as attachments. Utilize Nextpoint’s request files instead to ensure you maintain an accurate and easily traceable chain of custody.
- Maintain clear custodian ownership when collecting so that information can be effectively assigned during import (e.g. avoid a mass collection across multiple custodians into one pst/mbox).
- For remote collections, consider how it will be accomplished, if you have custodians login information, and timing of collection. This ensures the mailbox custodian will have as little downtime as possible.
- Maintain clear organization in the File Room. This will ease the import and subsequent quality control processes when moving your data from the File Room into your Nextpoint database.
- If you are working with text messages, consider how you would like to organize and review the data prior to collection (e.g. do you want a separate document for each message or a spreadsheet with all of them or both or something in-between like a single spreadsheet for each conversation). These requirements may affect your collection method.
- If you are working with data from proprietary software, that proprietary software will likely be necessary if you would like to review images of the files. It is important to consider if the party collecting these files can obtain an image during the collection process and/or if an image will need to be generated post-collection. For more information on Nextpoint’s Custom Imaging Services, please contact support@nextpoint.com.
Collections Checklist
- What parties are involved?
- What deadlines have been agreed upon, to date?
- Have any preservation steps been taken?
- Who are your key custodians and where are they located?
- Do any of the identified custodians have direct IT resources available?
- What are each custodian's key sources (e.g. Email, phone, tablet, company server, etc.?)
- How accessible are each identified key source (e.g. password protection)?
- Which collection method is preferred/necessary for each source? (e.g. self v. external v. remote )
- Do you anticipate the authenticity of any evidence may come into question during the course of your matter?
- Is there a priority hierarchy that can be created from all identified custodians and their respective sources?
- Are there any parameters to be applied at the time of collection (e.g. date range)?
Collection Best Practices & Checklist
Below, we take a closer look at the different Import Types and Import Data Settings components of our improved import experience. Click here to review the complete guided import workflow.
Table of Contents
Imports available to users with Advanced user permissions, only.
Import Types
When importing data into Nextpoint, there are four different Import Types. Each import type has corresponding pre-set recommendations for Deduplication and DeNIST settings.
If you initiate the import process by selecting your files from the File Room, Nextpoint will detect the type of data you selected (single mailbox, loose files, or produced data with load file) and will automatically set such in Step 1 of the guided import workflow, and you will be navigated to Step 2, Import Data Settings.
If you initiate the import process by navigating to DATA Imports, you will be navigated to Step 1 to make your Import Type selection. Since you have not yet selected your files for import, Nextpoint needs to know what type of data you intend to import. After making this selection, you will meet the 'Import selected files from File Room' workflow at Step 2, Import Data Settings.
A closer look at the different Import Types
Single Mailbox
Any single mailbox container file (pst, mbox).
Our recommended best practice is to import one mailbox at a time. You may import multiple mailboxes at once, but your import will be recognized as a Multiple Files Import Type. Please note, only one custodian assignment is allowed per import batch, so consider keeping mailbox imports limited to one custodian per batch, at the minimum.
Multiple Files
Any single non-mailbox file, any selection of multiple loose files (including pdfs, office files, mailboxes and archives), or any folder that does not contain a nextpoint_load_file.csv in the first level.
Production with Load File
Any folder containing a load file titled nextpoint_load_file.csv in the first level.
Our recommended best practice for production data sets is to upload to the File Room unzipped. If you upload a zipped production, then it will be considered a Multiple Files Import Type.
Manual
Any type of file selection. This import type will be most applicable with the upcoming release of our load file mapper. While we are simplifying the load file mapping process, we recognize some users may have existing workflows for produced data imports which they would like to maintain and bypass the load file mapper. You can read more on manual imports here.
Import Data Settings & Deduplication
Once your files have been selected for import, you will be navigated to Step 2 of the import sequence: Import Data Settings. Here, you will verify and/or outline settings applicable to your current import.
Import Data Settings include the following:
-
Type of Import: If you initiated your import from the File Room, verify the Type of Import selected. To modify the import type, click the pencil icon
and you will be returned to Step 1 of the sequence to make your selection.
-
Selected Files for Import: If you initiated your import from the File Room, verify the selected files. To modify your selection, click the folder icon
to access the pop-up file picker which is populated by the File Room contents.
- Batch Name: Recommended for most efficient tracking once the data has been imported.
-
Assign Custodian on Import: Search list of existing custodians or add new via the profile + icon
.
-
Add to Folder on Import: Search list of existing folders or add new via the folder + icon
.
-
Deduplication and DeNIST Detection: Pre-set recommendations for Deduplication and DeNIST settings will be populated based on which type of data is detected from the File Room (or selected in Step 1).
If you would like to modify the recommended settings, make sure the applicable toggle is turned onand click the gear to open the settings pop-up.
Continue below for a complete list of Import Types and associated Deduplication + DeNIST settings.
A closer look at Deduplication and DeNIST Detection
Complete list of Import Types and associated Deduplication + DeNIST settings outlined below:
| Import Type | Deduplication Setting | DeNIST Setting |
|---|---|---|
| Manual | Dedupe - OFF | DeNIST - OFF |
| Single Mailbox | Dedupe - ON , File Match - ON , Context - ON | DeNIST - OFF |
| Multiple Files | Dedupe - ON , File Match - ON , Context - ON | DeNIST - ON , Tag-ON |
| Production with load file | Dedupe - OFF | DeNIST - OFF |
Deduplication
Deduplication at the time of import prevents existing documents and email families from entering your database multiple times. The deduplication settings selected in the import workflow determine the definition of 'Duplicate' for the import batch at-hand.
When deduplication is turned off at the time of import, no deduplication will occur and all files will be imported.
How does Deduplication work?
FIGURE 1
INITIAL PROCESSING
1 | First, you queue your files for processing by initiating an import. See the three different file types queued for processing on the far left in Figure 1 (above).
2 | Once you initiate an import, Nextpoint begins processing by extracting files from their containers (zips, pst, box), extracting any attachments from their parent emails, and extracting metadata.
FILE MATCH CRITERIA
3 | Next is the First Deduplication Pass on all three file types where we look for a matching expansive hash for all the file types.
- If a loose file, expansive hash is the MD5 hash value.
- If an email family, expansive hash is formulated from the MD5s of all members of the email family.
Once an expansive hash is identified, we compare to other files being processed and existing in the database. Any matches are placed in a Dedupe Queue. Loose files without a match are imported.
4 | Also during the First Deduplication Pass, all remaining email files not placed in the dedupe queue due to matching expansive hash are checked for matching Message ID's.
Again, we look for matches against what already exists in the database and other files currently being processed. If we find a matching set, we add to the Dedupe Queue. If no match is found, the file is imported.
Note: Turn File Match Criteria ON for more aggressive deduplication using expansive hash and email message ID, as describe below. Turn OFF
to deduplicate more conservatively and only consider Content Hash matches duplicates.
CONTEXT CRITERIA
5 | Next, we address the Dedupe Queue.
- If Context is OFF, we take everything in the Dedupe Queue and merge field values which may conflict (e.g. file_path of file A is different than file B). We keep the first copy of the file which entered the database and discard the other(s).
-
If Context is ON, we take any sets of duplicates* and handle field value conflicts accordingly:
-
If fields from our Conflict Field List do not match in a set of duplicates, we keep both files, remove from the Dedupe Queue and import both.
If there are no conflicts present in the Conflict fields: - We evaluate fields from our Merge Field List. If any Merge Field does not match in a set of duplicates*, we keep one copy of the file, merge the mismatched values into the respective field, and discard the last copy to enter the database.
- We evaluate fields from our Ignore Field List. If any Ignore Field does not match in a set of duplicates, we do nothing with the fields and only keep the first copy of the file which entered the database.
-
If fields from our Conflict Field List do not match in a set of duplicates, we keep both files, remove from the Dedupe Queue and import both.
*Duplicates can be considered two files within the same import OR a single file in an import being compared to a file existing in the database.
| author | document_last_author | email_sent |
| bcc | document_subject | email_subject |
| created_date_time | email_author | last_print_date |
| document_author | email_message_id | modified_date_time |
| document_date | email_reply_id |
| cc | file_path | recipients |
| custodians | mailbox_file | root_folder |
| file_name | mailbox_path | shortcut |
All User Generated Fields
Default Fields not on Merge/Conflict Lists
| app_name | confidentiality_status | expansive_hash | privileged_status |
| batch_id | created_on | has_markups | redaction_notes |
| bates_end | delete_at_gmt | highlight_notes | relevancy_status |
| bates_range_end | document_title | id | supported_filetype |
| bates_range_start | document_properties | npcase_id | title |
| bates_stamped | document_type | number | updated_at_gmt |
| bates_start | email_received | page_notes | user_id |
| billing_size | encrypted | prefix | verified_page_count |
Note: All deduplication is considered at a family-level. If after a loose file is added to your case, that same file is added, but as part of a larger email family (or vice versa), no deduplication will occur.
DeNIST Detection
DeNIST provides a way to filter known, unnecessary files from uploaded data. During import and processing, files are checked against the National Institute of Standards and Technology Reference Library and matching documents are removed from the upload.
When DeNIST Detection is turned on, there are two options to consider:
- Tagging: Files found to match a DeNIST record will be imported and processed as usual, but will be assigned an additional "NIST" tag.
- Filtering: Files found to match a DeNIST record will be removed entirely from imports.
To return to the complete import workflow, click here >>
Import Types, Import Data Settings & Deduplication
Overview
DeNIST helps reduce review volume by identifying known system or application files with no evidentiary value and handling them appropriately during import. During import, files can be evaluated against the National Institute of Standards and Technology (NIST) National Software Reference Library (NSRL) Reference Data Set (RDS).
Each imported file’s MD5 hash (a digital fingerprint of the file) is compared against entries in the NIST NSRL RDS. If a match is found, the file is recognized as a NIST file and handled according to your DeNIST settings.
Configuring DeNIST During Import
The steps below explain how to configure DeNIST settings in both NextGen and Legacy databases.
Which database should I follow?
If you see the badge next to your database name, follow the NextGen Database tab below. Otherwise, switch to the Legacy Database tab.
DeNIST settings are configured during the Import Details step of the import workflow. From this screen, you can enable or disable DeNIST detection and choose how files that match a NIST record are handled.
DeNIST settings are configured during the Import Data Settings step of the import workflow. From this screen, you can enable or disable DeNIST detection and choose how files that match a NIST record are handled.
DeNIST Detection Options
If DeNIST detection is disabled, no NIST comparison is performed. All files are imported and processed normally, regardless of whether they match a NIST record.
If DeNIST detection is enabled, click the settings icon to choose how files that match a NIST record are handled:
- Tagged: Files that match a NIST record are imported and processed as usual, but are automatically assigned the tag tag:NIST. These files remain available for review and can be filtered or excluded later using search or tag criteria.
- Filtered: Files that match a NIST record are excluded from the import entirely. They are not processed or added to the database.
Import Batch Reporting
When DeNIST detection is enabled, results are recorded on the Import Batch Details page:
- Files that match a NIST record are noted in the batch summary.
- If the DeNIST setting is set to Filtered, excluded files are reported as filtered from the import.
- If the setting is Tagged, imported NIST files can be located using the tag:NIST tag.
Return to: Discovery Workflow
DeNIST Settings
Produced Data Imports
Outlined below are required considerations for produced data imports that utilize a load file. Requirements vary depending on whether your database is NextGen or Legacy.
Which database type should I follow?
If you see next to your database name, follow the NextGen tab. Otherwise, follow the Legacy tab.
NextGen databases support greater flexibility when importing produced data, including expanded file naming options and streamlined image load file handling.
- Load files must be in CSV or DAT format, encoded as UTF-8, and must not contain a BOM.
- Preferred production format includes single-page TIFF or JPG images or document-level PDFs, any produced native files, and text files named by the starting Bates number, with proper relative pathing.
- Per-page image files (TIFF/JPG): Image files may use any naming convention as long as an image load file correctly references each page. Sequential or Bates-based naming is not required.
-
Document-level PDF image files: Filenames may include suffixes (for example,
_CONFIDENTIAL) if the image load file references the exact filename. Confidential designations must still be included in metadata and stamped on images. - Load file paths must accurately reflect the location of image (if applicable), native, and text files. Paths must be relative to the load file location and must not include starting periods or trailing slashes.
- Text files must contain page breaks and be encoded as UTF-8 or ASCII.
- Replace spaces and special characters in field headers with underscores.
- Field headers are not case sensitive.
Legacy databases require stricter file naming conventions to ensure image and text files import successfully.
- Load files must be in CSV or DAT format, encoded as UTF-8, and must not contain a BOM.
- Preferred production format includes single-page TIFF or JPG images, any produced native files, and text files named by the starting Bates number, with proper relative pathing.
- Image files must be named strictly by their Bates numbers and must not include suffixes such as
_CONFIDENTIAL. Confidential designations should instead be reflected in the load file and stamped on each image. - If page-level suffixes (for example,
_0001) are used, the suffix must appear on every page, including the first page, and remain sequential. - PDF image files with load files are supported and should be named using the Bates start value only. Non-Bates PDF naming may increase load complexity and limit the ability to import search text.
- Load file paths must be relative to the load file location and must not include starting periods or trailing slashes.
- Text files must contain page breaks and be encoded as UTF-8 or ASCII.
- Replace spaces and special characters in field headers with underscores.
- Field headers are not case sensitive.
For step-by-step instructions on importing produced data with a load file, see: How to Import Produced Data with a Load File >>
Produced Data Import Required Specifications
Mapping Date/Time Metadata Fields in Load Files
If your production's load file contains metadata fields with date/time information, it is important to ensure these values are mapped correctly for accurate metadata loading.
The following fields have specific date/time formatting requirements:
- Email Sent
- Email Received
- Created Date Time
- Modified Date Time
- Last Print Time
There are two scenarios to consider when mapping these fields:
Scenario 1: Combined Date and Time in One Column
If the values are in a single column formatted as:
mm/dd/yyyy hh:mmmm/dd/yyyy hh:mm:ssmm/dd/yyyy hh:mm AM/PMmm/dd/yyyy hh:mm:ss AM/PM
Then map directly to:
- Email Sent
- Email Received
- Created Date Time
- Modified Date Time
- Last Print Time
Scenario 2: Date and Time in Separate Columns
If the values are split into two columns:
- one for the date:
mm/dd/yyyy - one for the time:
hh:mmhh:mm:sshh:mm AM/PMhh:mm:ss AM/PM
Then map the following field pairs:
- Email Sent Date → Email Sent Time
- Email Received Date → Email Received Time
- Created Date Time Date → Created Date Time Time
- Modified Date Time Date → Modified Date Time Time
- Last Print Date → Last Print Time
Proper mapping ensures accurate processing and display of metadata during review and production.
Mapping Date and Time Fields for Produced Data Imports
The following fields exist in Nextpoint without needing to explicitly add them to your database. Some are default fields to which you can map data during an import (Exhibit A), and others are protected fields to which you can not push data. While it is not necessary to map data to our default fields, it is best practice because it can reduce the number of fields you may need to search in your database
For instance, if you map "From" data in your load file to a custom "From" field instead of the default field "Email_Author," then to search your clients emails and those produced by Opposing Counsel for those authored by "John Smith," you would need to search:
email_author:"John Smith" OR from:"John Smith" If you map the "From" field to "Email_Author," you only need to search:
email_author:"John Smith"to return hits in both sets of data.
Warning
One field that is very important to most load file imports is the field "begattach." This field allows Nextpoint users to link parent emails with their attachments in produced data imports. In this field the bates_start value of the parent email appears in the attachment's "begattach" field. The "begattach" field must be an exact match to the character string "begattach" and must be created in a database before family linking is possible.
Default Fields & Document Attributes
For any of the below-listed fields, you do not need to set up a new Field under SETTINGS > Coding. Instead, if you have a header value in Row 1 of your load file, make sure that the load file value matches the below default fields exactly.
Values can be imported by load file headers to the provided values. App Name indicates what your load file header should read. Visible vs. Hidden indicates if a field can be seen under SETTINGS Coding Fields (Visible), or if it isn't seen in the field list but can accept your load file information (Hidden).
| App Name | Visible vs. Hidden |
|---|---|
| Author | Hidden |
| Bates_Start | Hidden |
| Bates_End | Hidden |
| Bates_Range_Start | Hidden |
| Bates_Range_End | Hidden |
| Begattach | Visible |
| Endattach | Visible |
| BCC | Visible |
| CC | Visible |
| Created_Date_Time | Visible |
| Custodian | Hidden |
| Custodians | Hidden |
| Date | Hidden |
| Document_Author | Visible |
| Document_Last_Author | Visible |
| Document_Subject | Visible |
| Document_Title | Visible |
| Document_Type | Hidden |
| Document_Date | Hidden |
| Email_Author | Visible |
| Email_Received | Visible |
| Email_Sent | Visible |
| Email_Subject | Visible |
| Email_Thread_Index | Hidden |
| Encrypted | Visible |
| File_Name | Visible |
| File_Path | Visible |
| Image_File | Hidden |
| Last_Print_Date | Visible |
| Mailbox_File | Visible |
| Mailbox_Path | Visible |
| Modified_Date_Time | Visible |
| Native_File | Hidden |
| Recipients | Visible |
| Root_Folder | Visible |
| Shortcut | Hidden |
| Tags | Hidden |
| Text_File | Hidden |
| Title | Hidden |
Important Field Notes:
- Custodian/Custodians are visible under Settings > Import > Custodians
- Have existing/historical Tags you want to migrate to Nextpoint's Additional Tags field? Your column header should read Tags and the values should be semicolon delimited (e.g. Bob Randolph; hard copy document; Production 1; 10/22/2019).
Protected System Fields
Data cannot be imported into any of the below fields because they are generated by the Nextpoint application.
If you’d like to map any of the below values into your database, you will be required to setup a field with a different name.
Note: Common fields replaced and suggested replacement values provided in parenthesis:
| Protected Field | Suggested Alternative |
|---|---|
| Filename | (use existing File Name) |
| Filepath | (use existing File Path) |
| batch | |
| batch_id | |
| batch_ids | |
| Bates | (use existing Bates_start and Bates_end as applicable) |
| Bates_stamped | |
| Confidentiality | (Conf_Status) |
| Confidentiality_Status | (Conf_Status) |
| Content_hash | (ContentHash) |
| Created_at | (use existing Created_Date_Time) |
| Created_at_gmt | (Created_Date_Time) |
| Created_on | |
| Description | (Desc) |
| Delete_at_gmt | |
| Deposition_id | |
| Deposition_names | |
| Deposition_volume_id | |
| Display_name | |
| Doc_props | |
| Document_properties | |
| Domain | (EmailDomain) |
| Email_message_id | (MessageID) |
| Email_reply_id | (ReplyID) |
| Email_Thread | (ThreadID) |
| Es_exh_designations | |
| Es_tags | |
| Es_updated_at_gmt | |
| Exhibit_stamped_as | |
| Expansive_hash | |
| Export_ids | |
| File_extension | (Fileext) |
| File_size | (Size) |
| Has_markups | (Has_Annotations) |
| Has_native_placeholder | |
| Highlight_issues | (Annotation_Issues) |
| Highlight_notes | (Annotation_Notes) |
| Id | |
| Incoming_wire_id | |
| Issues | (Document_Issues); (DocIssues) |
| Marked_for_delete | |
| Non_imaged_placeholder | |
| Notes | (Annotations) |
| Npdcase_id | |
| Original_filename | (use existing File Name) |
| Outgoing_wire_ids | |
| Page_count | (Pgcount) |
| Privileged | (Isprivileged) |
| Privileged_status | |
| Redacted | (Isredacted) |
| Relevancy_Status | (Relevancy) |
| Responsive_Issues | (Resp_Issues) |
| Review_status | |
| Updated_at | (Timeupdated) |
| Updated_at_gmt | |
| Updated_on | |
| Verified_page_count | |
| Wire_transfer_tags |
Nextpoint Default and Protected Fields
CSV Overlays
What is an overlay? An overlay is an index file formatted as a CSV that, when applied to your Discovery or Litigation database via the Overlay workflow, can change the metadata or coding of a document which has been previously imported.
Using the load file mapper, users will be provided the opportunity to easily match fields from your csv overlay file to the fields displayed in your Nextpoint database, from within the application. We’ve also included several instances of load file and field validation to ensure your overlay is successful.
Some notable highlights of this feature:
- Ability to perform CSV overlays via the new CSV Overlay Import Type.
- Document mapping key, providing Nextpoint with instructions for locating documents in your database which will be updated with information during the overlay.
- Effortless field matching with 'exact match' recommendations and the ability to search alternative existing fields or create new fields 'on the fly'.
- Backup Overlay File makes reverting data prior to the overlay stress-free.
This functionality is available for Advanced users only.
Formatting Requirements for a CSV Overlay
Your Overlay file should be formatted so that the first row of the CSV contains column headers (field names) and any subsequent row reflects a specific document.
Coding overlay column headers fall into one of three categories:
- Keys: Used to locate and target a specific document to which data will be applied
- Nextpoint System Fields: always available in all databases, not configurable
- Nextpoint Custom Fields: user-created fields which can be configured
We suggest supplying column headers as lowercase, underscore separated values. The system will do its best to coerce values like "Document Date" to "document_date", but we recommend formatting as much as possible before uploading to the File Room, as described in the steps below.
Each CSV row must contain at least one document key value. The Document Key provides Nextpoint with instructions for locating documents in your database which will be updated with information during the overlay. Available keys include:
| CSV Header | Description |
|---|---|
| npid | The Nextpoint ID of a document. This can be exported in bulk from Nextpoint using the "Nextpoint ID" export field. For individual documents, this is listed under "System Data" as DocID. Tip: This is the most accurate and preferred key for an overlay; it is guaranteed to be unique and will result in the fastest execution speed. |
| bates_start | The Bates value that corresponds with the first page of a document in Nextpoint. This can be exported in bulk from Nextpoint using the "Bates Range Start" export field. |
After your Document Key is defined in the first column of your overlay, all other fields which you intend to overlay in your database will fill in to the right in the first row. Subsequently, each row defines the data which will be overlaid in each particular field. See illustration above.
Outlined below is a list of Default System Fields to which you can overlay data to in your Nextpoint database. The only other fields which can be overlaid in your database are Custom (user-created) fields as described in the tab to the right.
| CSV Header | Description |
|---|---|
| app_name | Appears as "App Name" under coding fields. |
| author | Does not appear under coding fields, but is available for mapping. Often a merged field of document_author and email_author. |
| bcc | Appears as "BCC" under coding fields. |
| cc | Appears as "CC" under coding fields. |
| created_date_time | This field must be a date and will be parsed as such. Note: American date formatting is always utilized, it is recommended that dates are provided in the format MM/DD/YYYY. |
| document_author | Appears as "Document Author" under coding fields. |
| document_date | Appears as "Document Date" under coding fields. This field must be a date and will be parsed as such. Note: American date formatting is always utilized, it is recommended that dates are provided in the format MM/DD/YYYY. |
| document_last_author | Appears as "Document Last Author" under coding fields. |
| document_subject | Appears as "Document Subject" under coding fields. |
| document_title | Appears as "Document Title" under coding fields. |
| document_type | Appears as "Document Type" under coding fields. |
| email_author | Appears as "Email Author" under coding fields. |
| email_received | This field must be a date and will be parsed as such. Note: American date formatting is always utilized, it is recommended that dates are provided in the format MM/DD/YYYY. |
| email_sent | This field must be a date and will be parsed as such. Note: American date formatting is always utilized, it is recommended that dates are provided in the format MM/DD/YYYY. |
| email_subject | Appears as "Email Subject" under coding fields. |
| encrypted | Appears as "Encrypted" under coding fields. |
| file_name | Appears as "File Name" under coding fields. |
| file_path | Appears as "File Path" under coding fields. |
| last_print_date | This field must be a date and will be parsed as such. Note: American date formatting is always utilized, it is recommended that dates are provided in the format MM/DD/YYYY. |
| mailbox_file | Appears as "Mailbox File" under coding fields. |
| mailbox_path | Appears as "Mailbox Path" under coding fields. |
| modified_date_time | This field must be a date and will be parsed as such. Note: American date formatting is always utilized, it is recommended that dates are provided in the format MM/DD/YYYY. |
| np_folder_prefix | Does not appear under coding fields, but is available for mapping. Provides user with ability to add documents to a folder via an Overlay file. See coordinating np_folder_position field. Applicable value(s) which can be mapped via Overlay are any existing folder abbreviation/prefix. This article outlines how to use it. |
| np_folder_position | Does not appear under coding fields, but is available for mapping. Provides user with ability to add documents to a folder in a particular order via an Overlay file. See coordinating np_folder_prefix field. Applicable value(s) which can be mapped via Overlay are digits outlining which position you would like the document to take in a particular folder (e.g. a cell value of 6 would be the 6th document in the folder). This article outlines how to use it. |
| recipients | Appears as "Recipients" under coding fields. |
| root_folder | Appears as "Root Folder" under coding fields. |
| shortcut | Appears as "Shortcut" under coding fields. |
| title | Does not appear under coding fields, but is available for mapping. Often a merged field of document_title and email_subject. |
In addition to Nextpoint's default system field described in the previous tab, you can also overlay information to any custom fields which you create in your database.
All column headers should be lowercase with any spaces in the custom field names replaced by underscores. For example: “City Name” is represented in the csv header row as “city_name”
The way to format the CSV cells containing your document-level data will depend on the type of field being overlaid.
| CSV Header | Description |
|---|---|
| Freeform & Paragraph | Any value can be provided. |
| Date |
The coding overlay tool will attempt to parse data provided for this field into YYYY-MM-DD HH:MM:SS 24-hour format, which is how we require users to enter dates into our custom date fields, as it is sortable. If the provided value cannot be parsed into that format, the originally provided value will be overlaid. Note: American date formatting is always utilized, it is recommended that dates are provided in the format indicated above. |
| List & Locked List | The exact list option you want to be applied. If this list option does not exist it will be created. |
| Picklist |
These should be provided as a semi-colon delimited list of picklist options that should be checked. For example: "Option 1;option2; option 3" Trailing and preceding whitespace will be trimmed from the delimited values. This will go into Nextpoint as:
Keep in mind, all original picklist coding (the selections, not the options themselves) will be removed and replaced with what is provided in this field. |
| Single Checkbox | If any data is provided in this field, the checkbox will be checked. If an empty cell is provided, the checkbox will not be checked. |
Overlay Formatting Notes
Bates, Custodians, Native_File and Text_File cannot be overlaid. Please contact the Nextpoint support team for assistance with this action.
Additionally, please ensure your load file is saved as a CSV with UTF-8 Encoding.
Importing a CSV Overlay with the Load File Mapper
Before initiating any Overlay, it’s important to note that the documents to which you would like to overlay data must already be imported into your Nextpoint database.
1 | Upload CSV Overlay load file to File Room
-
Navigate to the File Room: In Discovery databases, via DATA File Room. In Litigation via MORE Data File Room.
-
Upload your CSV Overlay load file(s) to the File Room via one of the four following options:
Upload a folder of files via Drag & DropSelect the folder(s) on your desktop, thumb drive, or other location, and Drag & Drop into your File Room. All contents and subdirectory information will be maintained.
Upload loose file(s) via Drag & DropWithin the File Room, click the green Create Folder name your folder and select OK.
Maintaining an organizational system for your data Overlay files will help ensure you can best track your various overlays as time progresses.
Click into your newly created folder, and drag and drop your Overlay file into the folder location.
Request file upload from third partyIf you are requesting a CSV Overlay file from a third party (e.g. counsel, etc.), you can securely Request Files from your Nextpoint File Room.
It is a simple process in which you ("requestor") request files from a specified third-party, the "recipient" of that request receives a secure link to upload their respective file(s), and then you can access the uploaded files right away.
Read more on requesting from third parties here >>
Best Practices for Uploading
- Overlay files must be in CSV format (no excel or .dat)
- We recommend organizing your CSV Overlay files with the data set you are overlaying or in a specific Overlay Files folder in the File Room. The better organized you are here, the easier it will be to cross reference later, as needed.
2 | Initiate Overlay Workflow
Once your Overlay file has been uploaded to the File Room, navigate to the Overlays tab, also under the top-level DATA tab.
Click the blue Start an Overlay button to initiate the overlay workflow.
3 | Confirm Overlay Settings
Once you initiate the overlay workflow, you will be navigated to the next step, Overlay Settings. Here, you will verify and/or outline settings applicable to your current overlay.
The Overlay Settings you will need to set are as follows:
-
Overlay File Selection: Click the folder icon
to access the File Room contents and select your overlay file.
- Overlay Name: Recommended for most efficient tracking once the overlay is complete.
- Backup restored data: On by default, this setting will ensure existing field values are preserved in a separate CSV file before any information is overlaid. The resulting CSV file will be helpful if you ever need to revert an overlay to the previous state of coding/metadata.
4 | Review & Set Overlay Mappings
Load File Mapper at a Glance
When the Overlay Import Type is selected, the third step in the guided workflow is where you review and set your overlay file mapping specifications in the load file mapper.
The key objective of the load file mapper is to ensure the fields from your overlay file are mapping to the appropriate Nextpoint database fields. If the mapping is not made, Nextpoint will not know where to send the load file information during processing.
Once in the load file mapper, you will be presented with four core columns which provide you with data from your overlay file, a list of database fields to which load file data can be mapped, and a status indicator of your field mapping. These four columns are described in detail below.
A | The first column, Field from your load file, will be populated with a list of the fields contained in the header row of your selected overlay file.
B | The second column, Destination field, contains a list of available fields in your Nextpoint database to which corresponding overlay file field data can be mapped. Nextpoint will attempt to auto-map exact matches. You can also edit the auto-mapped recommendation, create a new destination field 'on the fly', or choose to skip the field within the field drop-down.
C | The third column, Load file preview, contains a three row preview of the data within the load file for each field. This information can provide assurance the appropriate values correspond with a particular field.
D | The fourth column, Field status, provides confirmation if a load file field has been successfully mapped to a destination field or if additional user action is required prior to import.
A Closer Look at the Destination Field Column
Now that you have an overview of four columns within the mapper, let’s take a closer look at the Destination field column and the different opportunities for mapping information from your Overlay load file to your Nextpoint database.
The first row in your Destination field column will be populated with document mapping key. The Document mapping key provides Nextpoint with instructions for locating documents in your database which will be updated with information during the overlay. See Formatting Requirements for a CSV Overlay above for further information on document mapping keys.
Click on the gear icon to validate the load file field which Nextpoint should use to locate the documents for your overlay.
Note: In the above visualization, you will note the duplicative ProdBeg (Bates_start) is skipped by the user. Bates cannot be overlaid, so there is no need to map that field beyond the document mapping key selection.
Auto-Mapping
For each load file field in column 1, Nextpoint will first look for an exact match with an existing Destination field. If an exact match is found, the field match will be auto-mapped.
For example, in the below image, BegAttach and BCC were an exact match so they are auto-mapped.
User-Mapping
For each load file filed in column 1, if an exact match can’t be made, fields can be user-mapped to existing or new fields.
For example, Tags were not auto-mapped in the below image because no exact match was present (and tags cannot be mapped). Therefore, we ask you as the user to select where that information should be mapped to in your Nextpoint database.
If a field needs to be user-mapped, each Destination field input contains a drop-down with a comprehensive list of all the fields which are available for mapping in your current database.
Varying text styles within the drop-down help to distinguish different types of fields.
- Normal (unbolded) field names are default fields which exist in every Nextpoint database. When possible, we recommend mapping to these default fields for streamlined searching later on.
- Grayed out fields are already in use within the current mappings and cannot be used twice. Remove/change the other field mapping in order to utilize a grayed out field.
- Bolded fields are user-created (or custom) fields which can be used in the mapper.
Create a New Field for Mapping
If the field you would like to use for mapping isn't available in the Destination field list drop-down, you are provided with the option to create a new database field on the fly. To create a new field while in the mapper, click the icon to the right of the applicable Destination field list.
Upon clicking the icon, confirm the auto-populated name or set your preferred field title, then click Create.
As soon as you click Create, that field will now be in your database and data can be mapped to that field moving forward.
You can skip a field mapping by selecting Skip Field in the Destination field drop-down, but skipping a field during mapping means skipping data going into your database. Therefore, we do require users explicitly skip a field for mapping via the Skip Field selection.
You can also skip all unmapped fields as a last selection before moving to the next step, processing.
5 | Initiate Your Overlay
Once all load file mappings are complete, click the blue Overlay button at the bottom right and processing will begin. Nextpoint will take your original overlay file, make a copy with any mapping requirements, and make any necessary conversions on the back-end during processing.
Warning!
All fields provided will be entirely overwritten by what is in the provided CSV. This means that if a field has an empty value in the CSV, that field will have its existing data removed in Nextpoint.
Before initiating your Overlay, we recommend ensuring Backup restored data is Enabled in when confirming your overlay settings. Doing so will ensure you are able to revert your overlay changes, if needed.
6 | Review Overlay Results
After your overlay is complete, we recommend reviewing your overlay results to ensure your overlay mapped as expected. You can review any overlay batch details via DATA > Overlays > click on the name of the overlay in the overlay batch list.
Several reports/files are generate during processing which will be helpful in your review:
- The overlay file used for processing will be added to your original folder selected from the File Room for import. Any selections made in the load file mapper will be reflected in this resulting file.
- Field Mapping Report: Fields used for mapping will be stored as a report in the individual overlay details page.
- Processing Results Report: Outlines the document mapping key utilized, which Nextpoint DocIDs the key matched, and the associated coding/metadata applied during overlay.
- Backup Overlay Load File: An CSV export of documents in your overlay batch and the coding/metadata in place prior to processing the overlay. Helpful in the event you need to revert your overlay for any reason.
7 | Family Link
Note: This step is only applicable if you were overlaying email family relationships via the combination of Bates_start document mapping key and BegAttach field.
The very last step once processing is complete is to Family Link your overlay batch. Family linking is the process which visually links imported (produced) emails and attachments using a set of two fields: "Unique ID" and "Family ID".
This takes place after import processing is complete and via DATA Overlays click on the overlay name to view Batch Details. At the bottom right of your Batch Summary page, click . A sliding menu will appear with checkboxes & headers for Batch, User, Uploaded, Docs (batch number, importing user, upload date, batch document count), and a selection drop-down for your Linking Options.
- Select the overlay batch(es) you would like to Family Link.
- Select the fields Nextpoint should use to link parent emails to their attachments via the Linking Options drop-down.
- Click Family Link Documents
- Confirm your selection by clicking Run Family Linking.
Read more on family linking here >>
After processing is complete, you will receive a green Complete, yellow Complete With Errors, or red Error status. Read more on Common Overlay Errors and Solutions here >>
How to Import a CSV Overlay
Nextpoint includes a built-in load file mapper for produced data imports, allowing you to easily match fields from your load file to the corresponding fields in your Nextpoint database directly within the application. The import workflow also includes load file and field validation checks to help ensure your data is imported successfully.
This article walks through the produced data import process in both NextGen and Legacy databases.
Which database type should I follow?
If you see the badge in the top left next to the name of your database, follow the NextGen steps below. Otherwise, Jump to the legacy instructions.
Prefer a video presentation on this topic? You can find one here
How to Import Produced Data in NextGen Databases
Table of Contents
- Upload data to Nextpoint File Room
- Select files for import from Nextpoint File Room
- Confirm Import Data Settings
- Review & Set Load File Mappings
- Initiate Your Import
- Review Import Results and Family Link
1 - Upload Data to Nextpoint File Room
The first step to importing in Nextpoint, is to upload your data to the File Room. File Room is a secure ‘data-bank’ for storing all your confidential files in your database, and comes with a built-in, high-speed, multi-file uploader to get data into Nextpoint quickly and efficiently.
To get started uploading your data to the File Room:
It is important to note, we recommend you upload your production data folder to the File Room unzipped. This will ensure all subdirectories and load files are accessible during the guided import workflow and processing.
-
Navigate to the File Room: In Discovery databases, via DATA>File Room. In Litigation via MORE > Data > File Room.
-
Upload your files to the File Room via one of the four following options:
Upload a folder of files via Drag & DropThe primary, and recommended, function for uploading data to your File Room.
Select the folder(s) on your desktop, thumb drive, or other location, and Drag & Drop into your File Room. All contents and subdirectory information will be maintained.
Upload loose files via Drag & DropWithin the File Room, click the green Create Folder name your folder and select OK.
Click into your newly created folder, and drag and drop your loose files into the folder location.
Maintaining an organizational system for your data uploads will help ensure you can best track your various imports as time progresses.
Request file upload from third partyYou can securely Request Files from any third party (clients, counsel, etc...) from your Nextpoint File Room. It is a simple process in which you ("requestor") request files from a specified third-party, the "recipient" of that request receives a secure link to upload their respective files, and then you can access the uploaded files right away.
Read more on requesting from third parties here >>
-
After you initiate your upload in the step above, the data will begin to upload and the status of the upload will be displayed on your screen.
It is important you do not navigate away from the File Room during an active upload. This will cancel the ongoing upload, and you will need to delete all files from the File Room which were interrupted during upload and begin again.
Need to keep working on other action items? Open a new tab, or duplicate your current tab and you are set!
Read our File Room Best Practices here >>
2 - Select Files for Import
Once your data has been successfully uploaded to the File Room, you can select that data directly from the File Room to initiate the guided import sequence.
To select your data for import click the blue Import button next to any production folder in the File Room.
When initiating your import from the File Room, Nextpoint will detect the type of data you selected and will automatically set such in the first step of the guided import sequence. If a load file is present and there is a subfolder titled IMAGES, your import type will be recognized as Production with Load File.
Alternative option for selecting files for import
While selecting files for Import from the File Room, as described above, is the recommended workflow for initiating your imports, you may also initiate your import via DATA Imports.
The difference you will notice in starting from this location will be the added Import Type selection in Step 1. After making this selection, you will meet the 'Import from File Room' sequence at Step 2, Import Data Settings.
Read more on Import Types here >>
3 - Confirm Import Data Settings
Once your files have been selected for import, you will be navigated to the next step of the import sequence, Import Data Settings. Here, you will verify and/or outline settings applicable to your current import.
For Production with Load File imports, common Import Data Settings you will see are as follows:
-
Type of Import: Verify Production with Load File is selected. Click the pencil icon
to edit, as needed.
-
Selected Files for Import: If you initiated your import from the File Room, verify the selected files or modify by clicking the folder icon
to access the File Room contents.
- Load File Selection: Nextpoint will use the first load file found, but if there is a particular load file you would like to use, you can change such in the drop-down.
- Image Load File Selection: Nextpoint will use the first image load file found, but if there is a particular load file you would like to use, you can change such in the drop-down.
- Batch Name: Recommended for most efficient tracking once the data has been imported.
- Assign Custodian on Import: For produced data sets with an accompanying load file, Custodian information is typically provided in the load file (and will be mapped in the next step).
-
Add to Folder on Import: Search list of existing folders or add new via the folder + icon
.
Deduplication and DeNIST Detection
When importing produced data, Deduplication and DeNIST detection are
disabled
by default to help mitigate the risk of deduplicating data that was produced
to you.
In NextGen databases, these options are removed from the Import Settings screen entirely for produced data imports. In Legacy databases, Deduplication and DeNIST settings remain visible on the Import Settings screen but are automatically toggled OFF.
FAQ: Production with Load File Import Type not recognized?
If you reach the Import Data Settings page and the Import Type does not indicated "Production with load file", then a load file was not detected during the selection process. If this is the case, return to the File Room and make sure that a DAT or CSV load file is in your production folder. We typically see load files present in the DATA folder or at the root of the main production folder.
4 - Review & Set Load File Mappings
Load File Mapper at a Glance
When Production with Load File Import Type is selected, a new step has been added to the guided workflow in which you can review and set your load file mapping specifications, the load file mapper.
The key objective of the load file mapper is to ensure the fields from your load file are mapping to the appropriate Nextpoint database fields. If the mapping is not made, Nextpoint will not know where to send the load file information during processing.
Once in the load file mapper, you will be presented with four core columns which provide you with data from your load file, a list of database fields to which load file data can be mapped, and a status indicator of your field mapping. These four columns are described in detail below.
A | The first column, Field from your load file, will be populated with a list of the fields contained in the header row of your selected load file.
B | The second column, Destination field, contains a list of available fields in your Nextpoint database to which corresponding load file field data can be mapped. Nextpoint will attempt to auto-map matches between your load file and the database fields based on common field name formats. You can also edit the auto-mapped recommendation, create a new destination field 'on the fly', or choose to skip the field within the field drop-down.
C | The third column, Load file preview, contains a three row preview of the data within the load file for each field. This information can provide assurance the appropriate values correspond with a particular field.
D | The fourth column, Field status, provides confirmation if a load file field has been successfully mapped to a destination field or if additional user action is required prior to import.
A Closer Look at the Destination Field Column
Now that you have an overview of four columns within the mapper, let’s take a closer look at the Destination field column and the different opportunities for mapping information from your load file to your Nextpoint database.
The first one or two rows in your Destination field column will be populated with image mapping criteria. Image mapping criteria provides Nextpoint with instructions for locating your production images during processing.
Click on the gear icon to validate the load file field which Nextpoint should use to locate the images for your production.
Auto-Mapping
For each load file field in column 1, Nextpoint will first look for an exact match with an existing Destination field. If an exact match is found, the field match will be auto-mapped.
For example, in the below image, BegAttach and EndAttach were an exact match so they are auto-mapped.
User-Mapping
For each load file filed in column 1, if an exact match can’t be made, fields can be user-mapped to existing or new fields.
For example, ProdBeg and ProdEnd were not auto-mapped in the below image because no exact match was present. Therefore, we ask you as the user to select where that information should be mapped to in your Nextpoint database.
If a field needs to be user-mapped, each Destination field input contains a drop-down with a comprehensive list of all the fields which are available for mapping in your current database.
Varying text styles within the drop-down help to distinguish different types of fields.
- Normal (unbolded) field names are default fields which exist in every Nextpoint database. When possible, we recommend mapping to these default fields for streamlined searching later on. For more information on linking fields in a load file to Nextpoint's system fields, please review the Nextpoint System and Protected Fields support article.
- Grayed out fields are already in use within the current mappings and cannot be used twice. Remove/change the other field mapping in order to utilize a grayed out field.
- Bolded fields are user-created (or custom) fields which can be used in the mapper.
The following fields are VERY important to map correctly if they exist in your load file.
bates_start/bates_end - usually called "Prodbeg"/"Prodend" or something similar, these fields map your Bates numbers to your documents and are usually used for imaging (if the images are named by Bates numbers).
begattach - This is a default Nextpoint field used to identify family relationships during an import and should contain the metadata from the load file associated with document families (commonly labeled Production Begin Attachment or a similar variation). If a parent identifier exists in the load file—such as the parent document’s Bates number—it can be used to establish family relationships during processing.
native file - If your production contains a "Natives" folder and native files, you need to map the paths to these natives onto the "native file" field and validate the paths by clicking on the gear icon next to the field and selecting the folder containing the native files.
text file - If your production contains a "Text" or "OCR" folder containing the search text for each document, you need to map the paths to these text files onto the "text file" field and validate the paths by clicking on the gear icon next to the field and selecting the folder containing the text files.
Create a New Field for Mapping
If the field you would like to use for mapping isn't available in the Destination field list drop-down, you are provided with the option to create a new database field on the fly. To create a new field while in the mapper, click the icon to the right of the applicable Destination field list.
Upon clicking the icon, confirm the auto-populated name or set your preferred field title, then click Create.
As soon as you click Create, that field will now be in your database and data can be mapped to that field moving forward.
You can skip a field mapping by selecting Skip Field in the Destination field drop-down, but skipping a field during mapping means skipping data going into your database. Therefore, we do require users explicitly skip a field for mapping via the Skip Field selection.
You can also skip all unmapped fields as a last selection before moving to the next step, processing.
Before finalizing your mapping, the last, but critical decision point concerns validating pathing information for Natives and Text. This validation point ensures your load file is giving Nextpoint the correct instructions to find the different pieces of your data set to create unique documents during processing.
To validate, click the gear icon, and confirm the relative path of the location of the respective. In other words, the top-level folder in which Nextpoint should start looking for text or native files during processing. Most often, this will be the top-level TEXT and NATIVES folders in your production set.
Load File Mapper Tips + Tricks
In the event "something doesn't seem right" when you are in the mapper (spinning, no text/native paths showing, etc.), we recommend the following troubleshooting tips and tricks
- If the native/text file path listings are not displaying when you go to validate, your parent production folder in the File Room and the folder in the native/text paths may be mismatched. Update your File Room folder to correlate with the native/text paths or update the native/text paths to match the File Room folder, then re-upload.
- If your load file is not being read and/or has uncommon characters contained within, make sure your load file is saved with UTF-8 Encoding.
5 - Initiate Your Import
Once all load file mappings are complete, click import and processing will begin. Nextpoint will take your original load file, make a copy and make any necessary conversions on the back-end during processing.
6 - Review Import Results and Family Link
After your import is complete, the converted load file copy will be added to your original folder selected from the File Room for import. Fields used for mapping will be stored as a report in the individual import details page.
The very last step once processing is complete is to Family Link your import batch. Family linking is the process which visually links imported (produced) emails and attachments using a set of two fields: "Unique ID" and "Family ID". This takes place after import processing is complete and via DATA Import and by clicking on the batch name to view Batch Details Family Linking.
Read more on family linking here >>
How to Import Produced Data in Legacy Databases
Table of Contents
- Upload data to Nextpoint File Room
- Select files for import from Nextpoint File Room
- Confirm Import Data Settings
- Review & Set Load File Mappings
- Initiate Your Import
- Review Import Results and Family Link
1 - Upload Data to Nextpoint File Room
The first step to importing in Nextpoint, is to upload your data to the File Room. File Room is a secure ‘data-bank’ for storing all your confidential files in your database, and comes with a built-in, high-speed, multi-file uploader to get data into Nextpoint quickly and efficiently.
To get started uploading your data to the File Room:
It is important to note, we recommend you upload your production data folder to the File Room unzipped. This will ensure all subdirectories and load files are accessible during the guided import workflow and processing.
-
Navigate to the File Room: In Discovery databases, via DATA File Room. In Litigation via MORE Data File Room.
-
Upload your files to the File Room via one of the four following options:
Upload a folder of files via Drag & DropThe primary, and recommended, function for uploading data to your File Room.
Select the folder(s) on your desktop, thumb drive, or other location, and Drag & Drop into your File Room. All contents and subdirectory information will be maintained.
Upload loose files via Drag & DropWithin the File Room, click the green Create Folder name your folder and select OK.
Click into your newly created folder, and drag and drop your loose files into the folder location.
Maintaining an organizational system for your data uploads will help ensure you can best track your various imports as time progresses.
 Upload an individual file via Upload Files button
Within the File Room, click the blue Upload Files button and select the file from the directory prompt.
Note: This option only allows upload of one file at a time (loose file, .zip, mailbox archive).
Request file upload from third partyYou can securely Request Files from any third party (clients, counsel, etc...) from your Nextpoint File Room. It is a simple process in which you ("requestor") request files from a specified third-party, the "recipient" of that request receives a secure link to upload their respective files, and then you can access the uploaded files right away.
Read more on requesting from third parties here >>
-
After you initiate your upload in the step above, the data will begin to upload and the status of the upload will be displayed on your screen.
It is important you do not navigate away from the File Room during an active upload. This will cancel the ongoing upload, and you will need to delete all files from the File Room which were interrupted during upload and begin again.
Need to keep working on other action items? Open a new tab, or duplicate your current tab and you are set!
Read our File Room Best Practices here >>
2 - Select Files for Import
Once your data has been successfully uploaded to the File Room, you can select that data directly from the File Room to initiate the guided import sequence.
To select your data for import click the blue Import button next to any production folder in the File Room.
When initiating your import from the File Room, Nextpoint will detect the type of data you selected and will automatically set such in the first step of the guided import sequence. If a load file is present anywhere in your production folder, your import type will be recognized as Production with Load File.
Alternative option for selecting files for import
While selecting files for Import from the File Room, as described above, is the recommended workflow for initiating your imports, you may also initiate your import via DATA Imports.
The difference you will notice in starting from this location will be the added Import Type selection in Step 1. After making this selection, you will meet the 'Import from File Room' sequence at Step 2, Import Data Settings.
Read more on Import Types here >>
3 - Confirm Import Data Settings
Once your files have been selected for import, you will be navigated to the next step of the import sequence, Import Data Settings. Here, you will verify and/or outline settings applicable to your current import.
For Production with Load File imports, common Import Data Settings you will see are as follows:
-
Type of Import: Verify Production with Load File is selected. Click the pencil icon
-
Selected Files for Import: If you initiated your import from the File Room, verify the selected files or modify by clicking the folder icon
- Load File Selection: Nextpoint will use the first load file found, but if there is a particular load file you would like to use, you can change such in the drop-down.
- Batch Name: Recommended for most efficient tracking once the data has been imported.
- Assign Custodian on Import: For produced data sets with an accompanying load file, Custodian information is typically provided in the load file (and will be mapped in the next step).
-
Add to Folder on Import: Search list of existing folders or add new via the folder + icon
- Deduplication and DeNIST Detection: Deduplication and DeNIST settings are turned OFF as a pre-set recommendation for this type of import to help mitigate risk of deduping any data produced TO you.
FAQ: Production with Load File Import Type not recognized?
If you reach the Import Data Settings page and the Import Type does not indicated "Production with load file", then a load file was not detected during the selection process. If this is the case, return to the File Room and make sure that a DAT or CSV load file is in your production folder. We typically see load files present in the DATA folder or at the root of the main production folder.
4 - Review & Set Load File Mappings
Load File Mapper at a Glance
When Production with Load File Import Type is selected, a new step has been added to the guided workflow in which you can review and set your load file mapping specifications, the load file mapper.
The key objective of the load file mapper is to ensure the fields from your load file are mapping to the appropriate Nextpoint database fields. If the mapping is not made, Nextpoint will not know where to send the load file information during processing.
Once in the load file mapper, you will be presented with four core columns which provide you with data from your load file, a list of database fields to which load file data can be mapped, and a status indicator of your field mapping. These four columns are described in detail below.
A | The first column, Field from your load file, will be populated with a list of the fields contained in the header row of your selected load file.
B | The second column, Destination field, contains a list of available fields in your Nextpoint database to which corresponding load file field data can be mapped. Nextpoint will attempt to auto-map matches between your load file and the database fields based on common field name formats. You can also edit the auto-mapped recommendation, create a new destination field 'on the fly', or choose to skip the field within the field drop-down.
C | The third column, Load file preview, contains a three row preview of the data within the load file for each field. This information can provide assurance the appropriate values correspond with a particular field.
D | The fourth column, Field status, provides confirmation if a load file field has been successfully mapped to a destination field or if additional user action is required prior to import.
A Closer Look at the Destination Field Column
Now that you have an overview of four columns within the mapper, let’s take a closer look at the Destination field column and the different opportunities for mapping information from your load file to your Nextpoint database.
The first one or two rows in your Destination field column will be populated with image mapping criteria. Image mapping criteria provides Nextpoint with instructions for locating your production images during processing.
Click on the gear icon to validate the load file field which Nextpoint should use to locate the images for your production.
Auto-Mapping
For each load file field in column 1, Nextpoint will first look for an exact match with an existing Destination field. If an exact match is found, the field match will be auto-mapped.
For example, in the below image, BegAttach and EndAttach were an exact match so they are auto-mapped.
User-Mapping
For each load file field in column 1, if an exact match can’t be made, fields can be user-mapped to existing or new fields.
If a field needs to be user-mapped, each Destination field input contains a drop-down with a comprehensive list of all the fields which are available for mapping in your current database.
- Normal (unbolded) field names are default fields which exist in every Nextpoint database.
- Grayed out fields are already in use and cannot be used twice.
- Bolded fields are user-created (custom) fields.
The following fields are VERY important to map correctly if they exist in your load file:
bates_start/bates_end – maps Bates numbers.
begattach – required for family relationships.
native file – required for native pathing.
text file – required for OCR/text pathing.
Create a New Field for Mapping
If the field you would like to use for mapping isn't available, click the icon to create a new database field.
You can skip a field mapping by selecting Skip Field in the Destination field drop-down. Skipping a field means skipping data going into your database.
Before finalizing your mapping, validate pathing information for Natives and Text to ensure Nextpoint can locate all files during processing.
Load File Mapper Tips + Tricks
In the event "something doesn't seem right" when you are in the mapper (spinning, no text/native paths showing, etc.), we recommend the following troubleshooting tips and tricks
- If the native/text file path listings are not displaying when you go to validate, your parent production folder in the File Room and the folder in the native/text paths may be mismatched. Update your File Room folder to correlate with the native/text paths or update the native/text paths to match the File Room folder, then re-upload.
- If your load file is not being read and/or has uncommon characters contained within, make sure your load file is saved with UTF-8 Encoding.
5 - Initiate Your Import
Once all load file mappings are complete, click import and processing will begin. Nextpoint will take your original load file, make a copy and make any necessary conversions on the back-end during processing.
6 - Review Import Results and Family Link
After your import is complete, the converted load file copy will be added to your original folder selected from the File Room for import. Fields used for mapping will be stored as a report in the individual import details page.
The very last step once processing is complete is to Family Link your import batch. Family linking is the process which visually links imported (produced) emails and attachments using a set of two fields: "Unique ID" and "Family ID". This takes place after import processing is complete and via DATA Import and by clicking on the batch name to view Batch Details Family Linking.
Read more on family linking here >>
How to Import Produced Data with a Load File
Note: This functionality is available for Advanced users only.
In early 2021, we rolled out the much anticipated second installment of enhancements to the Nextpoint import experience with the introduction of a load file mapper for produced data imports. This new and improved workflow will accommodate most produced data imports with a load file, but we understand some users may still want to utilize the workflow they were previously used to. We refer to this as a Manual Import - one in which you modify your load file before uploading to the File Room and do not use the load file mapper.
In addition to serving existing workflows, this Manual Import Type is helpful in the event you have data for import which has already been processed. In particular, we see this most often with a native production import which already has attachments extracted from their parent emails. This approach allows you to choose to disable child processing which prevents attachments from extracting from their parent emails a second time.
All steps outlined below based on the assumption of a ranged image import. See below for a breakdown of the typical format for such an import:
What Does a Ranged Image Import Look Like?
Your produced data set will contain up to 4 folders. At the very least, this type of data set must contain an "Images" or "IMAGES" folder):
IMAGES - This folder contains the document pages, each a one-page image file. Image file pages will be in the .tif or .jpg format, and the files will be named by their Bates numbers.
TEXT - This folder contains the OCR text information, and can be either one text file per page, or one text file per document. If included, the OCR text files will be named by the corresponding Bates start numbers of the document they represent.
NATIVES - This folder contains any native files that accompany each document. If included, the Native files will be named by the corresponding Bates start numbers of the document they represent.
DATA - This folder contains load files associated with your data set. All information contained within the load file serves as an instruction manual for Nextpoint during import so the correct IMAGES, NATIVES, and TEXT files are combined to create unique documents and those documents can be viewed, searched, and filtered.
These load files will, at the minimum, contain document boundary information outlining which image files should be extracted from the aforementioned IMAGES directory and combined to create unique documents during import. Additionally, load files will oftentimes include data about the documents (Author, Recipients, Bates range, etc..) and have the paths to text and native files within the TEXT and NATIVES directories.
Below is what a graphic representation of a what a common ranged image data set looks like (when it is expanded):

Produced Data Import Instructions
The following steps have been strategically organized to help guide you through the import of produced data using the Manual Import Type selection. We recommend navigating the instructions one step at a time.
It is also recommended you review these required considerations for produced data imports prior to proceeding with the below Produced Data Import Instructions.
Open your production folder and review the subdirectories for the following specifications:
- DATA: Check for a .CSV and/or .DAT load files. If you have a .DAT, you must convert this file type to a more user-friendly .CSV format in Step 2. Additional file types such as .lfp, .log, .opt, may be discarded for purposes of these instructions.
- IMAGES: Check for single-page tiffs/jpgs named by their Bates number. In some cases, the image files are provided as PDFs named by their Bates start and that is acceptable.
- TEXT: Check for per-document text files. These are named by the Bates start of each document.
- NATIVES: Check for any native file types which have been provided. These are named by the Bates start of the document. Oftentimes Excel, Powerpoint, and other file types which do not image well (or at all).
A reminder of what you should anticipate seeing in a ranged image import:
FAQ: My TEXT (.txt) files are located in my IMAGES folder. What do I do?
If your text (.txt) files are not in a separate TEXT folder, that is typically OK. You will need to supplement a field in your load file titled image_extension. We further explain how to add this field when you get to Step 3 | Load File Configuration --> Document Boundaries.
For successful import to Nextpoint, load files must be saved in a CSV (comma-separated value) format.
If you located a .DAT in your DATA folder in Step 1, you must first convert the file to a .CSV before proceeding. Not only is it required for the Manual Import Type in Nextpoint, but making the conversion from .DAT .CSV allows you to more easily view your load file and make necessary modifications (in Excel). VS
VS 
Steps to convert a .DAT to .CSV:
- Open your .DAT file in a text editor such as TextPad or Sublime Text (this is the application preferred by Nextpoint Data Analysts).
To open, right click on the .DAT file Select "Open With" click on the text editor program you would like to use.
- Once opened in your text editor, the values in your .DAT file will likely be separated by the symbols þ□þ (thorn, □ (ASCII 20), and another thorn). So, the text displayed resembles this:
þProdBegþ□þProdEndþ□þBegAttachþ□þENDAttachþ□þCustodiansþ
If using Sublime text, your beginning state may look like this:
þProdBegþ<0x14>þProdEndþ<0x14>þBegAttachþ<0x14>þENDAttachþ - Using the functions in TextPad or Sublime, you must complete a find and replace on the aforementioned characters to convert the load file format. Use the following sequence:
- Find-replace all " (quote) with "" (double quote) - This will ensure your line breaks remain consistent.
- Find-replace all þ (thorn) with " (quote)
- Find-replace all □ (ASCII 20) with , (comma) - □ may read as <0x14> if working in Sublime Text.

- Find-replace all " (quote) with "" (double quote) - This will ensure your line breaks remain consistent.
- The find and replace actions you take above in Step 3 will result in all values being now separated by "," (quote comma quote, or in other words, comma separated values / CSV). The text displayed should resemble this:
- Though it is often not necessary, at times DAT files are not provided in UTF-8 format. Therefore, it is best practice to save the file with UTF-8 encoding. Select "File" > "Save with Encoding" > "UTF-8".
- Save your file as: nextpoint_load_file.csv.

- Locate your nextpoint_load_file.csv in your production folder and open the file in Excel. Your values will be separated into columns, and much easier to work with moving forward.

Prefer a video tutorial on converting your load file from .DAT to .CSV? Watch here >>
Troubleshooting: "My find-replace is not working correctly."
Some clients using Textpad or Notepad have had trouble in the past with certain characters being unexplainably replaced during this process, thus altering the desired results of their ending CSV (e.g. "" replacing the character sequence of "th" ). If you notice nuances in your resulting CSV, some users have found Sublime Text to be a helpful text editor alternative.
Now, you will make modifications to your .CSV load file AND Nextpoint database fields to ensure all information in your load file has somewhere to go when imported into your Nextpoint database.
Once your load file is converted in Step 2, open your resulting .CSV in Excel, if you have not already. Each row in your load file (spreadsheet) contains the information for one document. 
DOCUMENT BOUNDARIES
- In your load file, review the first two columns to confirm Bates_start and Bates_end or a general control number is present (e.g. Bates_begin/Bates_end OR prod_beg/prod_end)
- These beginning and ending numbers will identify which ranges of single page tiff/jpgs should be pulled from the IMAGES folder and combined to create individual documents.
- These beginning and ending numbers will identify which ranges of single page tiff/jpgs should be pulled from the IMAGES folder and combined to create individual documents.
- If these two columns are named something other than Bates_start and Bates_end, you must rename these columns in your load file to Bates_start and Bates_end in order for your import to be successful. *Capitalization and underscores (vs. a space) do not matter.
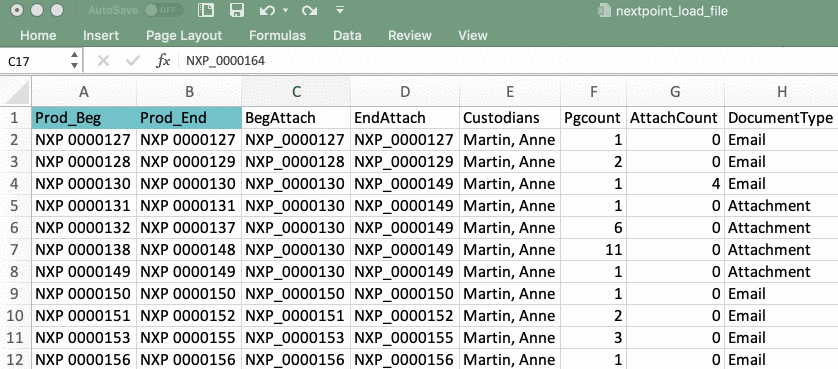
If your Image files were provided as PDF's named by their Bates start in Step 1
If you have singular images for documents, such as a PDF (likely named by Bates start), you must add a column to your load file titled image_file. After you add the image_file column to your load file, you must then populate the cells below with the appropriate files' relative path information.
Read more here on how to populate the image_file column.
FAMILY RELATIONSHIPS
- In your load file, review your column headers to confirm Begattach and Endattach column headers are present. Sometimes these are titled production_begin and production_end, etc...
- These beginning and ending attachment numbers are vital to establishing email family relationships after your import is complete.
- Establishing these visual relationships after import is referred to as Family Linking and is further covered below in step 7.
- In your load file, if named anything other than begattach and endattach (e.g. prod_begin/end, production_beg_attach/production_end_attach, etc..), you must rename these columns to Begattach and Endattach in order for your import to be successful. *Capitalization and underscores (vs. a space) do not matter.
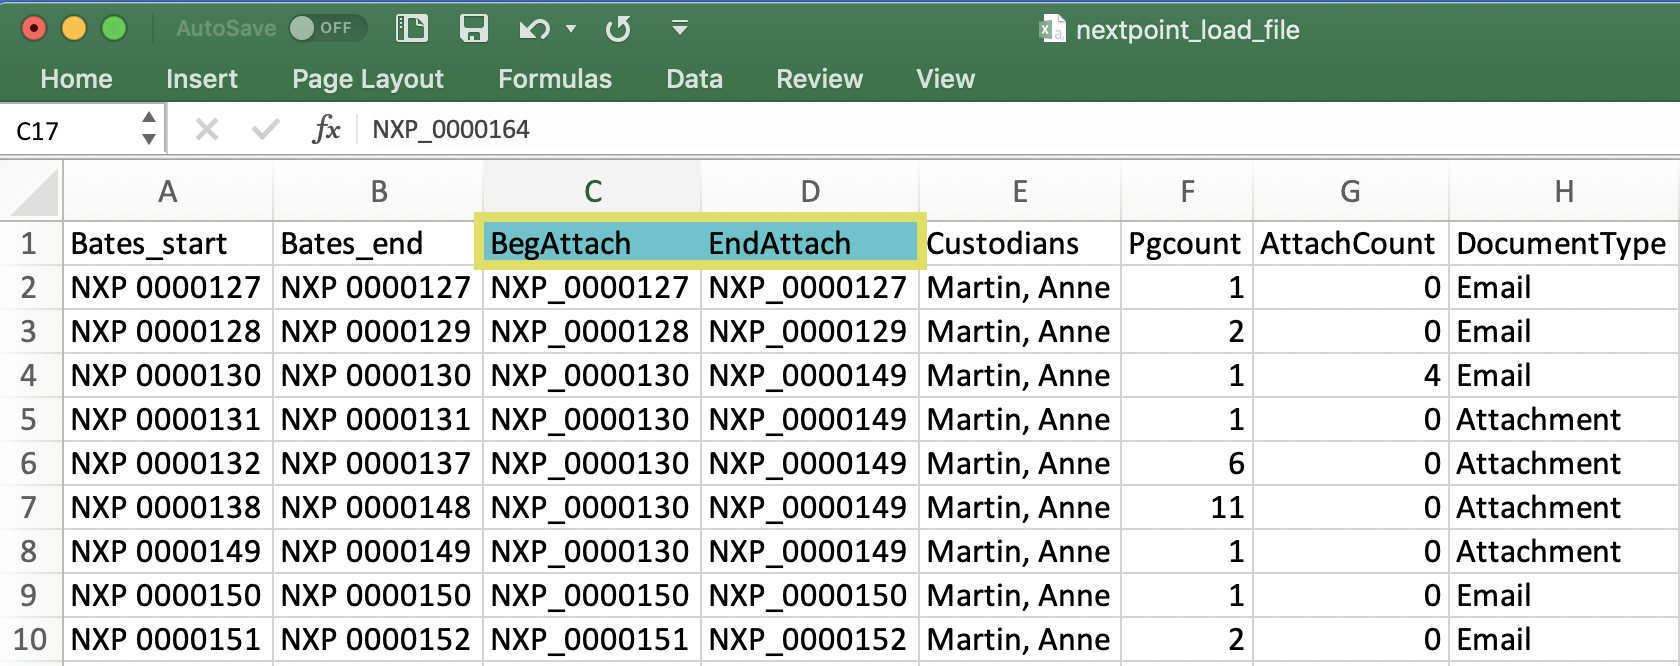
- In your Nextpoint Discovery database, if begattach and endattach fields are not present under Settings Coding Fields, then you must add begattach and endattach as Freeform fields.

- Importing to a Litigation database? You can add these fields under MORE Settings Coding Fields.
If your text (.txt) files were contained in your IMAGES folder in Step 1
If your image and text files are contained within the same folder (most oftentimes, IMAGES), you must add a column header in your load file titled image_extension and add the value tif|tiff|jpg|jpeg in all of the rows. Adding explicit file extensions for images will limit what sorts of files Nextpoint should consider as potential page images (and keep it from mistaking text files for images).
METADATA FIELDS
Once your document boundaries and family relationships are verified in the steps above, the next step is to verify the metadata fields in your load file. It is recommended you address the remaining load file fields in the following order:
- DEFAULT FIELDS
- First, see this list of Default Fields and Document Attributes, Exhibit A ("Exhibit A"). Fields on this list already exist in each Nextpoint database.
- If a column header in your load file matches, or is similar to, a field listed in Exhibit A, you must rename your load file header to match the field name from Exhibit A.
IMPORTANT: Your load file column header must exactly match the field name in Default Fields and Document Attributes, Exhibit A in order for your import to be successful.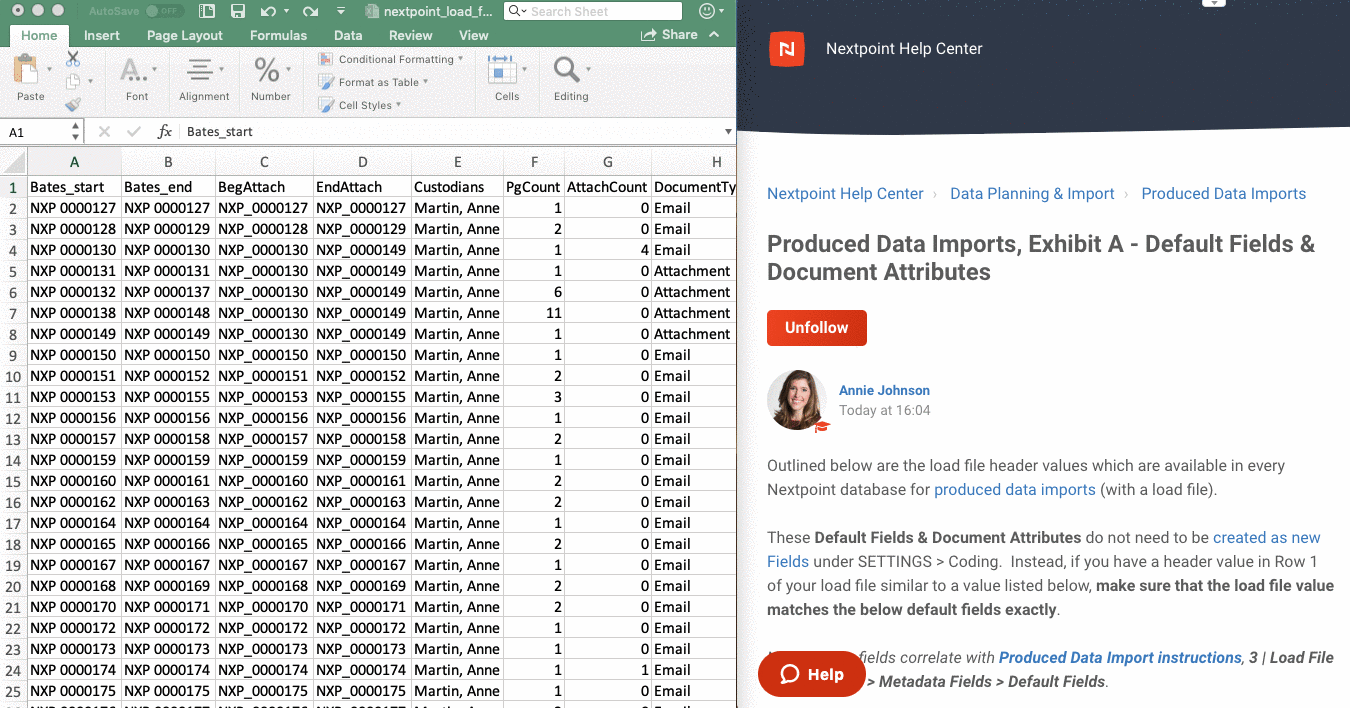
FAQ re: Default Fields
Q: I'm concerned if I use a header in my load file that is similar to, but not exactly the same, as a Default Field, I will mess up my import.
A: Don't worry, you will not "break" the import! Sometimes, it may be necessary to create similar fields to what is existing, and that is OK. For example, Nextpoint has a default Email_Sent field which incorporates the date AND time an email was sent. If you have Email_Sent_Date and Email_Sent_Time in your load file, it is perfectly fine to keep your load file fields named as such. However, if you do this, please make sure to set up the corresponding field in your Nextpoint Discovery database by navigating to Settings Coding Fields Create New Select Freeform Field enter the field name click "Create". This gives your load file data somewhere to go in Nextpoint once imported.
- PROTECTED SYSTEM FIELDS
- Next, see this list of Protected System Fields, Exhibit B ("Exhibit B"). Data cannot be imported into any of these fields because they are generated by the Nextpoint application.
- If a column header in your load file matches a field listed in Exhibit B, you must rename the fields in your load file to something different AND ALSO set up a corresponding field in your database.
- Renaming the field in your load file eliminates the use of a protected system field, and setting up the corresponding field in your database gives the information from your load file "somewhere to go" when your load file is ultimately imported into Nextpoint.
- Suggestions for what to rename the field in your load file (and subsequently add to your database) are provided in parentheses next to each field in Exhibit B.
RENAME FIELD IN YOUR LOAD FILE TO SOMETHING OTHER THAN PROTECTED SYSTEM FIELD: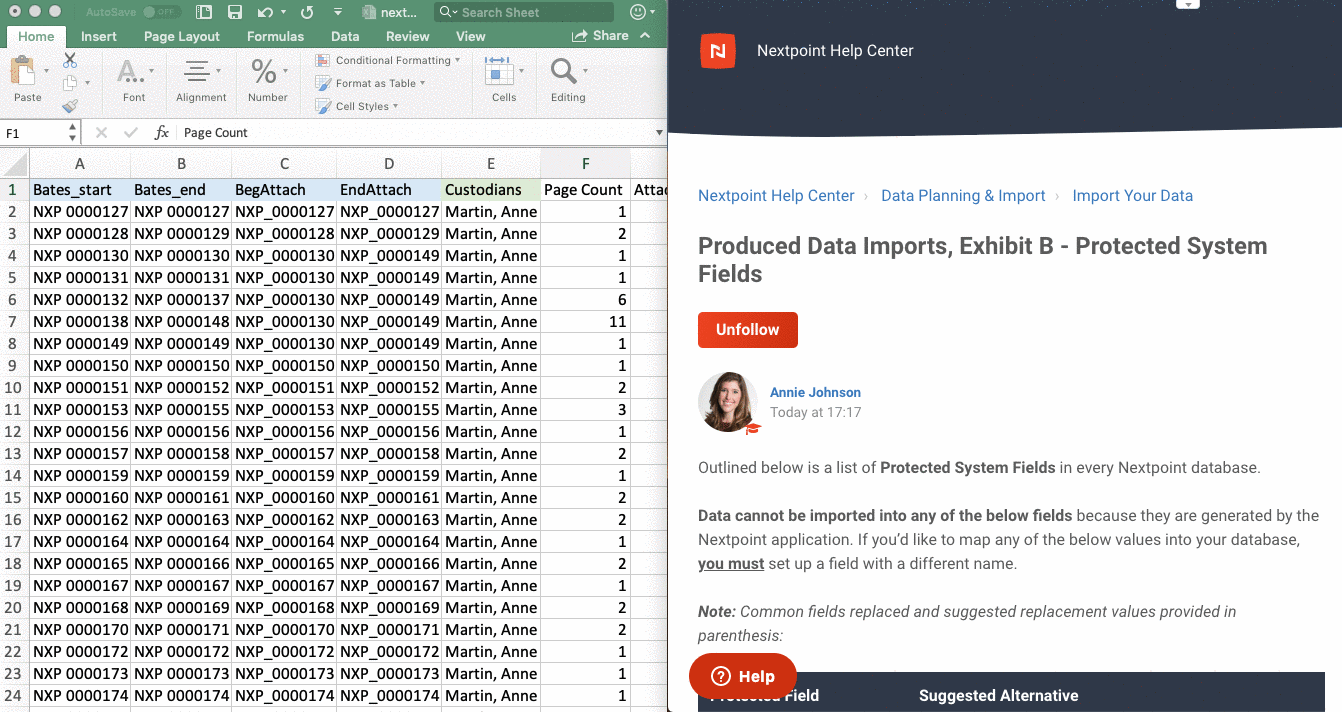
- If you change a column header in your load file (in 2.2 above), you must also set up the corresponding field in your Nextpoint Discovery database by navigating to Settings Coding Fields Create New Select Freeform Field enter the field name click "Create".
- Importing to a Litigation database? You can add these fields under MORE Settings Coding Fields.
- TEXT & NATIVE PATHS
Next up? Text and Native Paths.
During import, Nextpoint needs to know which text and native files to pull from their respective TEXT and NATIVE folders, and line up with their corresponding document image(s) from the IMAGES folder. This is accomplished by using the text_file and/or native_file column headers in your load file, which contain the path to, and name of, the text and native files, respectively.
Oftentimes, you will not be provided with ALL natives, but rather a select set of file types which do not image well (or at all). If you notice your native_file column lacking information in many of the cells, there is likely nothing wrong with your import, and rather only certain file types were provided natively (e.g. Excels, Powerpoints, Autocad drawings, etc).
- In your load file, make sure these two column headers are named text_file and native_file, respectively. They must be named as such in order for the import to work correctly.
- Then, in your load file, check to make sure the paths are relative to where the load file will be saved. It is critical to your import's success that the nextpoint_load_file.csv includes native and text path information relative to where the load file resides in your production set's base folder.
- The relative path for any native file starts with NATIVES. For example, the first value of the native_file column in the image above is NATIVES\00001\NXP000149.xlsx
- The relative path for any text file starts with TEXT. For example, the first value of the text_file column in the image above is TEXT\00001\NXP_0000127.txt
- See more information on relative paths here.
- In your load file, make sure these two column headers are named text_file and native_file, respectively. They must be named as such in order for the import to work correctly.
- EVERYTHING ELSE
- After addressing the Default Fields, Protected System Fields, and Text/Native Paths above, check for any remaining headers in your load file without a corresponding field in your Nextpoint database.
- If remaining fields are found, create a new Field in your database named exactly the same as your load file header(s).
- Working in a Discovery database? Navigate to Settings Coding Fields Create New Select Freeform Field and enter the field name.
- Working in a Litigation database? Navigate to MORE first, then Settings Coding Fields Create New Select Freeform Field and enter the field name.
After your load file is configured in Step 3, it is critical to the import’s success to save your load file as nextpoint_load_file.csv. This is what indicates to Nextpoint during import "this is a load file and you should use it for this import".
- First, move your load file to the root of your production folder.
- Then, upload your production folder to your Nextpoint File Room by dragging and dropping the unzipped folder.
Initiate the Import Workflow via DATA Import Import Files Select Manual Import.
Once in the guided import workflow, take the following steps:
- Select the Manual Import type in Step 1 of the Import Workflow click Next.
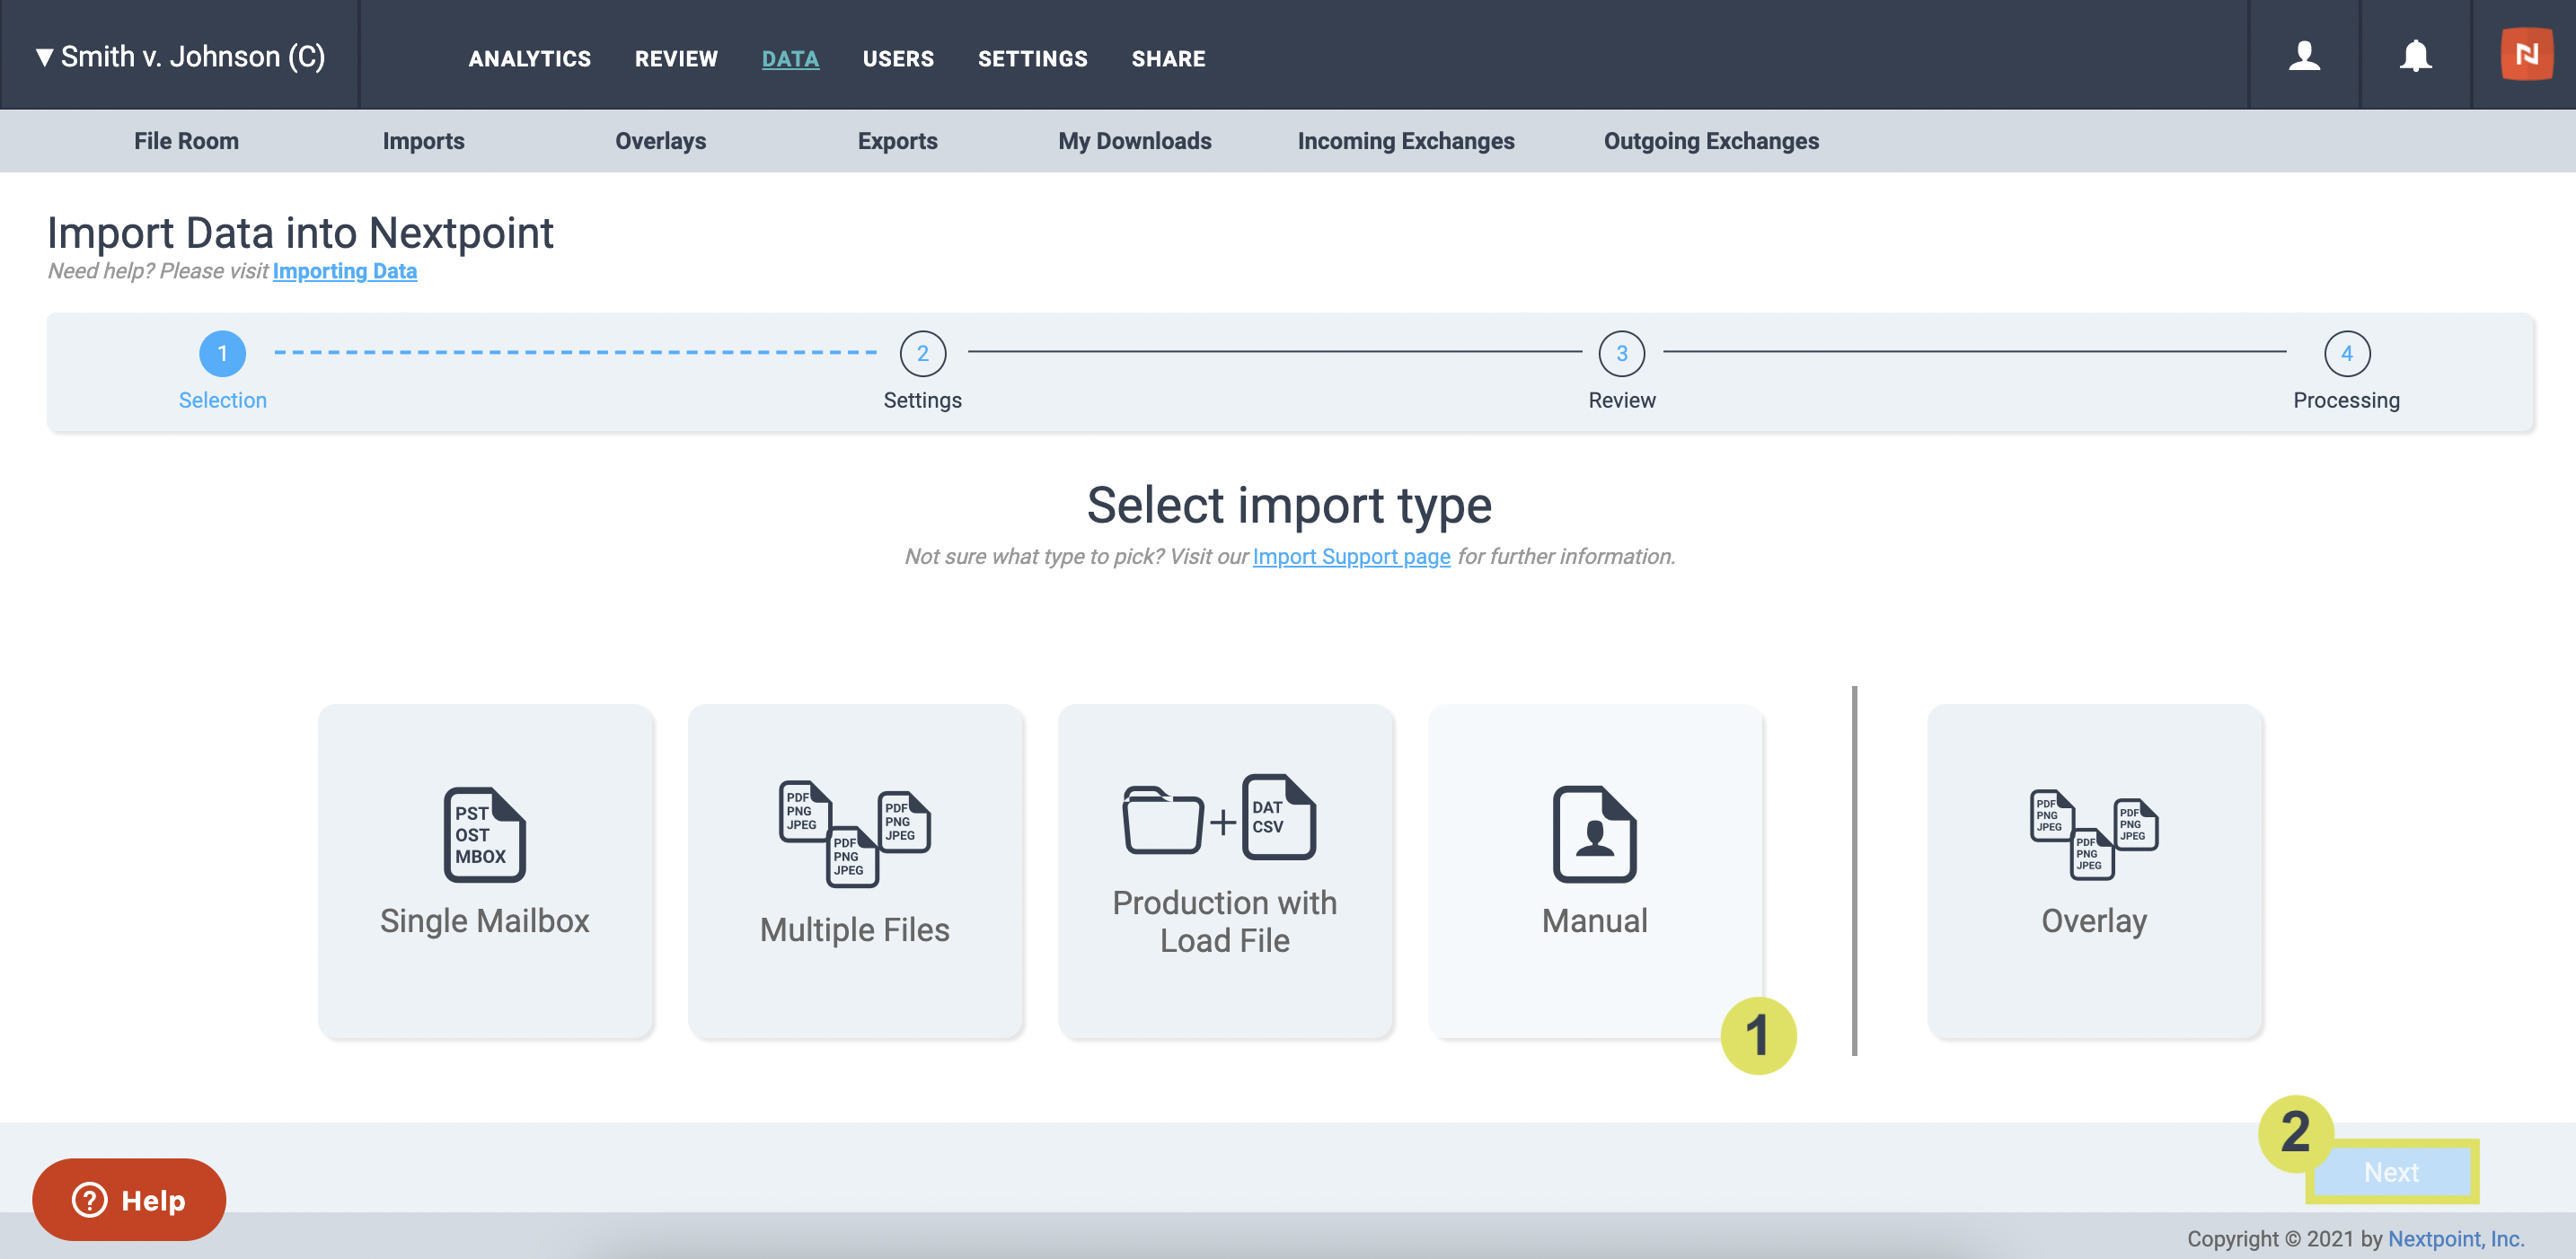
- You will be navigated to Import Data Settings. Here, select your files for import by first clicking on the folder icon next to the Files text.
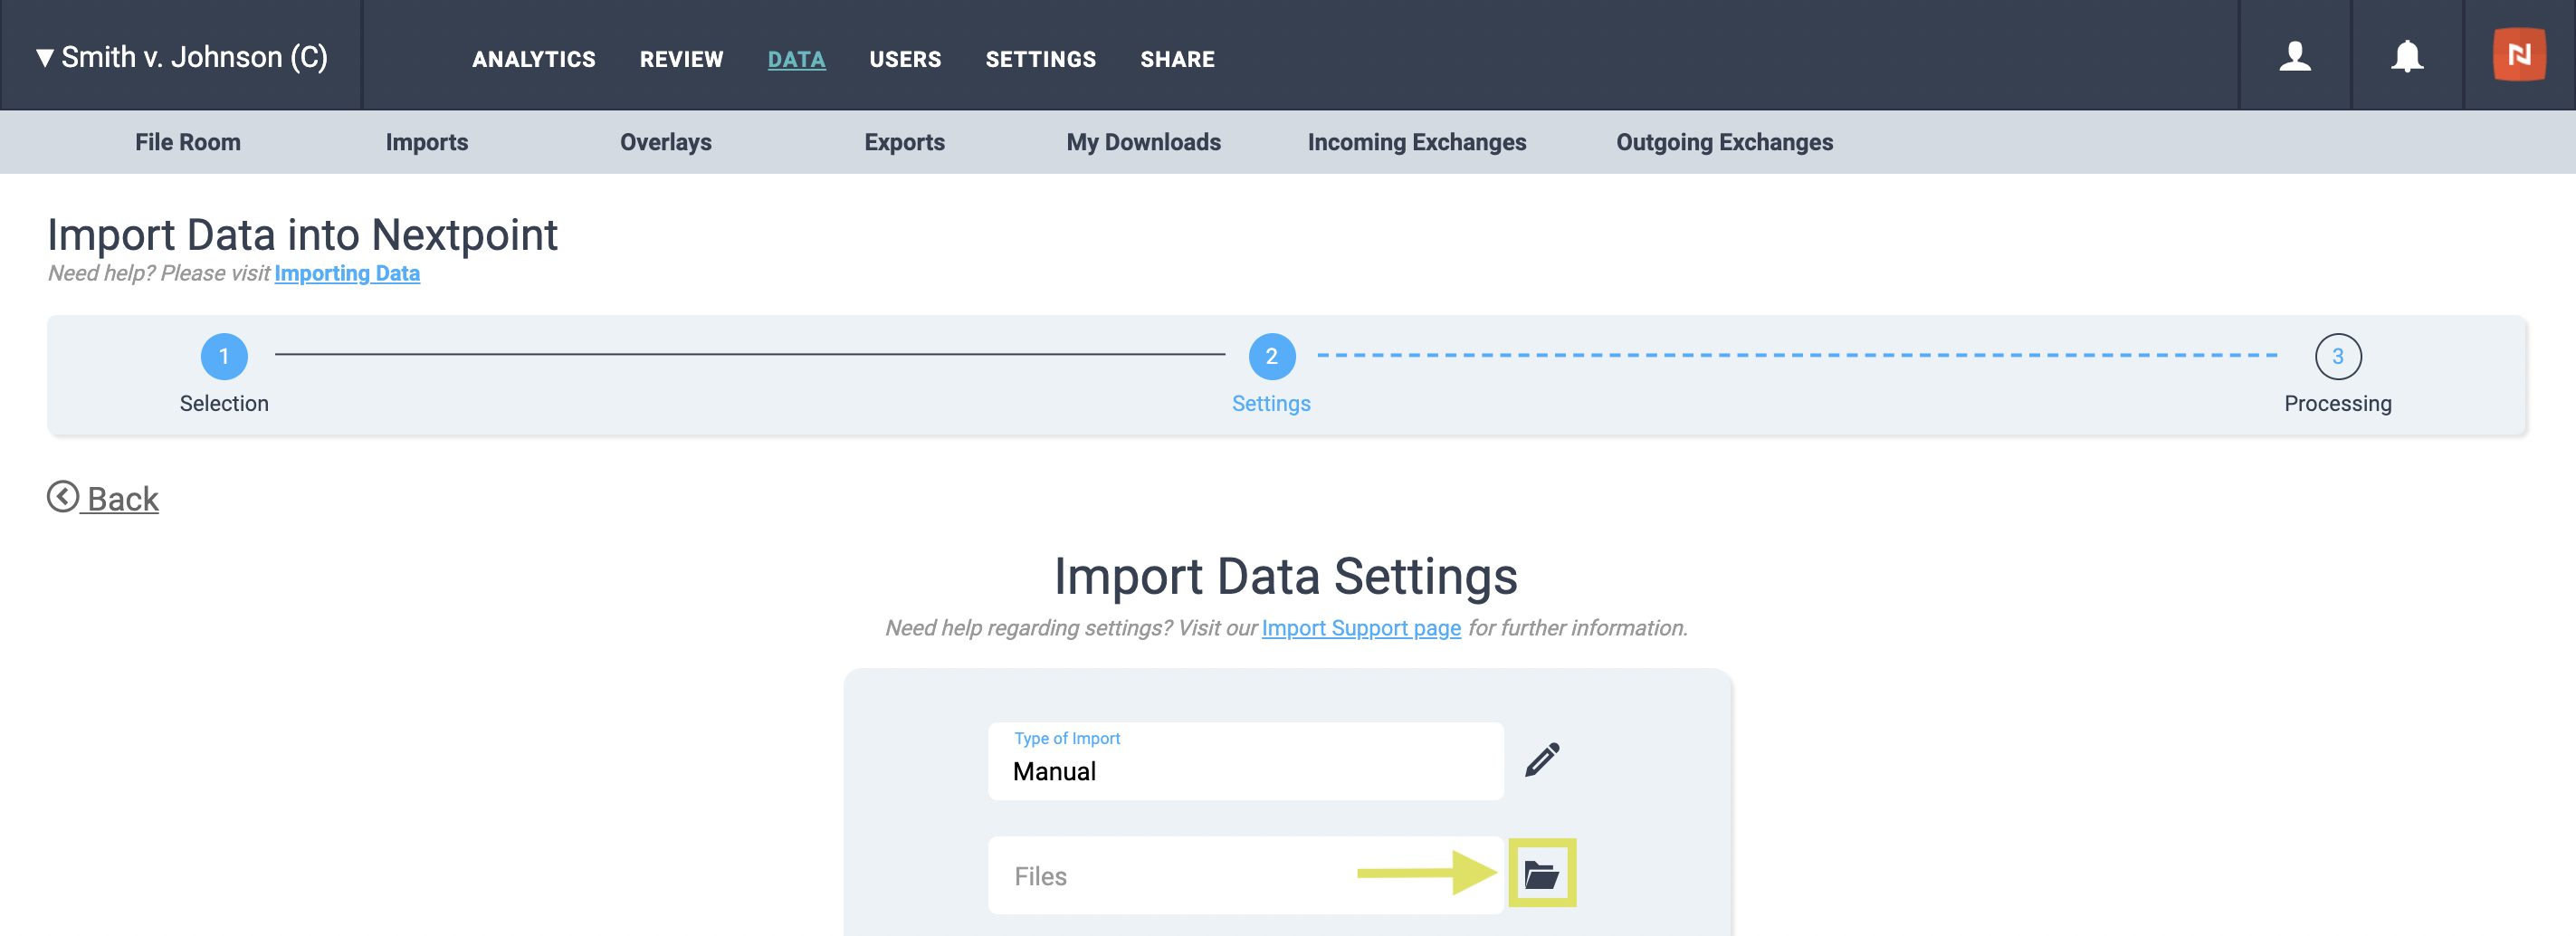
Then, select your parent production folder click orange Add selected to import list button click blue Import button.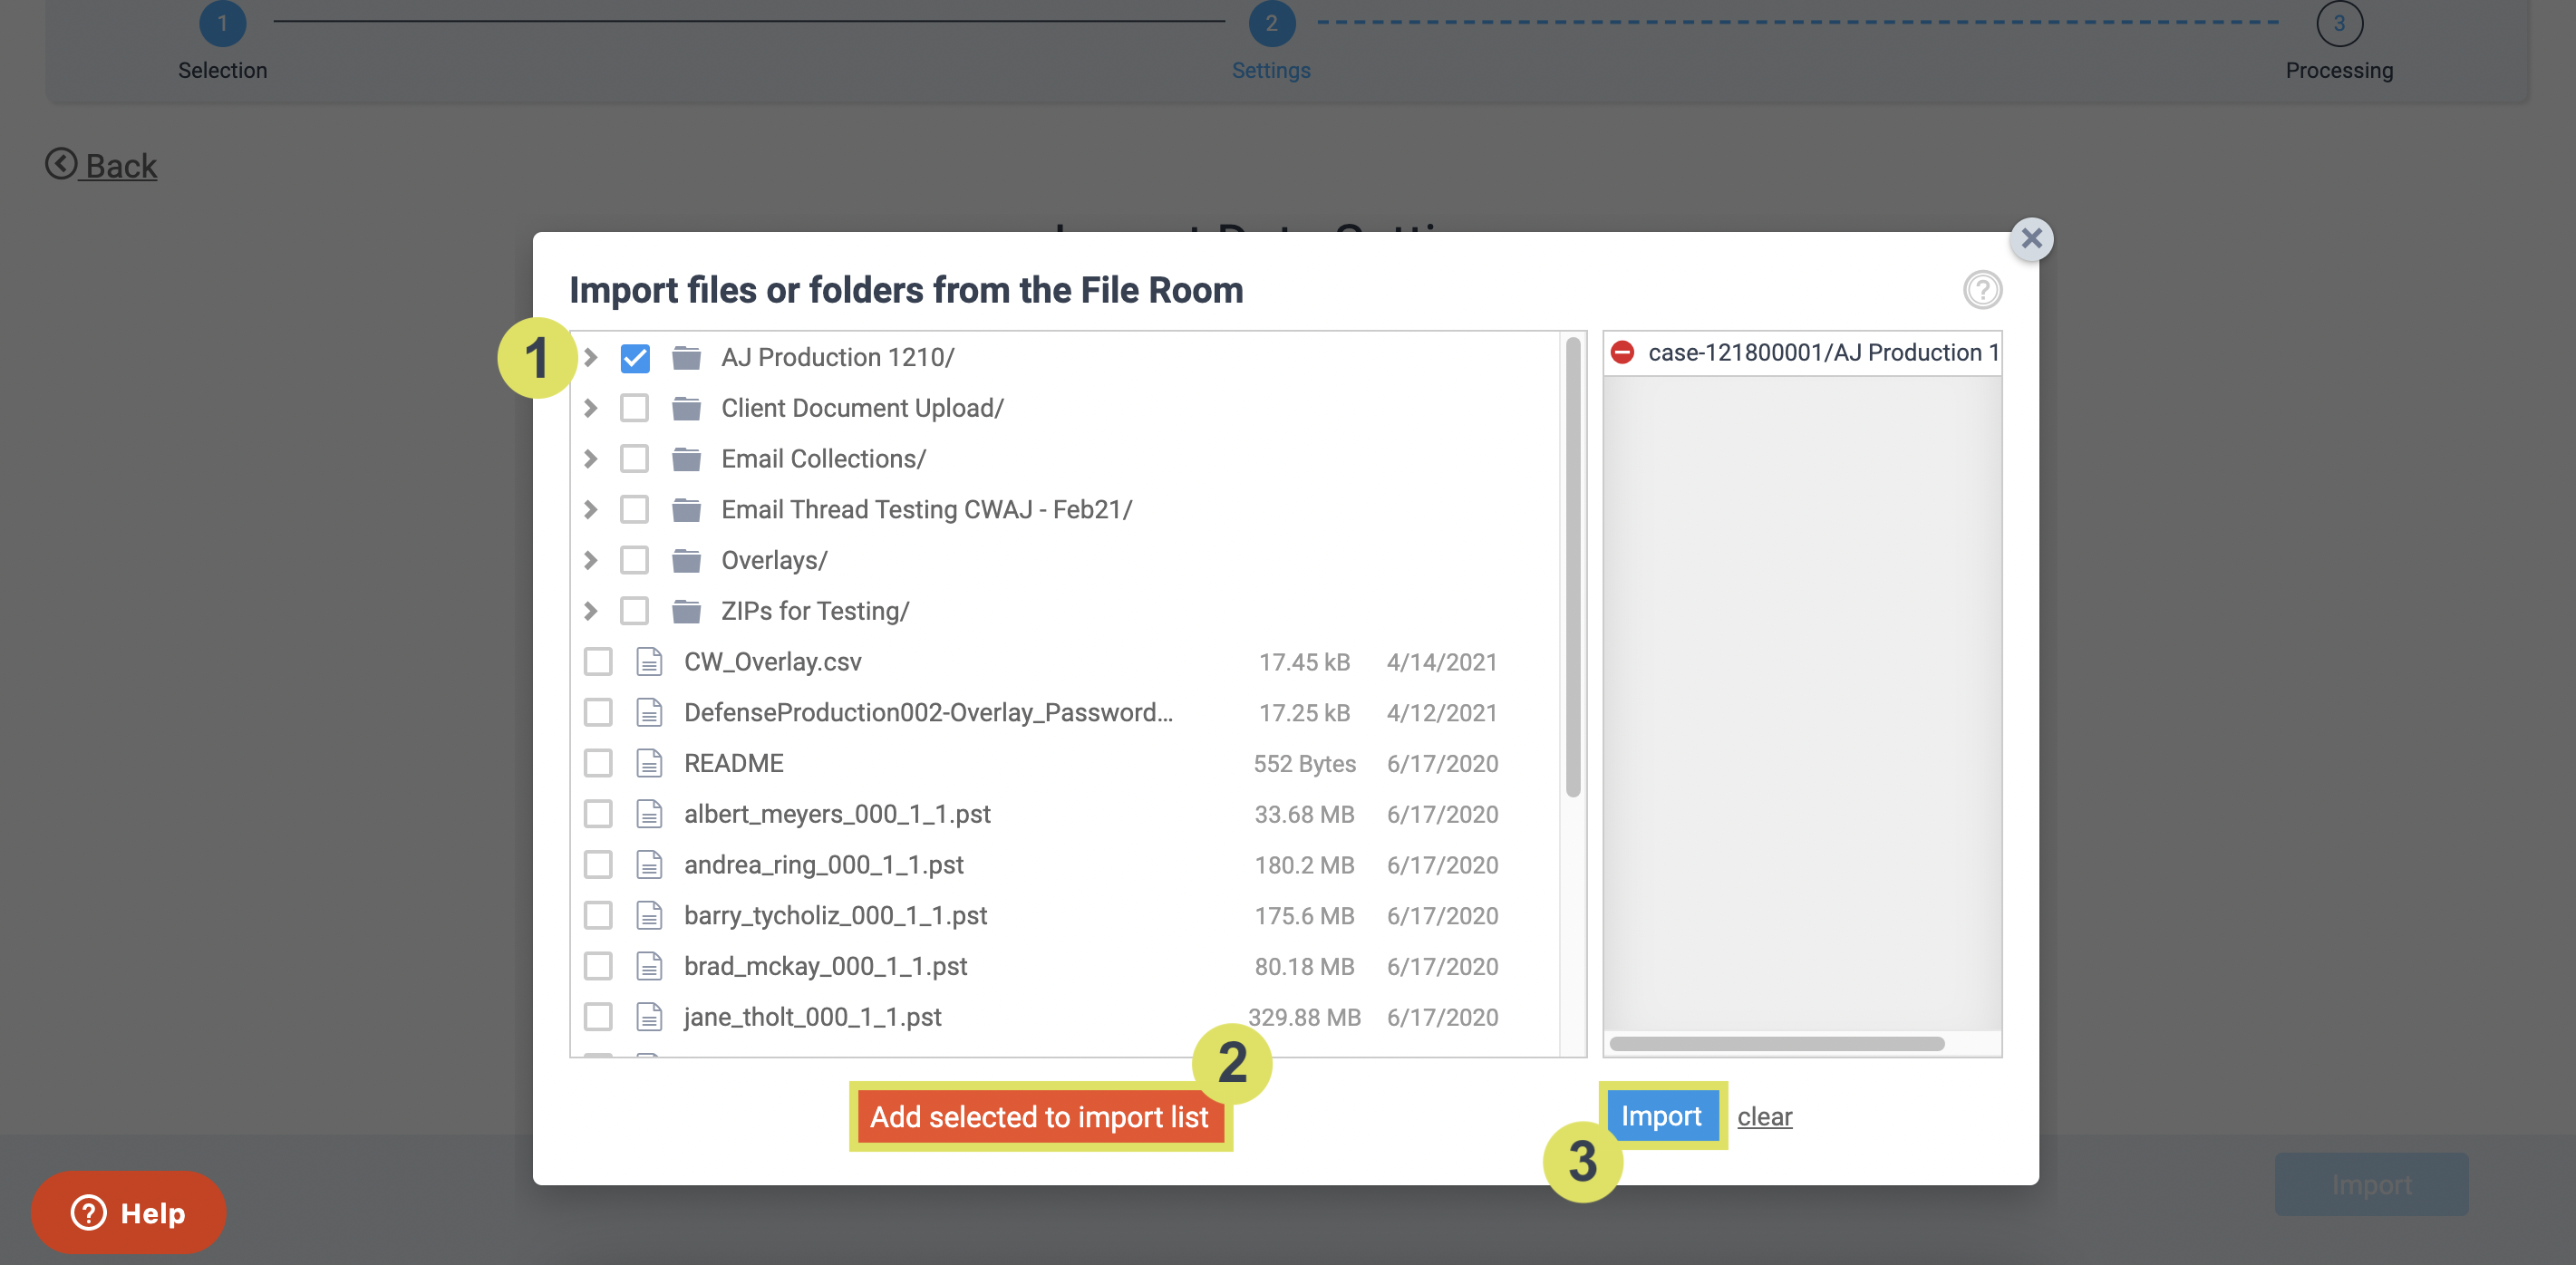
After you've selected your file for import, complete the remainder of the Import Data Settings. This includes naming your import batch, selecting a folder to which you would like your documents added after processing is complete, deduplication settings(we recommend deduplication be off for produced data), and Child Processing settings.
What is Child Processing? When enabled, children of parent emails or contents of zip files will be extracted and process in their standard format as stand-alone documents after import.When disabled, children will not be extracted from their parents. Disabling this feature may be leveraged in use cases such as native production imports with a load file, or in the event that children have been processed separately from the import at hand.
Once the aforementioned settings are determined, click the blue Next button to initiate your import.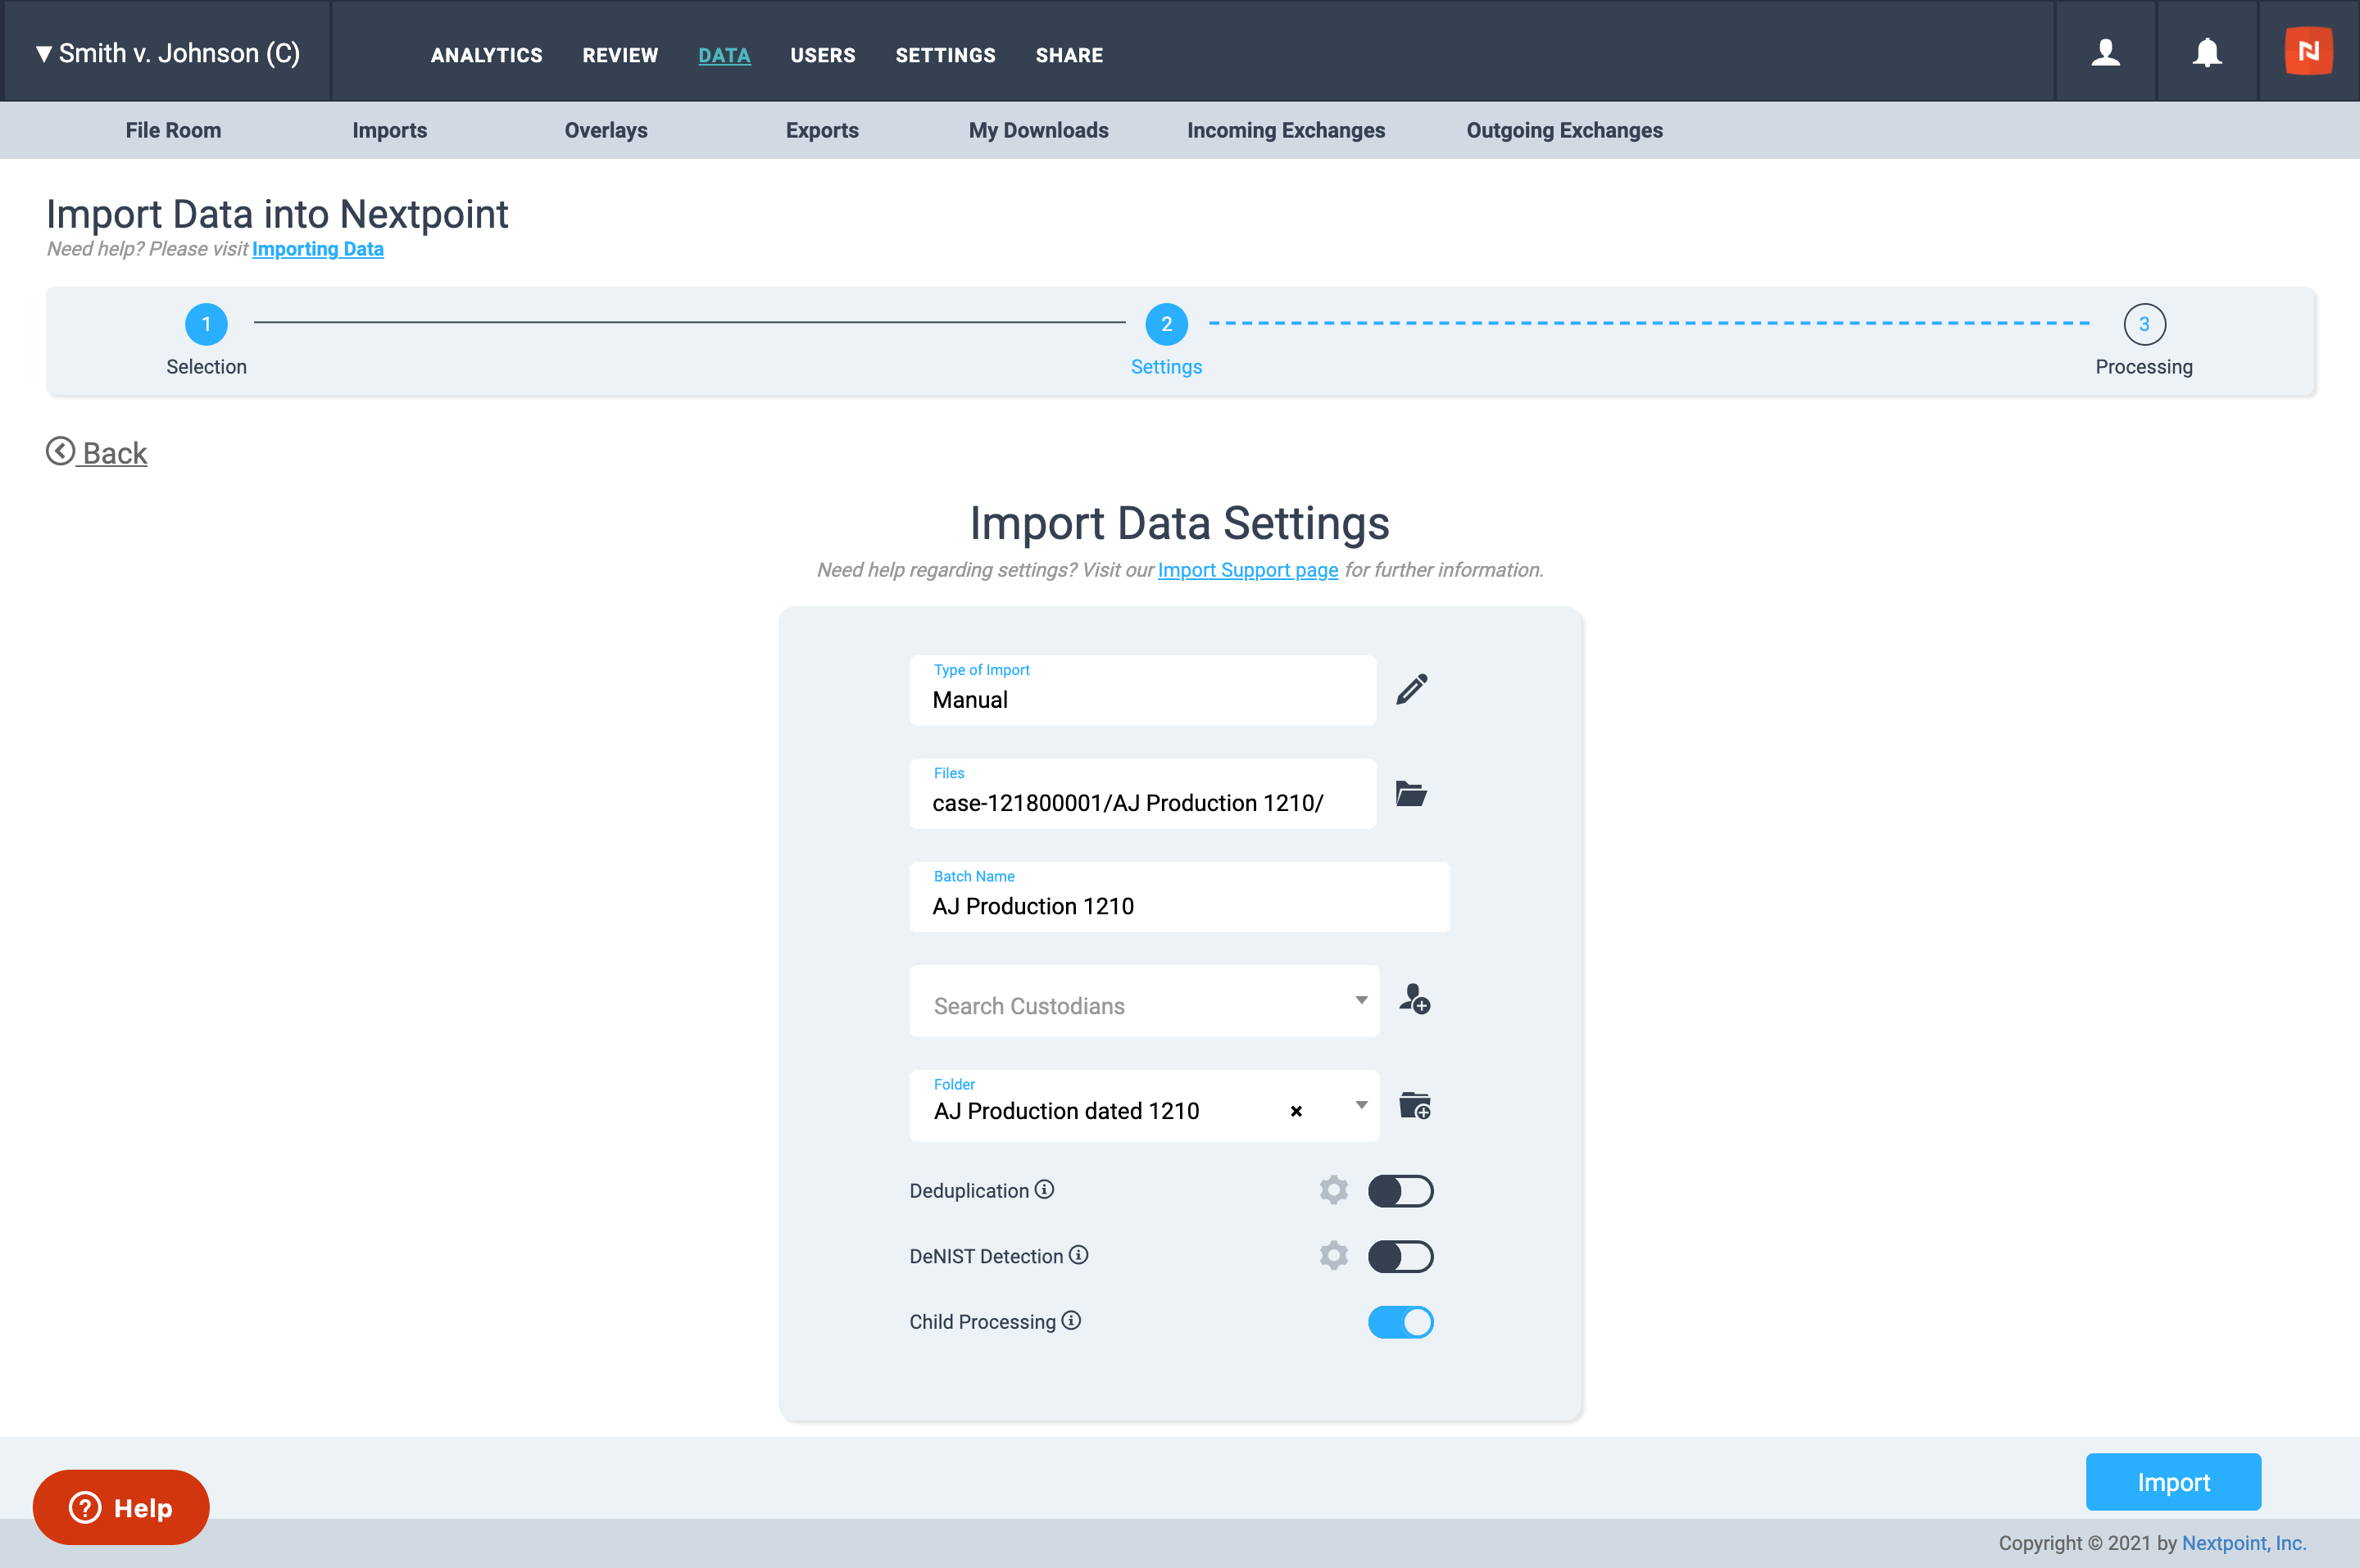
My Import Didn't Work, Why?
Every import is different, and sometimes even the smallest nuance can affect the outcome of your import. We have compiled a list of common import errors and solutions for general troubleshooting, and are further developing more specific troubleshooting options for produced data imports, specifically.
Once your Import is has completed processing, you will receive an email notification, and subsequently run “Family Linking" from your Batch Summary page. This is vital for visually establishing parent-email relationships in your import.
- You will receive an email notification stating your import is Complete. Click on the link contained within the email, or navigate back to Data Imports and click on the title of the batch you just imported to view the Batch Summary. Working in a Litigation database? Navigate here via More Data Imports.
- At the bottom right of your Batch Summary page, click
 . A sliding menu will appear with checkboxes & headers for Batch, User, Uploaded, Docs (batch number, importing user, upload date, batch document count), and a selection drop-down for your Linking Options.
- Select the batch(es) you would like to Family Link. You can link more than one batch at the same time.
- Select the fields Nextpoint should use to link parent emails to their attachments via the "Linking Options" drop-down. If you utilized Begattach/Endattach in Step 3/Family Relationships, select that option from the drop-down.
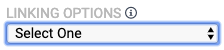
- Click "Family Link Documents"
- Confirm your selection by clicking "Run Family Linking"
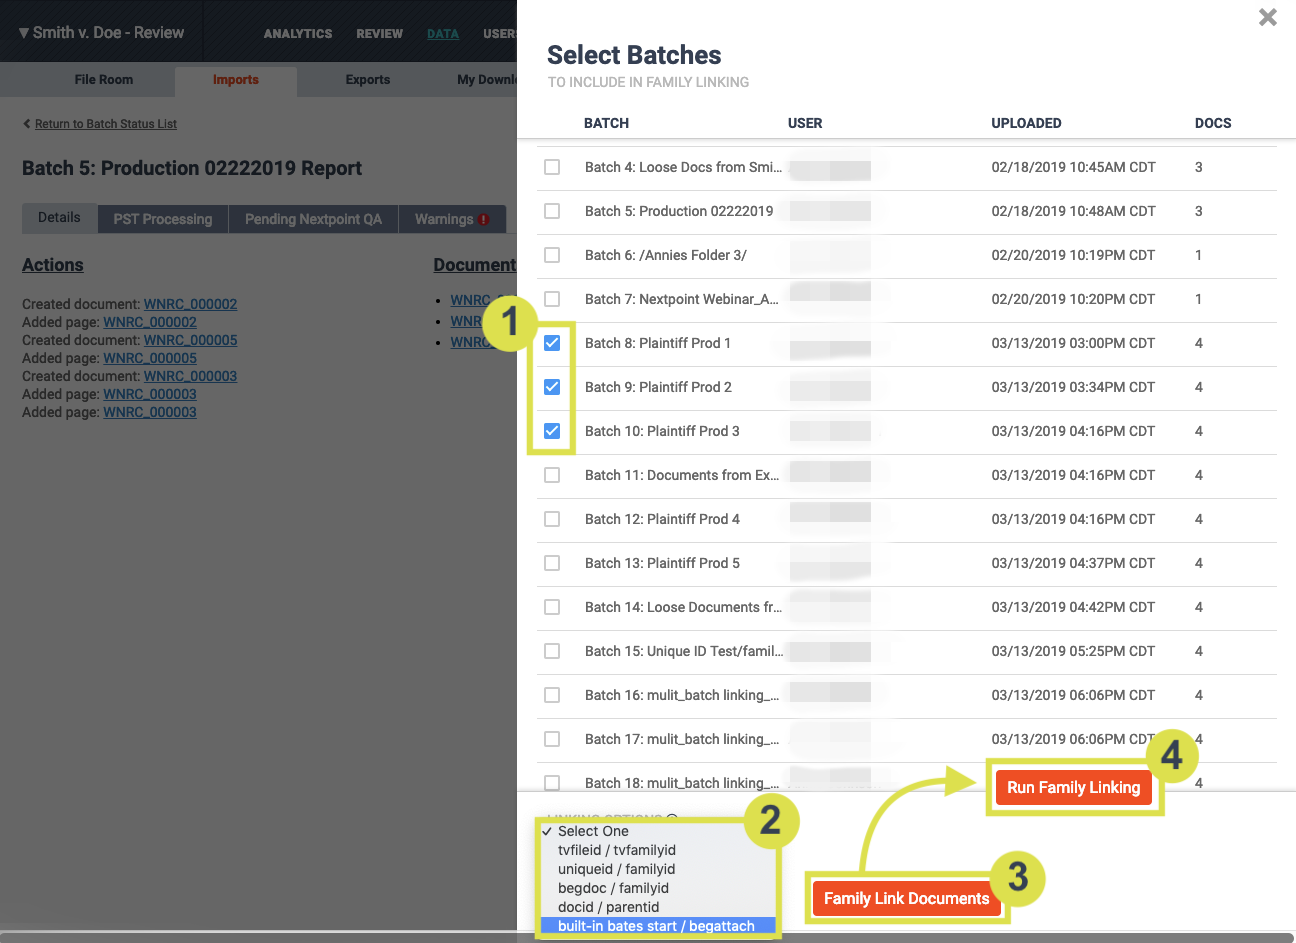
- Once linking is complete you will receive an email with a link back to the Batch Summary page where you can download and review a report to ensure the emails and attachments were linked without issue.

Have Questions?
Produced data and migration imports can be difficult. After reviewing the above Produced Data Import Approach, if you need additional training or assistance from the Nextpoint Engagement, please contact your Client Success Director or the Nextpoint Support Team.
Default Fields & Document Attributes
For any of the below-listed fields, you do not need to set up a new Field under SETTINGS > Coding. Instead, if you have a header value in Row 1 of your load file, make sure that the load file value matches the below default fields exactly.
Values can be imported by load file headers to the provided values. App Name indicates what your load file header should read. Visible vs. Hidden indicates if a field can be seen under SETTINGS Coding Fields (Visible), or if it isn't seen in the field list but can accept your load file information (Hidden).
| App Name | Visible vs. Hidden |
|---|---|
| Author | Hidden |
| Bates_Start | Hidden |
| Bates_End | Hidden |
| Bates_Range_Start | Hidden |
| Bates_Range_End | Hidden |
| BCC | Visible |
| CC | Visible |
| Created_Date_Time | Visible |
| Custodian | Hidden |
| Custodians | Hidden |
| Date | Hidden |
| Document_Author | Visible |
| Document_Last_Author | Visible |
| Document_Subject | Visible |
| Document_Title | Visible |
| Document_Type | Hidden |
| Document_Date | Hidden |
| Email_Author | Visible |
| Email_Received | Visible |
| Email_Sent | Visible |
| Email_Subject | Visible |
| Email_Thread_Index | Hidden |
| Encrypted | Visible |
| File_Name | Visible |
| File_Path | Visible |
| Image_File | Hidden |
| Image_Range_Start | Hidden |
| Image_Range_End | Hidden |
| Last_Print_Date | Visible |
| Mailbox_File | Visible |
| Mailbox_Path | Visible |
| Modified_Date_Time | Visible |
| Native_File | Hidden |
| Recipients | Visible |
| Root_Folder | Visible |
| Shortcut | Hidden |
| Tags | Hidden |
| Text_File | Hidden |
| Title | Hidden |
Important Field Notes:
- Custodian/Custodians are visible under Settings > Import > Custodians
- Have existing/historical Tags you want to migrate to Nextpoint's Additional Tags field? Your column header should read Tags and the values should be semicolon delimited (e.g. Bob Randolph; hard copy document; Production 1; 10/22/2019).
Protected System Fields
Data cannot be imported into any of the below fields because they are generated by the Nextpoint application.
If you’d like to map any of the below values into your database, you will be required to setup a field with a different name.
Note: Common fields replaced and suggested replacement values provided in parenthesis:
| Protected Field | Suggested Alternative |
|---|---|
| Filename | (use existing File Name) |
| Filepath | (use existing File Path) |
| batch | |
| batch_id | |
| batch_ids | |
| Bates | (use existing Bates_start and Bates_end as applicable) |
| Bates_stamped | |
| Confidentiality | (Conf_Status) |
| Confidentiality_Status | (Conf_Status) |
| Content_hash | (ContentHash) |
| Created_at | (use existing Created_Date_Time) |
| Created_at_gmt | (Created_Date_Time) |
| Created_on | |
| Delete_at_gmt | |
| Deposition_id | |
| Deposition_names | |
| Deposition_volume_id | |
| Display_name | |
| Doc_props | |
| Document_properties | |
| Domain | (EmailDomain) |
| Email_message_id | (MessageID) |
| Email_reply_id | (ReplyID) |
| Email_Thread | (ThreadID) |
| Es_exh_designations | |
| Es_tags | |
| Es_updated_at_gmt | |
| Exhibit_stamped_as | |
| Expansive_hash | |
| Export_ids | |
| File_extension | (Fileext) |
| File_size | (Size) |
| Has_markups | (Has_Annotations) |
| Has_native_placeholder | |
| Highlight_issues | (Annotation_Issues) |
| Highlight_notes | (Annotation_Notes) |
| Id | |
| Incoming_wire_id | |
| Issues | (Document_Issues); (DocIssues) |
| Marked_for_delete | |
| Non_imaged_placeholder | |
| Notes | (Annotations) |
| Npdcase_id | |
| Original_filename | (use existing File Name) |
| Outgoing_wire_ids | |
| Page_count | (Pgcount) |
| Privileged | (Isprivileged) |
| Privileged_status | |
| Redacted | (Isredacted) |
| Relevancy_Status | (Relevancy) |
| Responsive_Issues | (Resp_Issues) |
| Review_status | |
| Updated_at | (Timeupdated) |
| Updated_at_gmt | |
| Updated_on | |
| Verified_page_count | |
| Wire_transfer_tags |
How to Import Produced Data for Manual Import Type
Import Troubleshooting
Error Messages:
- "Incomplete PST file import/extraction."
- "Unable to extract unprocessable files from PST."
- "Email format was downgraded to plain text."
- "Extracted page count didn't match expectation."
- "File was too large to process."
- "Skipped document with invalid page range."
- "Skipped loadfile line for missing file."
- "Truncated data in..."
- "Unable to create document."
- "Unable to create page."
- "Your import reached an unexpected error."
- "Encoding error in load file, please convert to UTF-8."
- "Filtered duplicate file."
"Incomplete PST file import/extraction."
Same error as "Unable to extract unprocessable files from PST."
What does this mean?
Nextpoint is able to process most PST files. If you have received a PST Error in your Batch Report, there is corruption within the PST and at least one files has not been extracted correctly. The PST file most likely needs to be repaired and uploaded again.
What can be done to correct it?
To repair a PST you can follow this short tutorial from Microsoft: How to repair your Outlook PST. Please make sure to make a backup copy of the original PST file before attempting repair.
If the unextracted files within the PST have occurred in locations that are of no consequence to your review, (e.g. Calendar, Tasks, etc.) you may choose to ignore the errors and proceed. We urge you to please review the errors carefully before continuing.
If you need additional assistance, please contact Nextpoint support at support@nextpoint.com.
Warning: If you need Nextpoint to help repair PST errors and reprocess all the files in the PST, do not start your review until we re-import the new batch.
"Email format was downgraded to plain text."
What does this mean?
These emails contain anomalies that prevented Nextpoint from processing their HTML code normally. When this happens, Nextpoint processes the plain text version of the email instead.
Frequently, this leads to successful processing of the basic text content of these emails, but without embedded images or styling.
What can be done to correct it?
If the styling or embedded images are not important to your review, it may be OK to ignore this error. However, you should first spot-check these emails to verify that their text is intact.
If the content of these emails does not look acceptable to you, please contact our Client Success team at support@nextpoint.com to inquire about reprocessing them.
"Extracted page count didn't match expectation."
What does this mean?
Occasionally, this is not a serious issue. For example, an Excel spreadsheet may have different page counts on different computer print settings.
In more common scenarios, the document may be corrupt, password protected or too large or complex to be processed. The document was still imported into Nextpoint, but may not contain any content.
What can be done to correct it?
Download and attempt to open the native outside of Nextpoint.
- If the document opens and contains content: Try to "print to PDF" the documents pages and "Add pages" to your import so that you can review the pages in Nextpoint.
- If the document does not contain any content: Try to re-import the original source file and add those pages to the document later on.
- If the file is corrupt: Corrupt files typically report a size of 0KB or will trigger an error message when you try to open them. Sometimes files are corrupted during a transfer from one disk to another. Ask your source to re-send the file or provide a better copy.
- If the file is password protected: Unlock the file on your computer and upload a copy without password protection. Ask the custodian or your client's IT administrator for the password.
Note: If an image of the file isn't necessary, an image-exception-placeholder can also be substituted for the exhibit.
"Files was too large to process."
What does this mean?
The file size or resolution is unusually large, and it isn't practical for review software to image it.
What can be done to correct it?
Frequently, our clients decide to use a placeholder for these documents and review them in their native format by downloading them to a local computer.
"Skipped document with invalid page range."
Same error as "Skipped loadfile line for missing file."
What does this mean?
The image range start/end (or Bates start/end) did not make sense sequentially (eg: DAN00076 - DAN00043, or DAN00076 - JIM00084). It is most likely a loadfile error.
What can be done to correct it?
Correct the image range of the specified document(s) and create a new loadfile containing the impacted rows.
"Truncated data in (field name)."
What does this mean?
A field's value exceeded the character limit for that particular field and thus the text was not fully populated. This warning is applicable to any text field (recipients, cc, bcc, shortcut, custom text fields etc). Further information on the character limits for various field types is located here >>.
What can be done to correct it?
If you are importing native files and determine it is important to populate more than the character limit for any particular field, please contact your Account Director or our Services team at support@nextpoint.com for options to expand the character limit.
If you are importing produced data with a load file, and anticipate certain fields to contain a lot of text, you can avoid this by setting those fields as the “Paragraph” field type, which is less susceptible to truncation.
"Unable to create document."
What does this mean?
There was most likely a system or network error during processing.
What can be done to correct it?
Import the file again. If you get the same message, try importing the file using a loadfile that includes any desired coding information.
"Unable to create page."
What does this mean?
There was most likely a system or network error during processing. As a result, the document was imaged, but does not appear to include all its original pages.
What can be done to correct it?
Examine the loadfile for this import and locate the document with missing pages. Import these pages into Nextpoint, where they can be added to the previously imaged document and positioned accordingly.
"Your import reached an unexpected error."
If you receive a notice of error, and the screen displays "Your import reached and unexpected error", this message is indicative of an issue with the data being imported. It can be a number of things that cause this to happen, each unique to the data set.
If you receive this error with corresponding "no anomalies message", please contact support@nextpoint.com for further data assessment.
"Encoding error in load file, please convert to UTF-8."
If you receive this warning, Nextpoint was unable to parse your load file for processing due to the encoding.
To resolve, please save your load file with UTF-8 Encoding. Open your load file in a Text Editor (Sublime text shown below) > File > Save with Encoding > UTF-8. Preferred is UTF-8 without BOM, but UTF-8 with BOM should also resolve the issue.
Note: The steps to update encoding may vary depending on the text editor you are using. If not intuitive in your text editor of choice, locate instructions by searching in any browser for "how to update encoding in [insert text editor name]".
Once saved, upload to File Room in the same location where your original load file is located. If name the same, the correctly encoded load file will overwrite your initial load file.
"Filtered duplicate file."
If you receive the "Filtered duplicate file" warning, you've attempted to import duplicate files in the same import batch. Regardless of your deduplication settings, you are not able to import the same file multiple times in the same batch. The file will be imported once and any relevant metadata that is different (like file path) will be merged on import. If you need to import the same file multiple times, you will need to import it in separate batches.
Common Import Warnings and Solutions
SMF data (Text Message, Slack, Teams, etc.) presents unique processing challenges compared to traditional email or document collections due to threading structures, time-based conversation flows, and inline attachments. This guide will help you or your collection partner prepare SMF data for seamless import into Nextpoint.
Note: Nextpoint does not currently support importing SMF data directly (often in Relativity Short Message Format, RSMF structures). This guide is applicable when working with collections from Cellebrite, Magnet Axiom, or similar forensic tools that can structure the data as image files/attachments with a load file structure.
Depending on the complexities of your data, it may be beneficial to consult with one of Nextpoint's data experts before beginning your import. Contact your Client Success Director to schedule a consultation.
Working with Collection Partners
If you're working with a collection partner to capture SMF data, share the following requirements:
For Forensic Collection
Use tools capable of preserving conversation threading (e.g., Magnet Axiom, Cellebrite, X1 Social Discovery)
Maintain conversation context by grouping messages into logical threads or channels
Capture complete participant lists and timestamps
For Conversion/Processing
Convert message threads to PDF format while preserving chronological order
Consider breaking lengthy conversations by 24-hour periods for reviewability
Extract all attachments as separate files
Generate a load file following the structure outlined in this article
Populate tvfileid and tvfamilyid fields correctly to enable family relationships.
Recommended Data Format
For successful import of collected SMF data into Nextpoint, you will need the following components:
-
Message threads should be converted to multi-page PDF files
Each PDF should represent a conversation thread/channel broken into manageable segments
-
Time period options for breaking up threads:
24-hour periods (most common for lengthy threads)
Full thread/channel history (for shorter conversations)
Weekly or monthly periods (for very long-running conversations)
PDFs should be placed in an IMAGES folder
File naming convention: Use a consistent identifier (For example: AX0000116.pdf, AX0000137.pdf)
Any attachments shared within message threads (images, files, documents, etc.) should be extracted as individual files
Attachment image files should be placed in the IMAGES folder
Native/extracted attachment files should be placed in a NATIVES folder
-
File naming: Attachments can use any unique filename (e.g.,
AX0000130_Attach.png), but the filename listed in your load file must exactly match the actual filename in the File Room, including the file extension.Suggested naming convention: Use the parent document ID plus "_Attach" (e.g.,
AX0000130_Attach.png)
A comma-separated value (CSV) file containing document-level metadata
Should include the metadata fields outlined below
Recommended Load File Structure
Your load file should be formatted as a CSV file with the following fields.
Required Fields
image_file – The only truly required field for import
tvfileid and tvfamilyid – Required only if you want to establish family linking between conversations and attachments
Optional Fields
All other fields are optional but recommended for organizing and searching your SMF data effectively.
Core Fields
| Field Name | Description |
|---|---|
| image_file | Relative path to the image file (REQUIRED) |
| tvfileid | Unique document identifier (required for family linking) |
| tvfamilyid | Parent document identifier for establishing relationships (required for family linking) |
| conversation_id | Can be leveraged to denote a conversation thread |
| title | Document title/filename |
| native_file | Relative path to the native file (for attachments only; leave blank or use the same path as image_file for conversation PDFs) |
| start_date | Beginning timestamp of conversation segment |
| end_date | Ending timestamp of conversation segment |
| participants | Semicolon-separated list of participants |
| custodians | Primary custodian/data source |
Establishing Family Relationships
For SMF data, family relationships are critical to maintaining the connection between conversation threads and their attachments:
Parent documents (conversation PDFs) should have matching tvfileid and tvfamilyid values.
-
Attachments should have:
Their own unique tvfileid
The parent conversation's ID in the tvfamilyid field
Example:
Pre-Import Checklist
Before importing your SMF data into Nextpoint:
1. Add Custom Fields
These can also be created using the Load File Mapper upon import.
Navigate to Settings > Coding > Fields in your Nextpoint database and add the following fields as Freeform type:
tvfileid
tvfamilyid
participants
start_date
end_date (if not already present)
Note: The tvfileid and tvfamilyid fields are essential for establishing family relationships and conversation threading between parent documents and their attachments.
2. Verify Load File Format
Ensure your load file is saved as CSV (comma-separated values)
Verify that all file paths in the load file match the file room paths relative to where the load file is uploaded
Confirm that tvfileid and tvfamilyid fields are populated correctly
3. Organize Folder Structure in the File Room
Create a folder structure that mirrors the paths in your load file:
Production_Folder/
├── IMAGES/
│   ├── AX0000137.pdf (conversation thread)
│   ├── AX0000130_Attach.png (attachment image)
│   └── ...
├── NATIVES/
│   ├── AX0000130_Attach.png (attachment native)
│   └── ...
└── LoadFile.csv
Note: The NATIVES folder should only contain extracted attachments and files, not the conversation thread PDFs.
4. Place Load File at Root in the File Room
Place your CSV load file at the root level of your production folder (not inside the IMAGES or NATIVES folders).
Import Process
Step 1: Initiate Import
Navigate to the uploaded folder in File Room.
-
Click the blue Import button to the right of your root-level folder.
Because Nextpoint detects an IMAGES folder within your root folder, it will automatically recognize this as produced/processed data and utilize the Load File Mapper to reconstruct the documents using your CSV load file.
Step 2: Configure Import Settings
-
In the Load File Mapper, map your fields:
Use image_file as your Image Mapping field
Map document identifiers (tvfileid, tvfamilyid) if using family linking
Map Native File for attachments
Map any additional metadata fields you're including (start_date, end_date, participants, custodians, etc.)
Click the blue Import button in the bottom right of the import screen to begin processing.
Step 3: Apply Family Linking
Important: After your import completes successfully, you'll need to apply family linking to visually connect parent conversation threads to their child attachments.
Navigate to Data > Imports (More > Data > Imports in a Litigation database)
Click on your completed import batch name
On the Batch Report page, locate and click the Family Link button
Nextpoint will process the tvfileid and tvfamilyid relationships from your load file to establish parent-child connections
Additional Support
Produced data and SMF imports can involve unique complexities depending on the collection method and platform. The Nextpoint Data Strategy and Services teams are here to help ensure your data imports are successful and review-ready. Please contact your Client Success Director or email support@nextpoint.com to set up a consultation.
Related Articles
Importing Short Message Format (SMF) Data into Nextpoint
Why did my PST import with errors and/or warnings? Is there anything I can do to avoid them?
Because of the complexity of mailboxes and the variety of formats they can be exported from, PSTs are notoriously error prone. Some issues are unavoidable but these steps can minimize issues:
- Import PSTs one at a time.
- Look into the PST processing tab.
"Missing" errors could mean:
- We don't support the extraction of certain file types from PSTs (things like Teams Messages and PersonMetadata often show as extraction errors).
- There is some corruption in the PST that caused our processors to skip those files.
- There is an error on the PSTs index and all files were actually extracted.
To address these extraction "errors" we recommend the following:
- Download the PST
- Open it in Outlook or another compatible PST processor.
- Confirm the file count in the folder the "missing" files are from.
- Determine if the files in this folder could be relevant to your case
- Extract the missing files from that folder (or the entire folder if they cannot be individually identified)
- Import the additional individual emails into your database (with deduplication on if importing the entire folder).
We can also complete these steps for you as a billable service. Please contact support@nextpoint.com for details.
Why do several of the "emails" extracted from my PST appear blank?
Email files that appear to be blank often consist of iCalendar/vCalendar or Contact files. These files are atypical and because of their unusual formatting, we do not fully support the extraction of all of the metadata that may appear in the files themselves. To check this, click the three-dot menu from the document viewer, "view original files" and download it. If the native still appears blank after download, click into the properties of the email and you may notice mention of calendar invites or contacts.
It is possible to have a custom service project done that would convert these to a plain text file that will be imaged and can be searched, similar to what you see below. Please reach out to support@nextpoint.com for more information.
What can be done about Teams Messages that do not extract on import?
Though we do not currently extract teams messages from PST files on import. However, it is possible to extract them separately as loose files and import them into your database.
To do this, open the email file in outlook and find the folder called "TeamsMessagesData". Select all of the items and copy/paste them into a folder on your local computer. You can then upload that folder to the file room and import.
Why is the subject metadata in my grid view blank?
Sometimes emails will come in without without a subject or title field. This can happen with atypical or potentially corrupted files, but you can still click into the document and download the original file if it hasn't imaged within our system. We are working on automatically correcting these blank subject fields to reflect "<no subject>" and can run a script through your import to correct this so that every document is clickable. Another workaround to address this issue is to add the Nextpoint ID to your grid view (through settings) which you can then click on to view the document in question.
Why do the PST files appear as documents in my database and why is this file "blank"?
Similar to if you imported an email with an attached zip file, Nextpoint preserves container files as their own "documents" while also extracting their contents. They are duplicative of the extracted contents and generally are NOT be produced along side their contents as they are both duplicative and could contain information that is otherwise withheld as non-responsive or privileged. These files can be removed from review folders or databases without affecting the status of their imported contents. They appear "blank" because they are simply the shells that contain other documents (which are extracted and imported).
What do errors/warnings related to PST imports mean and how should I address them?
Check out this support article for details about PST import errors and warnings.
Common PST Questions & Answers
Overlay Results Reporting
After any Overlay processing is complete, you will be notified of the processing results in two different locations.
The first, is the status within the main Overlay batch list, located via DATA > Overlays (MORE > Data > Overlays in a Litigation database). Here, the statuses will read as green Complete, yellow Complete With Errors, or red Error.
Anything marked with a Complete With Errors or Error status should be reviewed for further action.
The second location where you can gather additional details on the processing error is within the Overlay batch details page. This can be accessed by clicking on the name of the batch > the Overlay Errors tab.
Here, you will find a description of what caused the error. Outlined below is a list of the various types of errors and how to address in your Nextpoint Discovery or Litigation database.
Table of Contents
- Skipped Duplicate Document in load file
- Load file row did not match any documents in the database.
- An Unknown error occurred. Please check the load file formatting.
- Encoding error in load file. Please convert to UTF-8.
- Unable to parse the load file. Please check the formatting.
Complete with Error Messages
A Yellow Complete with Error Overlay status indicates that part, but not all, of your overlay processed as expected. The errors will need to be reviewed and addressed as necessary.
"Skipped Duplicate Document in load file."
What does this mean?
Your overlay file included the same document key more than once.
What is a document key? A document key provides Nextpoint with instructions for locating documents in your database which will be updated with information during the overlay. This will always be a Bates start number or Nextpoint Document ID.
Therefore, if your overlay file contains varying information for the same document (key), Nextpoint cannot determine which information should be prioritized. We will overlay the first instance of the document key we encounter, but the second instance will be skipped and the overlay processing will continue on.
What can be done to correct it?
Review the Overlay batch details page, and specifically the Overlay errors tab contained within.
For any document key reported as a duplicate, verify the desired data was overlaid. If so, no further action is required. If not, we recommend you prepare a paired down overlay file of only the document key which does not have the correct information and run an additional overlay.
"Load file row did not match any documents in the database."
What does this mean?
Your overlay file included a document key which does not exist in your database.
What is a document key? A document key provides Nextpoint with instructions for locating documents in your database which will be updated with information during the overlay. This will always be a Bates start number or Nextpoint Document ID.
Therefore, if the document key cannot be located during processing, it is not possible to overlay information.
What can be done to correct it?
Review the Overlay batch details page, and specifically the Overlay errors tab contained within.
For any document key reporting as not found, verify the information (spelling, number, etc...). If there was a typo error throughout the entire overlay file, we recommend you modify your overlay file and rerun. If the document key does not exist in the database, it is worth evaluating further where that information should have gone and ultimately preparing a modified overlay file which will be rerun in a separate overlay batch.
Please Note: If your Overlay batch details page reports "Load file row did not match any documents in the database. Key field: . [EMPTY ROW]", it is likely your overlay file contained what appears to be blank rows, but in fact, there are empty cells which are read by our processors and thus reported as a non-match. If you encounter the aforementioned warning, we recommend you review the full processing report as illustrated below. If the only error is the empty rows, you can ignore the warning and move forward with your review.
Error Messages
A red Error Overlay status indicates that your overlay did not process. The root cause of the error will need to be addressed and your overlay run again.
"An Unknown error occurred. Please check the load file formatting."
What does this mean?
Likely a network timeout issue, but the root cause is unidentifiable.
What can be done to correct it?
Please retry your Overlay. If doing so does not resolve the error, please contact support@nextpoint.com for further data assessment.
"Encoding error in load file. Please convert to UTF-8."
What does this mean?
If you receive this warning, Nextpoint was unable to parse your overlay file for processing due to the encoding.
What can be done to correct it?
To resolve, please save your overlay file with UTF-8 Encoding. Open your load file in a Text Editor (Sublime text shown below) > File > Save with Encoding > UTF-8. Preferred is UTF-8 without BOM, but UTF-8 with BOM should also resolve the issue.
Note: The steps to update encoding may vary depending on the text editor you are using. If not intuitive in your text editor of choice, locate instructions by searching in any browser for "how to update encoding in [insert text editor name]".
Once saved, upload to File Room in the same location where your original overlay file is located. If name the same, the correctly encoded overlay file will overwrite your initial overlay file.
"Unable to parse the load file. Please check the formatting."
What does this mean?
If you receive this warning, Nextpoint was unable to parse your overlay file. It could be due to the encoding as described in the aforementioned error, but it can also be indicative of an issue with the data being imported. It can be a number of things that cause this to happen, each unique to the data set.
What can be done to correct it?
To resolve, please first try to save your overlay file with UTF-8 Encoding and rerun your overlay. Open your load file in a Text Editor (Sublime text shown below) > File > Save with Encoding > UTF-8. Preferred is UTF-8 without BOM, but UTF-8 with BOM should also resolve the issue.
Note: The steps to update encoding may vary depending on the text editor you are using. If not intuitive in your text editor of choice, locate instructions by searching in any browser for "how to update encoding in [insert text editor name]".
Once saved, upload to File Room in the same location where your original overlay file is located. If name the same, the correctly encoded overlay file will overwrite your initial overlay file.
If the above does not resolve the error, please contact support@nextpoint.com for further data assessment.