Native Imports and Settings
- How to Import Data in Nextpoint
- Generating a File Listing for Load File Creation
- Understanding Deduplication
- Collection Best Practices & Checklist
- Import Types, Import Data Settings & Deduplication
- DeNIST Settings
- Assigning a Custodian to Your Data
- Using a Load File to Populate Folders & Responsive Issues
- Import Batch Status Page
- Building a Simple Load File
- Compiling a List of Files to Create a Load File
- How to Set Up an Email Attachment Index
This article covers importing data in both NextGen and Legacy databases. Use the tabs below to switch between instructions.
Which database type should I follow?
If you see in the top left next to the name of your database, follow the NextGen steps below. Otherwise, switch to the Legacy tab.
How to Import in NextGen Databases
Table of Contents
- Upload data to Nextpoint File Room
- Select files for import from Nextpoint File Room
- Import details
- Initiate import
- Review import results
Imports available to users with Advanced user permissions, only.
1. Upload Data to Nextpoint File Room
The first step is to upload your data to the File Room, which is a secure data repository with a high-speed multi-file uploader.
To get started, upload your data to the File Room:
It is important to note, if you are importing Produced Data, before uploading to the File Room, we recommend you follow our similar topic which covers How to Import Produced Data with a Load File
-
Navigate to the File Room: In Discovery databases, via DATA → File Room. In Litigation, via MORE → Data → File Room.
-
Upload your files to the File Room via:
Upload a folder of files via Drag & DropThe primary, and recommended, function for uploading data to your File Room.
Select the folder(s) on your desktop, thumb drive, or other location, and Drag & Drop into your File Room. All contents and subdirectory information will be maintained.
Upload loose files via Drag & DropWithin the File Room, click the green Create Folder name your folder and select OK.
Click into your newly created folder, and drag and drop your loose files into the folder location.
Maintaining an organizational system for your data uploads will help ensure you can best track your various imports as time progresses.
Request file upload from third partyYou can securely Request Files from any third party (clients, counsel, etc...) from your Nextpoint File Room. It is a simple process in which you ("requestor") request files from a specified third-party, the "recipient" of that request receives a secure link to upload their respective files, and then you can access the uploaded files right away.
Read more on requesting from third parties here >>
-
After initiating your upload, the status of the upload will be displayed on-screen. Important: do not navigate away during an active upload. Interrupted uploads must be deleted and restarted.
Need to keep working on other action items? Open a new tab, or duplicate your current tab and you are set!
Read our File Room Best Practices here >>
2. Select Files for Import
Once uploaded, select your data from the File Room to start the guided import sequence.
- Click the blue Import button next to any folder, or
- Check boxes next to individual files and click Import Selected.
Alternative option for selecting files for import
While selecting files for Import from the File Room, as described above, is the recommended workflow for initiating your imports, you may also initiate your import via DATA -> Imports -> New Import:
The difference you will notice in starting from this location will be the added Import Type selection in Step 1.
Read more on Import Types here >>
3. Import Details
Once your files have been selected for import, you will be navigated to the Import Details page. Here, you will verify and/or outline settings applicable to your current import.
Importing Produced Data with a Load File? Reference our topic on importing produced data here >>
Import Data Settings include the following:
- Type of Import: If you initiated your import from the File Room, verify the Type of Import selected. To modify the import type, click the Back button and you will be returned to Step 1 of the sequence to make your selection.
-
Selected Files for Import: If you initiated your import from the File Room, verify the selected files. To modify your selection, click the folder icon
to access the pop-up file picker which is populated by the File Room contents.
- Batch Name: Recommended for most efficient tracking once the data has been imported.
-
Assign Custodian on Import: Search list of existing custodians or add new via the profile + icon
.
-
Add to Folder on Import: Search list of existing folders or add new via the folder + icon
.
-
Deduplication and DeNIST Detection: Pre-set recommendations for Deduplication and DeNIST settings will be populated based on which type of data is detected from the File Room.
If you would like to modify the recommended settings, make sure the applicable toggle is turned onand click the gear to open the settings pop-up.
Complete list of Import Types and associated Deduplication + DeNIST settings outlined below:
| Import Type | Deduplication Setting | DeNIST Setting |
|---|---|---|
| Manual | Dedupe - OFF | DeNIST - OFF |
| Single Mailbox | Dedupe - ON , File Match - ON , Context - ON | DeNIST - OFF |
| Multiple Files | Dedupe - ON , File Match - ON , Context - ON | DeNIST - ON , Tag-ON |
| Production with load file | Dedupe - OFF | DeNIST - OFF |
Read more on Import Data Settings here >>
4. Initiate Import
Click the blue Import button to start the import. Monitor progress on the Batch Details page. You will receive an email notification when complete.
5. Review Import Results
- If you imported produced data: run Family Linking.
- Check import status & resolve any processing errors. If issues exist, resolve early to avoid later complications.
- Verify folder assignment: If no Bates numbers exist, files will be foldered in date/family order.
How to Import in Legacy Databases
Table of Contents
- Upload data to Nextpoint File Room
- Select files for import from Nextpoint File Room
- Confirm Import data settings
- Initiate import
- Review import results
Imports available to users with Advanced user permissions, only.
1. Upload Data to Nextpoint File Room
The first step to importing in Nextpoint, is to upload your data to the File Room. File Room is a secure ‘data-bank’ for storing all your confidential files in your database, and comes with a built-in, high-speed, multi-file uploader to get data into Nextpoint quickly and efficiently.
To get started, upload your data to the File Room:
It is important to note, if you are importing Produced Data, before uploading to the File Room, we recommend you follow our similar topic which covers How to Import Produced Data with a Load File.
-
Navigate to the File Room: In Discovery databases, via DATA File Room. In Litigation via MORE Data File Room.
-
Upload your files to the File Room via one of the four following options:
Upload a folder of files via Drag & DropThe primary, and recommended, function for uploading data to your File Room.
Select the folder(s) on your desktop, thumb drive, or other location, and Drag & Drop into your File Room. All contents and subdirectory information will be maintained.
Upload loose files via Drag & DropWithin the File Room, click the green Create Folder name your folder and select OK.
Click into your newly created folder, and drag and drop your loose files into the folder location.
Maintaining an organizational system for your data uploads will help ensure you can best track your various imports as time progresses.
Request file upload from third partyYou can securely Request Files from any third party (clients, counsel, etc...) from your Nextpoint File Room. It is a simple process in which you ("requestor") request files from a specified third-party, the "recipient" of that request receives a secure link to upload their respective files, and then you can access the uploaded files right away.
Read more on requesting from third parties here >>
-
After you initiate your upload in the step above, the data will begin to upload and the status of the upload will be displayed on your screen.
It is important you do not navigate away from the File Room during an active upload. This will cancel the ongoing upload, and you will need to delete all files from the File Room which were interrupted during upload and begin again.
Need to keep working on other action items? Open a new tab, or duplicate your current tab and you are set!
Read our File Room Best Practices here >>
2. Select Files for Import
Once your data has been successfully uploaded to the File Room, you can select that data directly from the File Room to initiate the guided import sequence.
To select your data for import:
- Click the blue Import button next to any folder in the File Room, or
-
Check boxes next to individual files and click Import Selected.
When initiating your import from the File Room, Nextpoint will detect the type of data you selected (single mailbox, loose files, or produced data with a load file) and will automatically set such in the first step of the guided import sequence.
Alternative option for selecting files for import
While selecting files for Import from the File Room, as described above, is the recommended workflow for initiating your imports, you may also initiate your import via DATA Imports.
The difference you will notice in starting from this location will be the added Import Type selection in Step 1. After making this selection, you will meet the 'Import from File Room' sequence at Step 2, Import Data Settings.
Read more on Import Types here >>
3. Import Data Settings
Once your files have been selected for import, you will be navigated to the second step of the import sequence, Import Data Settings. Here, you will verify and/or outline settings applicable to your current import.
Importing Produced Data with a Load File? Reference our topic on importing produced data here >>
Import Data Settings include the following:
-
Type of Import: If you initiated your import from the File Room, verify the Type of Import selected. To modify the import type, click the pencil icon
and you will be returned to Step 1 of the sequence to make your selection.
-
Selected Files for Import: If you initiated your import from the File Room, verify the selected files. To modify your selection, click the folder icon
- Batch Name: Recommended for most efficient tracking once the data has been imported.
-
Assign Custodian on Import: Search list of existing custodians or add new via the profile + icon
-
Add to Folder on Import: Search list of existing folders or add new via the folder + icon
-
Deduplication and DeNIST Detection: Pre-set recommendations for Deduplication and DeNIST settings will be populated based on which type of data is detected from the File Room (or selected in Step 1).
If you would like to modify the recommended settings, make sure the applicable toggle is turned on
Complete list of Import Types and associated Deduplication + DeNIST settings outlined below:
| Import Type | Deduplication Setting | DeNIST Setting |
|---|---|---|
| Manual | Dedupe - OFF | DeNIST - OFF |
| Single Mailbox | Dedupe - ON , File Match - ON , Context - ON | DeNIST - OFF |
| Multiple Files | Dedupe - ON , File Match - ON , Context - ON | DeNIST - ON , Tag-ON |
| Production with load file | Dedupe - OFF | DeNIST - OFF |
Read more on Import Data Settings here >>
5. Initiate Import
After the aforementioned steps are complete, click blue Import button at the bottom right of the Import Data Settings page.
This will initiate import processing and navigate you to the Batch details page. You will receive email when processing of the import is complete.
5. Review Import Results
Prior to beginning work with your imported data, it is strongly encouraged you review and verify your import results once you receive the email notification that your import is complete.
- If you imported produced data, first run Family Linking on the import batch. This will ensure any parent emails and their attachments are associated in the database.
- Check import status & resolve any processing errors. Making sure to resolve any issues as early as possible will mitigate a lot of clean up later on when you may be in a time crunch.
- Verify any folder assignment outlined in the Import Data Settings was accurately applied. To do so, navigate to the REVIEW or DOCUMENTS tabs (in Discovery and Litigation, respectively), and ensure the document count is expected and files are in Bates order. If no Bates, files should be organized in the folder in chronological order.
Import FAQs
- What file types does Nextpoint accept?
- Is there a restriction on the size of my files?
- Do I have to load by custodian?
- Import times seem to vary, why is that?
- How do I check my import’s status?
- What does my error mean?
- Why are my email times displayed in UTC (Coordinated Universal Time) when imaged in Nextpoint?
- Why is there a load file in my File Room after I imported loose files?
How to Import Data in Nextpoint
OPTION A (If all files are in a single folder):
- Navigate to the source folder in Windows Explorer.
- Press Ctrl+A to select all the items.
- Hold down the Shift key, right-click on the selection and choose Copy as Path.
- Open your spreadsheet program and, paste (Ctrl+V) the list to it
OPTION B:
- Open a command prompt on your computer
- CD into the folder with the files (or the folder that contains subfolders of files) by typing “cd “ and pasting in the path to the folder from the File Explorer.
- Type the command:
dir /a /s /b > FILES.csvGenerating a File Listing for Load File Creation
Deduplication at the time of import prevents existing documents and email families from entering your database multiple times. The deduplication settings selected in the import workflow determine the definition of 'Duplicate' for the import batch at-hand.
When deduplication is turned off at the time of import, no deduplication will occur and all files will be imported.
NextGen Deduplication Experience
Deduplication has been simplified in NextGen processing. Instead of configuring file match and context criteria, you now only choose whether deduplication is on or off during import.
- Deduplication OFF: All copies of files (including duplicates already in the database) are imported as separate documents. Exact copies can still be viewed in the Related Documents panel.
- Deduplication ON: Files are evaluated using MD5 hash matching. Emails are checked by MD5 hash or Message ID. Matching files are treated as duplicates and only one copy is retained in the database.
- Family-level deduplication: Attachments are deduplicated within their family. If the same attachment exists under a different parent email, it will be treated as a new document.
- Metadata handling: When duplicates are merged, select file path and mailbox metadata fields are concatenated. Other metadata and custom fields remain unchanged.
- Optional BCC merge: A BCC merge option allows blind-copy recipients from duplicate emails to be combined into a single record (the document image will still only display the initial BCC value).
The information below reflects the legacy deduplication experience and may differ from what you see in NextGen databases.
How do I set Deduplication Settings?
When importing data via, Nextpoint will make pre-set recommendations for Deduplication settings in Step 2 of the import workflow. The dedupe selections will be populated based on which type of data is detected from the File Room (or selected in Step 1).
If you would like to modify the recommended settings, make sure the applicable toggle is turned ON and click the gear to open the settings pop-up.
Location of Deduplication Settings
How to Modify Recommended Deduplication Settings
Upon clicking on the gear icon , you will be presented with the option to toggle File match criteria and Context Criteria ON
or OFF
. Read more below on how File Match and Context Criteria factor into the deduplication process.
Default Deduplication Settings per Import Type
Outlined below is a list of the various import types and their associated deduplication settings:
| Import Type | Deduplication Setting | Image from Import Data Settings |
|---|---|---|
| Manual | Dedupe - OFF | |
| Single Mailbox | Dedupe - ON , File Match - ON , Context - ON |
|
| Multiple Files | Dedupe - ON , File Match - ON , Context - ON |
|
| Production with load file | Dedupe - OFF |
How does Deduplication work?
FIGURE 1
INITIAL PROCESSING
1 | First, you queue your files for processing by initiating an import. See the three different file types queued for processing on the far left in Figure 1 (above).
2 | Once you initiate an import, Nextpoint begins processing by extracting files from their containers (zips, pst, box), extracting any attachments from their parent emails, and extracting metadata.
FILE MATCH CRITERIA
3 | Next, is the First Deduplication Pass on all three file types where we look for a matching expansive hash for all the file types.
- If a loose file, expansive hash is the MD5 hash value.
- If an email family, expansive hash is formulated from the MD5s of all members of the email family.
Once an expansive hash is identified, we compare to other files being processed and existing in the database. Any matches are placed in a Dedupe Queue. Loose files without a match are imported.
4 | Also during the First Deduplication Pass, all remaining email files not placed in the dedupe queue due to matching expansive hash are checked for matching Message ID's.
Again, we look for matches against what already exists in the database and other files currently being processed. If we find a matching set, we add to the Dedupe Queue. If no match is found, the file is imported.
Note: Turn File Match Criteria ON for more aggressive deduplication using expansive hash and email message ID, as describe below. Turn OFF
to deduplicate more conservatively and only consider Content Hash matches duplicates.
CONTEXT CRITERIA
5 | Next, we address the Dedupe Queue.
- If Context is OFF, we take everything in the Dedupe Queue and merge field values which may conflict (e.g. file_path of file A is different than file B). We keep the first copy of the file which entered the database and discard the other(s).
-
If Context is ON, we take any sets of duplicates* and handle field value conflicts accordingly:
-
If fields from our Conflict Field List do not match in a set of duplicates, we keep both files, remove from the Dedupe Queue and import both.
If there are no conflicts present in the Conflict fields: - We evaluate fields from our Merge Field List. If any Merge Field does not match in a set of duplicates*, we keep one copy of the file, merge the mismatched values into the respective field, and discard the last copy to enter the database.
- We evaluate fields from our Ignore Field List. If any Ignore Field does not match in a set of duplicates, we do nothing with the fields and only keep the first copy of the file which entered the database.
-
If fields from our Conflict Field List do not match in a set of duplicates, we keep both files, remove from the Dedupe Queue and import both.
*Duplicates can be considered two files within the same import OR a single file in an import being compared to a file existing in the database.
| author | document_last_author | email_sent |
| bcc | document_subject | email_subject |
| created_date_time | email_author | last_print_date |
| document_author | email_message_id | modified_date_time |
| document_date | email_reply_id | key_document |
| cc | file_path | recipients |
| custodians | mailbox_file | root_folder |
| file_name | mailbox_path | shortcut |
All User Generated Fields
Default Fields not on Merge/Conflict Lists
| app_name | confidentiality_status | expansive_hash | privileged_status |
| batch_id | created_on | has_markups | redaction_notes |
| bates_end | delete_at_gmt | highlight_notes | relevancy_status |
| bates_range_end | document_title | id | supported_filetype |
| bates_range_start | document_properties | npcase_id | title |
| bates_stamped | document_type | number | updated_at_gmt |
| bates_start | email_received | page_notes | user_id |
| billing_size | encrypted | prefix | verified_page_count |
Note: All deduplication is considered at a family-level. If after a loose file is added to your case, that same file is added, but as part of a larger email family (or vice versa), no deduplication will occur.
Note: Turn Context Criteria ON for more conservative deduplication using the context. Turn OFF
to deduplicate more aggresively using content hash match duplicates.
Understanding Deduplication
Data collection can be the most complex and technically rigorous of all eDiscovery phases.
It involves the extraction of potentially relevant electronically stored information from its native source into a separate, secure repository for review. The collection process should be comprehensive without being over-inclusive. It should preserve the integrity of the data, the chain of custody and authenticity of the documents - all while not disrupting the organization or individual’s operations.
Managing Modern Data Collections
Don't begin ediscovery collections without this comprehensive, strategic guidebook.
General Considerations for Collections
- Consider and understand your source(s): Identify your key custodians, where their data is located, and the accessibility of that information (e.g. do you need a username and password to access?). Certain source types may require special considerations when collecting to ensure you collect the entirety of the data set. For example, when collecting emails, you may want to collect both server and local copies to ensure all emails are collected.
-
Consider your collection method: In conjunction with the above consideration of the who, what and where for your different sources, it is also important to consider how you will collect from each source. Outlined below are three different approaches for collections:
- Employee self-collection (riskiest): Most employees aren’t technically savvy and are highly likely to make errors or overlook key documents. Several courts have also questioned whether employee self-collection constitutes a ‘defensible’ eDiscovery response.
- IT collection: Understand the data and technology landscape and possess the technical skill to extract everything needed, but ensure they are provided with clear guidance from the legal team on what specifically to target (otherwise, more likely to collect very broadly)
- External collection: An outside expert is likely to have proven procedures and the necessary tools and skill to perform a collection that will withstand the highest levels of judicial scrutiny.
- Collect only what you need: More data collected means more data to process, and ultimately to review. And that all adds up to more money spent on eDiscovery. Instead, develop strong preservation and early case assessment processes, and target your collections so that you are only collecting the potentially relevant ESI—nothing more or less.
- Be Proactive: It’s always in your best interest—financially and procedurally—to be proactive in assessing your needs and determining if outside resources will be needed. Even if outside assistance or experts ultimately are not needed, it’s important to give your internal IT team early notice that a big project is potentially looming, so they can plan resources accordingly.
- Phase Your Collections: In a phased collection strategy, data is prioritized so that only the highly relevant data is collected immediately. Less relevant data is collected only when absolutely needed.
- Avoid Collecting Archived Mailboxes: Whenever possible, you should try to avoid collecting from mailboxes in an archived state as doing so can produce unexpected email metadata information, especially when coming from Microsoft 365. For example, if a sender's email address is jsmith@microsoft.com, it could be reflected incorrectly in an archived state as jsmith@microsoftexchange.com instead.
Tactical Best Practices
- Collected Mailbox File Size: Nextpoint recommends keeping your collected mailbox files (e.g. PST, Mbox, etc..) under 10 GB when possible, with a maximum file size of 20GB. Doing so will speed up processing, lesson chances of corruption, and improve error correction when needed. If you have more than the recommended size to collect, it is suggested the data is segmented into smaller sets prior to or during collection.
- If the client is self-collecting, it is recommended they do not forward data to you via email as attachments. Utilize Nextpoint’s request files instead to ensure you maintain an accurate and easily traceable chain of custody.
- Maintain clear custodian ownership when collecting so that information can be effectively assigned during import (e.g. avoid a mass collection across multiple custodians into one pst/mbox).
- For remote collections, consider how it will be accomplished, if you have custodians login information, and timing of collection. This ensures the mailbox custodian will have as little downtime as possible.
- Maintain clear organization in the File Room. This will ease the import and subsequent quality control processes when moving your data from the File Room into your Nextpoint database.
- If you are working with text messages, consider how you would like to organize and review the data prior to collection (e.g. do you want a separate document for each message or a spreadsheet with all of them or both or something in-between like a single spreadsheet for each conversation). These requirements may affect your collection method.
- If you are working with data from proprietary software, that proprietary software will likely be necessary if you would like to review images of the files. It is important to consider if the party collecting these files can obtain an image during the collection process and/or if an image will need to be generated post-collection. For more information on Nextpoint’s Custom Imaging Services, please contact support@nextpoint.com.
Collections Checklist
- What parties are involved?
- What deadlines have been agreed upon, to date?
- Have any preservation steps been taken?
- Who are your key custodians and where are they located?
- Do any of the identified custodians have direct IT resources available?
- What are each custodian's key sources (e.g. Email, phone, tablet, company server, etc.?)
- How accessible are each identified key source (e.g. password protection)?
- Which collection method is preferred/necessary for each source? (e.g. self v. external v. remote )
- Do you anticipate the authenticity of any evidence may come into question during the course of your matter?
- Is there a priority hierarchy that can be created from all identified custodians and their respective sources?
- Are there any parameters to be applied at the time of collection (e.g. date range)?
Collection Best Practices & Checklist
Below, we take a closer look at the different Import Types and Import Data Settings components of our improved import experience. Click here to review the complete guided import workflow.
Table of Contents
Imports available to users with Advanced user permissions, only.
Import Types
When importing data into Nextpoint, there are four different Import Types. Each import type has corresponding pre-set recommendations for Deduplication and DeNIST settings.
If you initiate the import process by selecting your files from the File Room, Nextpoint will detect the type of data you selected (single mailbox, loose files, or produced data with load file) and will automatically set such in Step 1 of the guided import workflow, and you will be navigated to Step 2, Import Data Settings.
If you initiate the import process by navigating to DATA Imports, you will be navigated to Step 1 to make your Import Type selection. Since you have not yet selected your files for import, Nextpoint needs to know what type of data you intend to import. After making this selection, you will meet the 'Import selected files from File Room' workflow at Step 2, Import Data Settings.
A closer look at the different Import Types
Single Mailbox
Any single mailbox container file (pst, mbox).
Our recommended best practice is to import one mailbox at a time. You may import multiple mailboxes at once, but your import will be recognized as a Multiple Files Import Type. Please note, only one custodian assignment is allowed per import batch, so consider keeping mailbox imports limited to one custodian per batch, at the minimum.
Multiple Files
Any single non-mailbox file, any selection of multiple loose files (including pdfs, office files, mailboxes and archives), or any folder that does not contain a nextpoint_load_file.csv in the first level.
Production with Load File
Any folder containing a load file titled nextpoint_load_file.csv in the first level.
Our recommended best practice for production data sets is to upload to the File Room unzipped. If you upload a zipped production, then it will be considered a Multiple Files Import Type.
Manual
Any type of file selection. This import type will be most applicable with the upcoming release of our load file mapper. While we are simplifying the load file mapping process, we recognize some users may have existing workflows for produced data imports which they would like to maintain and bypass the load file mapper. You can read more on manual imports here.
Import Data Settings & Deduplication
Once your files have been selected for import, you will be navigated to Step 2 of the import sequence: Import Data Settings. Here, you will verify and/or outline settings applicable to your current import.
Import Data Settings include the following:
-
Type of Import: If you initiated your import from the File Room, verify the Type of Import selected. To modify the import type, click the pencil icon
and you will be returned to Step 1 of the sequence to make your selection.
-
Selected Files for Import: If you initiated your import from the File Room, verify the selected files. To modify your selection, click the folder icon
to access the pop-up file picker which is populated by the File Room contents.
- Batch Name: Recommended for most efficient tracking once the data has been imported.
-
Assign Custodian on Import: Search list of existing custodians or add new via the profile + icon
.
-
Add to Folder on Import: Search list of existing folders or add new via the folder + icon
.
-
Deduplication and DeNIST Detection: Pre-set recommendations for Deduplication and DeNIST settings will be populated based on which type of data is detected from the File Room (or selected in Step 1).
If you would like to modify the recommended settings, make sure the applicable toggle is turned onand click the gear to open the settings pop-up.
Continue below for a complete list of Import Types and associated Deduplication + DeNIST settings.
A closer look at Deduplication and DeNIST Detection
Complete list of Import Types and associated Deduplication + DeNIST settings outlined below:
| Import Type | Deduplication Setting | DeNIST Setting |
|---|---|---|
| Manual | Dedupe - OFF | DeNIST - OFF |
| Single Mailbox | Dedupe - ON , File Match - ON , Context - ON | DeNIST - OFF |
| Multiple Files | Dedupe - ON , File Match - ON , Context - ON | DeNIST - ON , Tag-ON |
| Production with load file | Dedupe - OFF | DeNIST - OFF |
Deduplication
Deduplication at the time of import prevents existing documents and email families from entering your database multiple times. The deduplication settings selected in the import workflow determine the definition of 'Duplicate' for the import batch at-hand.
When deduplication is turned off at the time of import, no deduplication will occur and all files will be imported.
How does Deduplication work?
FIGURE 1
INITIAL PROCESSING
1 | First, you queue your files for processing by initiating an import. See the three different file types queued for processing on the far left in Figure 1 (above).
2 | Once you initiate an import, Nextpoint begins processing by extracting files from their containers (zips, pst, box), extracting any attachments from their parent emails, and extracting metadata.
FILE MATCH CRITERIA
3 | Next is the First Deduplication Pass on all three file types where we look for a matching expansive hash for all the file types.
- If a loose file, expansive hash is the MD5 hash value.
- If an email family, expansive hash is formulated from the MD5s of all members of the email family.
Once an expansive hash is identified, we compare to other files being processed and existing in the database. Any matches are placed in a Dedupe Queue. Loose files without a match are imported.
4 | Also during the First Deduplication Pass, all remaining email files not placed in the dedupe queue due to matching expansive hash are checked for matching Message ID's.
Again, we look for matches against what already exists in the database and other files currently being processed. If we find a matching set, we add to the Dedupe Queue. If no match is found, the file is imported.
Note: Turn File Match Criteria ON for more aggressive deduplication using expansive hash and email message ID, as describe below. Turn OFF
to deduplicate more conservatively and only consider Content Hash matches duplicates.
CONTEXT CRITERIA
5 | Next, we address the Dedupe Queue.
- If Context is OFF, we take everything in the Dedupe Queue and merge field values which may conflict (e.g. file_path of file A is different than file B). We keep the first copy of the file which entered the database and discard the other(s).
-
If Context is ON, we take any sets of duplicates* and handle field value conflicts accordingly:
-
If fields from our Conflict Field List do not match in a set of duplicates, we keep both files, remove from the Dedupe Queue and import both.
If there are no conflicts present in the Conflict fields: - We evaluate fields from our Merge Field List. If any Merge Field does not match in a set of duplicates*, we keep one copy of the file, merge the mismatched values into the respective field, and discard the last copy to enter the database.
- We evaluate fields from our Ignore Field List. If any Ignore Field does not match in a set of duplicates, we do nothing with the fields and only keep the first copy of the file which entered the database.
-
If fields from our Conflict Field List do not match in a set of duplicates, we keep both files, remove from the Dedupe Queue and import both.
*Duplicates can be considered two files within the same import OR a single file in an import being compared to a file existing in the database.
| author | document_last_author | email_sent |
| bcc | document_subject | email_subject |
| created_date_time | email_author | last_print_date |
| document_author | email_message_id | modified_date_time |
| document_date | email_reply_id |
| cc | file_path | recipients |
| custodians | mailbox_file | root_folder |
| file_name | mailbox_path | shortcut |
All User Generated Fields
Default Fields not on Merge/Conflict Lists
| app_name | confidentiality_status | expansive_hash | privileged_status |
| batch_id | created_on | has_markups | redaction_notes |
| bates_end | delete_at_gmt | highlight_notes | relevancy_status |
| bates_range_end | document_title | id | supported_filetype |
| bates_range_start | document_properties | npcase_id | title |
| bates_stamped | document_type | number | updated_at_gmt |
| bates_start | email_received | page_notes | user_id |
| billing_size | encrypted | prefix | verified_page_count |
Note: All deduplication is considered at a family-level. If after a loose file is added to your case, that same file is added, but as part of a larger email family (or vice versa), no deduplication will occur.
DeNIST Detection
DeNIST provides a way to filter known, unnecessary files from uploaded data. During import and processing, files are checked against the National Institute of Standards and Technology Reference Library and matching documents are removed from the upload.
When DeNIST Detection is turned on, there are two options to consider:
- Tagging: Files found to match a DeNIST record will be imported and processed as usual, but will be assigned an additional "NIST" tag.
- Filtering: Files found to match a DeNIST record will be removed entirely from imports.
To return to the complete import workflow, click here >>
Import Types, Import Data Settings & Deduplication
Overview
DeNIST helps reduce review volume by identifying known system or application files with no evidentiary value and handling them appropriately during import. During import, files can be evaluated against the National Institute of Standards and Technology (NIST) National Software Reference Library (NSRL) Reference Data Set (RDS).
Each imported file’s MD5 hash (a digital fingerprint of the file) is compared against entries in the NIST NSRL RDS. If a match is found, the file is recognized as a NIST file and handled according to your DeNIST settings.
Configuring DeNIST During Import
The steps below explain how to configure DeNIST settings in both NextGen and Legacy databases.
Which database should I follow?
If you see the badge next to your database name, follow the NextGen Database tab below. Otherwise, switch to the Legacy Database tab.
DeNIST settings are configured during the Import Details step of the import workflow. From this screen, you can enable or disable DeNIST detection and choose how files that match a NIST record are handled.
DeNIST settings are configured during the Import Data Settings step of the import workflow. From this screen, you can enable or disable DeNIST detection and choose how files that match a NIST record are handled.
DeNIST Detection Options
If DeNIST detection is disabled, no NIST comparison is performed. All files are imported and processed normally, regardless of whether they match a NIST record.
If DeNIST detection is enabled, click the settings icon to choose how files that match a NIST record are handled:
- Tagged: Files that match a NIST record are imported and processed as usual, but are automatically assigned the tag tag:NIST. These files remain available for review and can be filtered or excluded later using search or tag criteria.
- Filtered: Files that match a NIST record are excluded from the import entirely. They are not processed or added to the database.
Import Batch Reporting
When DeNIST detection is enabled, results are recorded on the Import Batch Details page:
- Files that match a NIST record are noted in the batch summary.
- If the DeNIST setting is set to Filtered, excluded files are reported as filtered from the import.
- If the setting is Tagged, imported NIST files can be located using the tag:NIST tag.
Return to: Discovery Workflow
DeNIST Settings
The custodian is the individual with administrative control of a document or electronic file. For example, the custodian of an email is the owner of the mailbox which contains the message. The custodian of loose documents is typically the owner of the computer or server where the documents originated.
A Custodian is assigned to a data set during import. It is important to apply the custodian to a set of data set so users can:
- Analyze, search, and isolate documents for particular custodian(s), and
- Include this information in a production export
Read more below on Master Custodian, Dupe Custodian and All Custodians
How to assign a Custodian during import
You can assign a custodian to your data set on import via Step 3 of the Nextpoint Import Workflow, Import Data Settings. Once in the Import Data Settings, you can select an existing custodian or create new in the Custodian input.
If a custodian is not applied upon import or was applied incorrectly, you can add, edit, or delete this information by navigating to SETTINGS > Import > Custodians:
Once a new custodian has been added, this information can be applied to a data set by selecting the files and utilizing the bulk actions feature.
Master, Dupe and All Custodians
When Custodians are applied during import, via bulk action, or at the document-level, Nextpoint will maintain which custodian is the Master Custodian and which custodians are Dupe Custodians.
Master Custodian is the first custodian assigned to a document while Dupe (or duplicate) Custodians are those assigned when the same document is deduplicated during processing. The Master and Dupe Custodians combined equal what we refer to as All Custodians.
Viewing Master and Dupe Custodians in your database
When viewing any document in your database, the Custodians section of the coding panel will display all custodians assigned to a document. When viewing, the Master Custodian will be bolded and the Dupe Custodians are selected, but not bold.
If you were to remove the Master Custodian assignment for any reason, the next assigned custodian will assume the position of Master Custodian.
Exporting Master, Dupe and All Custodians in a Load File
Upon export, you can include Master Custodian, Dupe Custodians, and (all) Custodians in your metadata load file template.
Assigning a Custodian to Your Data
You can use your nextpoint_load_file.csv to automatically assign your incoming documents with folders, or responsive issues.
First, make sure the folder or issue you are going to use has been created in your Nextpoint Discovery (see: Creating a Folder in Discovery, or Creating a Responsive Issue in Discovery).
If you are using the folder called "Today's Production" with the abbreviation TP, you'll need to add two columns to your load file, with the headers np_folder_prefix & np_folder_position. In the rows below, use the abbreviation of your desired folder, and the number you want to assign to each document.
If you'd like to include mapping for responsive issues as well: if you are using responsive issues titled "Environmental" and "Chemical", with the abbreviations/prefixes ENV & CHEM, add a column for each issue to your load file titled with the abbreviation/prefix of the issue. In the rows below, use the value Y (yes) to apply the issues to documents accordingly (you can also use yes, t, true, x, or *).
Example:
* When importing documents that will be processed by extraction into more documents (e.g. a .pst file), you should not try to add a folder using a load file, since there is not a one-to-one relationship between the documents in the load file and the number of documents after processing.
Return to Discovery Workflow
Using a Load File to Populate Folders & Responsive Issues
Outlined below are the steps for checking your import status. This article covers both NextGen and Legacy databases.
Which database type should I follow?
If you see next to your database name, follow the NextGen database tab below. Otherwise, switch to the Legacy database tab.
The Batch Import page provides detailed reporting and controls for every import into your database. From this page, you can monitor progress, review processing results, download reports, and investigate any issues that occurred during import.
Accessing the Batch Import Page
To view details about any import batch:
- Navigate to Data > Imports
- Click on the batch name of any completed or in-progress batch
Batch Page Header Controls
The batch name is prominently displayed in the upper left corner of the page. From the header, you can:
- View Documents: Click the View Documents button to open a new tab showing all documents from this batch in your Review or Document section
-
Download Reports: Access comprehensive import documentation directly from the batch page:
- Full import report: Download a complete summary of what occurred during this import
- Field mapping report: For processed/produced data imports using the load file mapper, download the field mapping report showing how source fields were mapped to Nextpoint fields
- Navigate between batches: Use the navigation arrows to move directly to previous or subsequent imports without returning to the Imports tab
-
Cancel or Delete an Import Batch: Click the three-dot menu icon in the upper right corner to access additional actions:
- Cancel import: Stop an in-progress import if you need to re-prioritize or correct an error
- Delete import: Remove the batch from your Imports page (only available after all documents from the batch have been trashed from your database)
Import Status and Processing Summary
Status Indicator
The status section clearly shows whether your import is in progress or complete. Completed imports display a green checkmark. If any issues occurred during import, a prominent yellow warning section appears indicating the import is complete but requires investigation.
Processing Summary Table
A comprehensive table provides real-time visibility into your import progress:
- Processed: Total number of files identified and evaluated from your source data (excludes files filtered by DeNIST settings)
- Deduplicated: Files removed as duplicates, either within this batch or against existing database content
- Files with Errors: Files with errors requiring attention (see Flags table below for details)
- Added: Unique documents successfully imported to your database
Formula: Processed - Deduplicated = Added
Production Import Details
For produced data imports, the batch page includes additional reporting sections to ensure complete accountability.
Production Summary
This section provides a detailed comparison of what was expected from your load file versus what was successfully processed:
- Documents included: Total documents referenced in the load file
- Fully imaged documents: Documents where all pages called for in the load file were found and processed (Processed vs. Expected)
- Text files: Extracted text files found and processed (Processed vs. Expected)
- Native files: Original source files processed (Processed vs. Expected)
This comparison makes it immediately clear if any files are missing from your produced data, allowing you to quickly identify and rectify gaps.
Family Linking
For produced data imports, you can initiate family linking directly from the batch page. For more details, see Linking Email Families in Produced Data Imports.
Content Summary and Analytics
Content Summary Chart
A dynamic, interactive chart displays the top file types included in your import. These charts function similarly to the Analytics tab in Discovery databases:
- Click on any file type segment to view those specific documents
- Quickly understand the composition of your imported data
- Identify unexpected file types that may require review
Database Comparison
If duplicates were identified during this import, a bar chart displays:
- How many documents in this batch were unique
- How many documents were identified as duplicates of existing database content
- The total number of documents
Import Settings
The Settings section provides a comprehensive summary of how this import was configured:
- Batch name: Click the pencil icon to edit the batch name.
- Batch ID: Unique identifier assigned to the import batch.
- Import type: The method used to import this data.
- Imported by: User who initiated the import.
- Initiated date/time: When the import was started.
- Completion date/time: When processing finished.
- DeNIST settings: How system files were handled.
- Deduplication settings: How duplicates were identified.
- Custodians: Custodians applied to imported documents.
- Folders: Destination folders selected during import.
- File Room Paths: Source File Room locations used.
- Load Files: Load files included in the import.
Flags Table
The Flags table provides detailed information about any errors or warnings that occurred during import processing.
Flag Categories
Flags are organized by severity and grouped into clickable categories:
-
Errors: Critical issues requiring action (e.g., password-protected files, corrupt files)
- Info: Informational notices requiring no action (e.g., deduplicated files)
-
Warnings: Non-critical issues recommended for review (e.g., truncated metadata, extraction issues)
Investigating Flagged Files
The Flags table makes troubleshooting significantly easier:
- Click on any flag category pill to filter the table
- Review the description of each flagged file
- Click the Nextpoint ID (NPID) in the leftmost column to navigate directly to that document
- Take corrective action as needed (add password, replace file, add placeholder, etc.)
This direct link from the flag to the actual document eliminates the need to manually search for problematic files.
Common Import Warnings and Solutions
For detailed information about specific import warnings and recommended solutions, see our Common Import Warnings support article or contact support@nextpoint.com for assistance.
* This functionality is available for Advanced users only.
* There is no page limit for any one document that is imported to Nextpoint.
When a document batch is uploaded/imported, Nextpoint automatically reports the actions taken during the import, as well as any follow up needed and/or warnings that have been triggered.
To view the details of your import batch navigate to the Imports tab and click on the Batch Name:
On the Batch Report page, you will see four tabs: Details, PST Processing, Pending Nextpoint QA and Warnings:
Details: A summary of all items processed, documents created, and any other processing actions that were executed normally during the import.
PST Processing: This tab contains a processing summary for all PST files in your batch. If there are any PST errors, they are named and the exact locations of the errors (i.e. Inbox, Drafts, Deleted Items) are listed.
- PST File Summaries report the count of all files in the PST (total), and the count of files in each directory contained in the PST.
- PST Errors report the count of files not extracted or processed from the PST, and their location.
PST Error Solution
Nextpoint is able to process most PST files. If you have received a PST Error in your Batch Report, there is likely a corruption within the PST and at least one files has not been extracted correctly. The PST file most likely needs to be repaired and uploaded again.
To repair a PST you can follow this short tutorial from Microsoft: How to repair your Outlook PST. Please make sure to make a backup copy of the original PST file before attempting repair.
If the unextracted files within the PST have occurred in locations that are of no consequence to your review, (e.g. Calendar, Tasks, etc.) you may choose to ignore the errors and proceed. We urge you to please review the errors carefully before continuing.
If you need additional assistance, please contact Nextpoint support at support@nextpoint.com.
Pending Nextpoint QA:Processing anomalies are reported here. Nextpoint engineers will need to take action to resolve these issues. Any issues that cannot be resolved by our team and require user action will be moved to the Warnings tab for further investigation by the end user.Please reach out to support@nextpoint.com to inquire about this type of error.
Warnings: Processing warnings are reported here.
Here is a list of the Warnings that we see most frequently, as well as the suggested solutions you can employ to resolve them. Other import warnings and their potential solutions can be found in the Common Import Warnings Support Article or you can email support@nextpoint.com and we will take a closer look.
Warnings:
- File required too much memory to process or document had too many pages to process: When processing fails for these reasons, it typically is due to corruption, complexity, password protection or sheer size of the file. In most situations it is just not practical, or even possible - to process these files into a document image.
- Extracted page count didn't match expectation: This is typically similar to the previous warning, except the import made a bit more progress—enough to know that we expected to receive some document pages, but during processing the file was found to be corrupt, very large/complex or password protected—and could not be processed as expected.
- An error occurred converting document to PDF: These are typically unsupported file types, but processing was attempted because the file extension wasn't in our file type blacklist. This error could also be due to corrupt/large/complex/password protected files.
- Couldn't convert uploaded image to PNG: These are normally images with a strange makeup. Most frequently it's seen on small, busy graphics (complex company logos, etc). Most commonly, this error occurs for images that would not be sought via search or likely to be reviewed.
Solutions
- Break the file up into smaller documents.
- Remove password protection from the file.
- If the file is corrupt, attempt to re-save the file.
- Many image processing errors can be resolved by printing the file to PDF.
- Check your load file for consistent bates_start/bates_end values. Because of the way our system processes images, if these numbers are not the same length and/or sequential our system cannot appropriately process those document's images.
Current Document Count
Additional information about the import can be found on the right side of the batch import screen. The chart at the bottom of that section indicates the number of Unique, Duplicate, and Total Documents are included in this batch. These numbers update with every subsequent batch (so duplicates between batches 1 and 2 will be indicated on the charts contained on both batches 1 and 2 Batch Status screens. These links are also hot links and will run a search of the unique, duplicate, or total documents contained in that batch when clicked.
Return to Discovery Workflow
Import Batch Status Page
Follow the steps below to create and import a simple load file.
-
Prepare your documents and folder structure.
Gather the documents you want to import and organize them into a clear folder structure on your local machine. Check out this topic to generate a file directory that looks like this: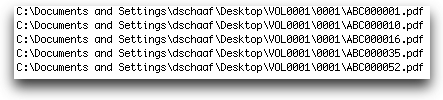
Tip: Organize your files into a single top-level folder (for example, VOL0001) before upload. This makes relative pathing and import setup much easier. -
Confirm relative file paths.
Nextpoint expects relative file paths in load files.
If your directory listing includes extra parent folders or local system paths, use Find and Replace in a text editor to remove unnecessary pathing. For example, if your load file will live inside the VOL0001 folder, paths should look like: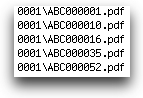
-
Create a new spreadsheet.
Open Excel (or another spreadsheet application) and create a new workbook. -
Add column headers.
In the first row, add column headers for the fields you want to include. At a minimum, you will typically need:image_file – the relative path to the document image
bates_start – if the files are named by starting Bates number
You may also want to include additional headers such as native_file (for native document files) and text_file (for extracted text files) -
Populate the load file.
Each subsequent row should represent a single document.
Copy the relative file path for each document into the image_file column and populate the bates_start column if applicable. It should look something like this: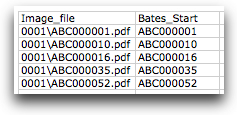
-
Save the file as CSV.
Save the spreadsheet as a .csv file.
Place the CSV file in the same top-level folder as your documents (for example, inside VOL0001).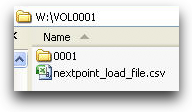
-
Upload the folder to the File Room.
Upload the entire folder (including the documents and the CSV load file) to the File Room in Nextpoint. You can drag and drop the folder or use the upload option. -
Start the import.
Once the upload is complete, initiate the import by clicking Import next to the folder in the File Room, or by navigating to Data > Imports and selecting Import Files.
Nextpoint will launch the guided import workflow and detect the presence of a load file automatically. -
Configure the import settings.
Name the import and select an optional custodian or destination folder. Review the available import settings and proceed to the next step.Once these settings are confirmed, Nextpoint will move you into the load file mapping stage if a load file is present.
-
Map the load file fields.
Nextpoint will open the Load File Mapper, where you can map fields from the CSV or DAT load file to database fields.Required fields will be flagged, some fields may auto-map when names match, and you can create or adjust mappings as needed. For more detailed steps on using the field mapper, check out our article on How to Import Produced Data with a Load File.
Once complete, your documents will be available in the Review/Documents tab with images, metadata, and Bates information applied.
Building a Simple Load File
To create a load file, you will need a list of files to include, and if applicable, the folders that they reside in. If you don't have this information in a list, you can easily create one.
Windows
- Right Click on the Root Folder, select "Open Command Window Here"
- In Windows 7, you may need to hold the CTRL key to get this option.
- In Windows 10, replace this step (1) with clicking in the search bar and typing
cmd. You may then move forward with the remainder of the steps described below.
- A command window will appear. On the Command Line, type the following: dir /b /s /a-d >>list.txt
- This will create a text file called “list.txt” in the root folder, that contains all the path information for each file and folder within the root folder that looks like this:

- Open "list.txt" in a text editor and do a Find and Replace to remove the extra pathing information, and you'll have a list of all the files in the folder, and their subfolder pathing, if necessary.
- Use this list to create a load file for your documents. Click here for information on how to create a simple load file.
Mac
- Open the utility, Terminal
- Type "find" (be sure to include the space) then drag the folder you want a list from.
- Terminal will give you a list of all the file names and pathing information for the folder, that you can copy and paste into a text editor to get in the format needed for your load file.
Compiling a List of Files to Create a Load File
Important: This feature is available only in Legacy databases. If you are working in a NextGen database, this workflow is no longer supported.
An email attachment index occurs on import. All imaged emails with attachments will contain an index of those attached files in the email header. Changing this setting in your database will only apply to future imports.
NOTE: In any new database (Discovery or Litigation), the Attachment Index's default setting is ENABLED.
Modifying Email Attachment Index
To disable the attachment index on all future imports in Discovery go to SETTINGS > Import. These same settings can be found in Litigation via More > SETTINGS > Import.
Scroll down to the find the Attachment Index on Email Images settings box and click Edit.
To change the attachment index settings, click Disable Attachment Index.
Below is an example of how the index will display on an imaged email when attachments are present. Shown in the document viewer screen.