Working with Exhibits
- How to Relate Exhibits to Transcripts & Create Hyperlinks
- Setting Up the Exhibit Stamping Template in Litigation
- Creating a Trial Exhibit List
- Applying Exhibit Stamps in Litigation
Nextpoint Litigation allows you to link exhibits to transcripts in two ways. You can relate a document to a deposition or proceeding transcript, and once a document is related, you can create hyperlinks within the transcript. See information on both below.
Relating Documents to a Transcript
To relate exhibits to their associated transcript, first import the transcript via the DEPONENTS or PROCEEDINGS tabs. You can then import and relate the associated exhibits in one of two ways:
This option is beneficial for importing and relating multiple documents/exhibits:
- Navigate to MORE > Data > File Room and upload the transcript exhibits, Import accordingly.
- After import, create and apply a folder for the particular transcript's exhibits (e.g. "John Smith Exhibits").
- Once the exhibits have been imported and the folder applied, navigate to the related transcript via DEPONENTS or PROCEEDINGS and click "Relate Folder" under the Related Documents drop-down.
- Select the folder of exhibits you would like to relate to the transcript, and click "Submit"
- The documents/exhibits contained within the selected folder will then show as being related to the transcript in both the transcript viewer and from the DEPONENTS or PROCEEDINGS tab.
This option allows for the import and relation of only one document at a time.
- Navigate into the desired transcript via DEPONENTS or PROCEEDINGS.
- Click blue "Import" under the Related Documents drop-down.
- A new window will prompt you to give enter a Title and Shortcut for the document, as well as any Link names that will become hyperlinks in the transcript. Add File From File Room/Computer or Drag and Drop the document file, and click "Import Related Document".
- The document/exhibit selected for import will then show as being related to the transcript in both the transcript viewer and from the DEPONENTS or PROCEEDINGS tab.
Hyperlink a Document in a Transcript
After you have related a document to a transcript, you can add hyperlinks for quick access when viewing the transcript. Click on the button to open the edit window. Enter the Names you would like to create hyperlinks for, then click Make Edits.
The Document Names will now appear as hyperlinks within the transcript.
- Clicking on the hyperlinked title within the Related Documents section will toggle amongst each entry of that specific exhibit in the transcript.
- Clicking on the hyperlink within the transcript will open that exhibit in a new tab of your browser.
Using Related/Linked documents in a Transcript:
- Import a new document to relate to the transcript.
- Click on the document name to jump to each entry of that particular exhibit in the transcript (when hyperlinked).
- Add or Edit hyperlinking to the document
, or delete the relation
.
- Open the document in a new tab of your browser.
- Insert text which should be hyperlinked within the transcript.
- View a list of all the related documents in a new tab of your browser.
Return to Litigation Workflow
How to Relate Exhibits to Transcripts & Create Hyperlinks
Which database type should I follow?
If you see the
badge next to your database name, follow the
NextGen tab below. Otherwise, switch to the
Legacy tab.
Exhibit Stamp Template
The Exhibit Stamp Template screen allows you to customize how exhibit stamps appear on documents. You can control the stamp’s structure, content, placement, and color, with a live preview showing how your changes will look.
Use the Structure section to design the layout of your exhibit stamp. You can include up to four rows of content.
Each row may include:
- Plain text (for example, Exhibit)
- Special characters
- Dynamic placeholders
Available placeholders:
- %F — Folder name
- %f — Folder prefix
- %e — Exhibit number
To modify the stamp structure:
- Enter text or placeholders into each row field.
- Click Add row to include an additional line (up to four total).
- Click Remove to delete a row.
- Use the drag handle to reorder rows.
The Preview panel updates automatically to show how the exhibit stamp will appear on a document based on your current settings.
Use the Settings section to control the default placement and appearance of the stamp.
- Vertical Placement — Choose where the stamp appears vertically (Top or Bottom).
- Horizontal Placement — Choose where the stamp appears horizontally (Left, Center, or Right).
- Color — Select whether the stamp appears in white or uses the folder’s assigned color.
You can reposition the stamp on individual documents after it has been applied.
- Click Update to save your changes.
- Click Cancel to discard changes and exit without updating the template.
Start by going to MORE > Settings.
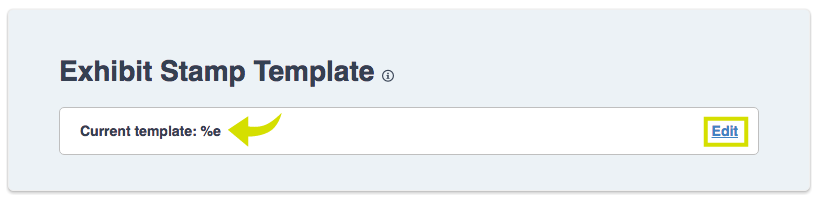
Exhibit Stamp Template
Nextpoint exhibit stamps include three rows of information, each serving a specific purpose.
Stamp Row Structure
- Row 1 — Displays the name of the folder from which you are stamping (for example, DEFENSE).
- Row 2 — Displays the word EXHIBIT.
- Row 3 — Customizable row that can include placeholders and freeform text. The exhibit number (%e) must be included in this row.
Available Placeholders
- %F — Folder name
- %f — Folder prefix
- %e — Exhibit number
Example
Including the placeholders %f-%e in the third row would result in a stamp similar to the example shown when applied to the first exhibit in the Defense folder.
Updating the Third Row
To change the third row of the stamp, select one of the common placeholder options or enter your own combination of placeholders and freeform text (for example, adding a court docket number).
Return to Litigation Workflow
Setting Up the Exhibit Stamping Template in Litigation
To create your trial exhibit list, first create a folder in which you will organize your exhibits.
To build your trial exhibit list document-by-document:
When viewing a document, open the Related Folders drop-down list.
- The gray folders listed indicates that the document is already a part of that folder set.
- Clicking the pencil icon will allow you to make edits.
Click the dropdown menu to choose another folder you'd like to add to related.
You can enter the Exhibit Number by clicking the pencil icon. If you leave it blank, the next available number will be used.
You can also enter Offered and Admitted dates, as well as any Notes for the exhibit.
When you are done, click "OK" and then Save. Your document is now a part of the exhibit set.
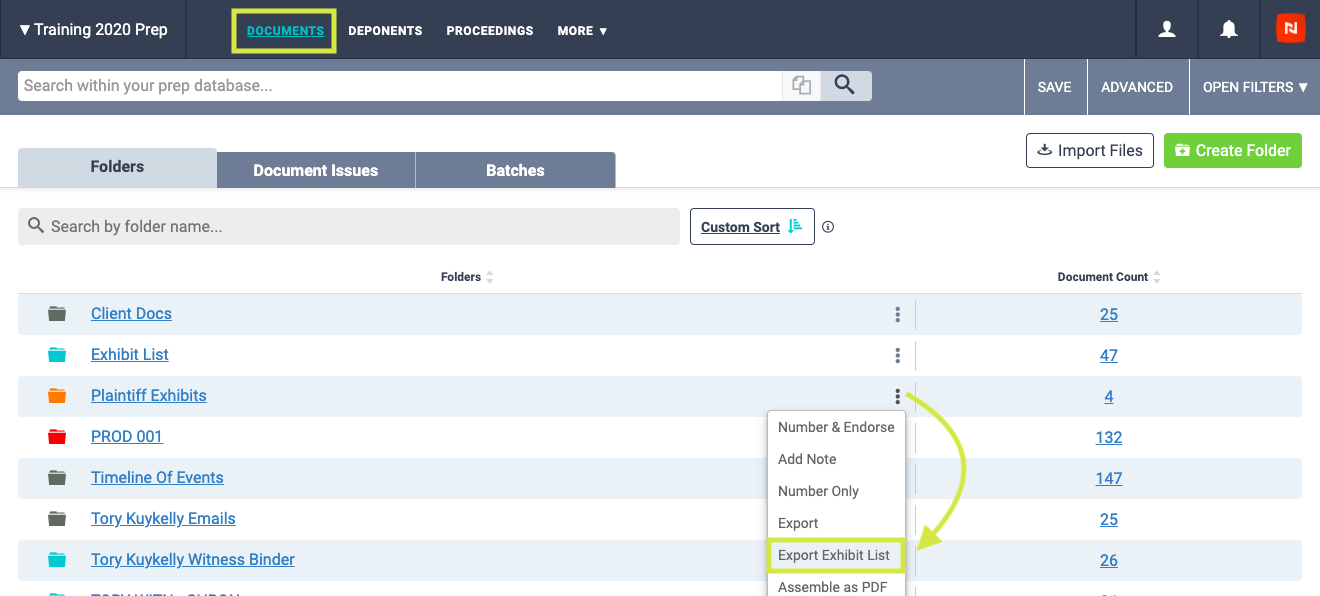
Export and Download your Exhibit List
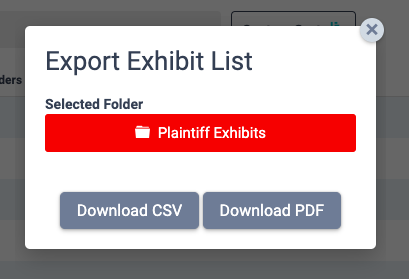
To quickly download a trial exhibit list, go back to the main Documents tab and select Export Exhibit List from the dropdown menu next to the Folder containing the trial exhibit list you wish to download.
Choose whether you would like to Download CSV or Download PDF.
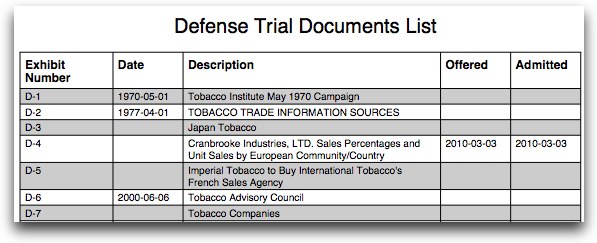
You will be able to download an exhibit list like the one below.
If you wish to add multiple documents to your exhibit list at the same time, click here to learn how.
When you are ready to stamp your trial exhibits, click here to learn how.
Return to Litigation Workflow
Creating a Trial Exhibit List
Exhibit stamping allows you to label documents with court-ready identifiers (such as exhibit numbers, case details, or docket information) for use in depositions, hearings, and trial. The steps for applying exhibit stamps differ depending on whether your database is NextGen or Legacy.
Which database type should I follow?
If you see the badge in the top left next to the name of your database, follow the NextGen steps below. Otherwise, switch to the Legacy tab.
Before stamping exhibits in either version, you must create a folder and add your documents to it.
Note: Have you considered exhibit marking prior to depositions to consolidate your master exhibit list? If so, see our suggested exhibit stamping workflow here.
Applying Exhibit Stamps in NextGen Databases
Set the Exhibit Stamping Template
Before stamping, configure your template using the Exhibit Stamping Template.
Apply Exhibit Stamps
- Open any document within your stamping folder.
- Expand the Related Folders section in the upper-right panel.
-
Click the blue stamp icon next to the stamping folder.
- The exhibit stamp appears instantly on the document.
- Advance to the next document to continue stamping.
Once you navigate away from a stamped document, the stamp is saved and the stamp icon turns green.
Note: A document can only have one exhibit stamp at a time. Re-stamping replaces the existing stamp.
Resize, Modify, or Remove Stamps
- Click the exhibit stamp to reveal resize handles.
- Drag to resize as needed.
- To remove a stamp, open the Layers panel and delete the exhibit stamp annotation.
Stamping Behavior
- Stamps appear instantly without re-processing.
- Stamps are branded into documents at export time.
- Stamps can be resized or removed without re-imaging.
Applying Exhibit Stamps in Legacy Databases
Set the Exhibit Stamping Template
Before stamping, configure your template using the Exhibit Stamping Template.
Apply Exhibit Stamps
Click on the first document in the population, look in the Related Folders section in the right sidebar. Click the icon to open the folder window and click the
icon to open the stamping interface.
When the stamping interface appears in the next window, use the following steps:
- Click the checkbox to add a stamp.
- Place the stamp where you'd like on the document.
- To apply a stamp only to this document, click Apply & Close.
- If you want to continue to the next document in the label set, click Apply & Next.
Your documents will re-process to burn the exhibit stamp onto the image, and the icon will change to green
to indicate that the document has been stamped.
If you need to re-stamp, don't worry, you can remove the document from the folder set, and the stamp will be removed.
Return to Litigation Workflow