Folder Organization
- How to Create Folders in Discovery
- Folder Management + Navigation
- Working with Folder Categories
- Managing your 'Favorites' Folder Category
- Advanced Folder Insights for Discovery & Litigation
- Add a Reviewer to a Folder
- Assigning Folders to Reviewers
*The below functionality is available for Advanced users only.
Introduction to Folders
Folders in Nextpoint are a mechanism used to organize groups of like documents. (e.g. “Custodian A Mailbox” or "ABC Production001") and can be applied to documents individually at the document-level or en masse with a Bulk Action.
It is important to note, folders are structured as a 'tag' that points to documents within a particular grouping. Thus, one unique document might be found in multiple folders because the different folder 'tags' are pointing to that document.
For example, I might add Email #1 to a folder titled "Email Review." After reviewing, I distinguish this email should be produced and ultimately it is added to my "ABC Prod001" folder. Moving forward, I will be able to locate email #1 in both the Email Review and ABC Prod001 folders (and it is only one copy of the email).
How to Create a New Folder
Whether you are first setting up and organizing your database, importing data, or running a search, creating a folder is accessible to you. Outlined below are the different ways to create a folder in Nextpoint.
Create a Folder from Settings
1 | Locate Folder Settings
From the top navigation in your Discovery database, navigate to Settings > Folders and click Create New in the Folders section.
2 | Create your Folder
- Enter your Folder Name and validate the auto-populated abbreviation/prefix is what you prefer.
- Assign a color to distinguish your folder visually in the database. Perhaps, all custodian folders are blue, all production folders are green, etc..
- Select which Folder Category (or categories) your folder should be associated with.
- Click Create to finalize the creation of your folder.
The next step will be to add documents to your folder. Read on how to use Bulk Actions to organize your documents here >>
Additional Folder Actions from database Settings
Edit your Folder
If you would like to edit a folder, click Edit and make your desired changes. Click Update to save your changes.
Manage Folder Assignments
Users with Reviewer user permissions can only access documents in folders that they have been assigned to. You can assign reviewers under the Review tab using the Assign button.
To assign or un-assign users to a particular folder, click the box next to the Folder(s) for which you would like to manage assignments click Bulk Edit select the desired action (Assign, Un-assign).
The same steps apply if you would like to inactivate or delete a folder.
If managing assignments, select the box next to the users you would like to assign to the selected folders click Assign.
Create and Apply a Folder on Import
1 | Initiate the Import Workflow
From the top navigation in your Discovery database, navigate to DATA > Imports
If you are in a Legacy Database, select Import Files:
If you are in a NextGen Database, select New Import:
2 | Select Files for Import and Set-up Import Details
- Select the import tyle you will be using: Single Mailbox (recommended for PST imports), Multiple Files, Production with Load File, and Manual.
- Select your files for import by clicking the envelope icon by Files and you will see Import files or folders from the File Room. Select desired file and click Add selected to import list. See more on the different import options here >>
- Enter a Batch Name
- Create and/or assign a Custodian if applicable.
- Click Create New Folder or search for an existing folder to which your data should be added to upon completion of your import batch. See further details below as to the settings prompted in the pop-up modal once you click Add New Folder.
- Click Import Files to initiate processing. Documents processed in your new batch will be added to the designated folder.
NOTE: If importing native data emails, loose files, etc..., the folder will populate in Date & Family order, meaning email families will be grouped together in chronological order. If importing produced data with Bates information, the folder will populate in Bates order.
3 | Add New Folder Modal
Once you click Add New Folder in the Import Set-up workflow, you will be prompted to add a few quick details.
- Enter your Folder Name and validate the auto-populated abbreviation/prefix is what you prefer.
- Assign a color to distinguish your folder visually in the database. Perhaps, all custodian folders are blue, all production folders are green, etc..
- Select which Folder Category (or categories) your folder should be associated with.
- Click Create to finalize the creation of your folder.
Note: If you simply want to name your folder in the immediate, you can always come back and edit the details later via settings or via the REVIEW tab (the three-dot drop-down next to each folder allow you to make edits).
Create a Folder from your Folder List
1 | Locate Folder List via REVIEW tab
From the top navigation in your Discovery database, navigate to REVIEW and click Create Folder in the top right of your folder list.
2 | Create your Folder
- Enter your Folder Name and validate the auto-populated abbreviation/prefix is what you prefer.
- Assign a color to distinguish your folder visually in the database. Perhaps, all custodian folders are blue, all production folders are green, etc..
- Select which Folder Category (or categories) your folder should be associated with.
- Click Create to finalize the creation of your folder.
The next step will be to add documents to your folder. Read on how to use Bulk Actions to organize your documents here >>
Create a Folder from Bulk Actions
1 | Access the Grid View
From the top navigation in your Discovery database, navigate to REVIEW and run your applicable search (or Filter).
Once you are on the Grid View, select the resulting list of documents then click Bulk Actions.
2 | Create your Folder
The Bulk Action modal will pop-up. Select Add under the Folder action checkbox then click Create New Folder.
- Enter your Folder Name and validate the auto-populated abbreviation/prefix is what you prefer.
- Click Create to finalize the creation of your folder.
3 | Finalize Bulk Action Settings and Update
- Once your folder has been created, verify the folder selection.
- Make your selection as to which related documents should be added to the folder (none, email family, email chain, duplicates).
- Make your selection as to the order in which documents should be added to the folder (current sort in the grid view, family order, date and family order).
- Lastly, click Update to initiate the Bulk Action to add the documents in your Grid View list to the newly created folder.
Create a Folder in a New Database (Empty State)
If no folders are set-up in your database, you will have the option to create a folder by selecting the REVIEW tab and clicking Create Folder
Following this step, you will be taken to a screen to enter the details of your new folder.
- Enter your Folder Name and validate the auto-populated abbreviation/prefix is what you prefer.
- Assign a color to distinguish your folder visually in the database. Perhaps, all custodian folders are blue, all production folders are green, etc..
- Select which Folder Category (or categories) your folder should be associated with.
-
- If Categories have not yet been created in your database, they will not be available for selection. You can further categorize after folder creation.
-
- Click Create to finalize the creation of your folder.
The next step will be to add documents to your folder. Read on how to use Bulk Actions to organize your documents here >>
There is no limit to the number of Folders you can create. Check out our blog post about this.
Return to Discovery Workflow
How to Create Folders in Discovery
- Folder management - You can create, edit, and inactivate folders right from your folder list in Discovery and Litigation. Additionally, your folder icons will now display in the color you set.
- Easy folder sorting - All columns in your folder lists are sortable and can be reset to your custom sort order with one click.
- Say goodbye to “Show More Folders” - Available folders are displayed in a continuous scrolling list. Better yet, we'll save your spot in the list when you navigate away in the database.
- Folder searching - When looking for a folder in your list, you can search any part of the folder name instead of the exact name.
- Assurance you’ve “seen it all”- An “unfoldered documents” link is available at the bottom of your folder list.
* Updates to creating and editing folders/issues available to Advanced User Permissions. User interface and navigation updates will be reflected in all user permissions. Read more below.
Simplified Folder Management
Folder management at your fingertips with the addition of the Create Folder + Create Document Issues (In Litigation) buttons on the folder list pages — creating efficiencies one less click at at time.
You can now find “Create Folder” + “Create Document Issue” buttons on the REVIEW and DOCUMENTS tabs in Discovery and Litigation, respectively.
Simply click on the green Create Folder button in the REVIEW tab of your Discovery database (DOCUMENTS tab in Litigation). You will be prompted to enter the folder name, abbreviation, and select a folder color (tip: your exhibit stamps will be the same color as your folder). After completing the folder creation form, click Create.
CREATE FOLDER IN DISCOVERY
CREATE FOLDER IN LITIGATION
Navigate to your Litigation database and go to DOCUMENTS at the top of your screen. Click the green Create Folder button. You will be prompted to enter the folder name, abbreviation, and select an editor color. After completing the folder creation form, click Create.
CREATE DOCUMENT ISSUE IN LITIGATION
Navigate to Litigation database > DOCUMENTS > Document Issues tab and click the green Create Document Issue button.
You will be prompted to enter the Issue name, abbreviation, issue desciption (optional) and select a report color (for highlights associated with the issue). After completing the issue creation form, click Create.
In addition to adding accessibility to creating folders, we also added the opportunity to edit/inactivate folders from the REVIEW tab and edit/inactivate folders or document issues from the DOCUMENTS tabs. This will only give further flexibility in managing your case organization.
To edit or inactivate a folder in discovery, navigate to the REVIEW tab and click the three-dot drop-down next to the folder name and make the appropriate selection.
EDIT OR INACTIVATE FOLDER IN DISCOVERY
EDIT OR INACTIVATE DOCUMENT ISSUE IN LITIGATION
To edit or inactivate a folder or document issue in litigation, navigate to the DOCUMENTS tab, click the three-dot drop-down next to the folder/document issue name, and make the appropriate selection.
In the folder list of Discovery and Litigation databases, you will now find an "unfoldered documents" link which returns search results for documents which have not been added to folders. The aim of this addition is to help ease anxiety you may have in making sure you have "seen it all."
Locate the unfoldered documents link under the REVIEW tab in a Discovery database or under the DOCUMENTS tab of a Litigation database.
UNFOLDERED DOCUMENTS LINK IN DISCOVERY
UNFOLDERED DOCUMENTS LINK IN LITIGATION
Added form validations for Create/Edit forms that check a name, prefix, color are present, name is not more that 100 characters, and not a protected name.
Folder Navigation Updates
Improved navigation (e.g new scrolling folder list vs. old “Show More Folders”) let’s you better organize without worrying how you will find your folders later.
Columns headers in the REVIEW and DOCUMENTS tabs (Discovery and Litigation, respectively) are sortable!
Click any column header in the folder lists of Discovery or Litigation to sort in ascending or descending order. Reset to user-defined order by clicking Custom Sort at the top of list.
What is Custom Sort?
Custom Sort is a specified sort order which any Advanced User within a given database can define and update in Settings. For example, you may want all of your Production folders grouped together in your folder list, followed by Custodian folders, then key term search hit folders, etc.
We removed the option to "Show More Folders” and now all folders will be displayed in one continually scrolling list (Discovery + Litigation).
Additionally, when you navigate away from the list and use your browser back arrow, we will highlight your previous location in the list for ease of reference.
Why are my columns not sorting?
If you find that the columns in your folder list do not appropriately sort when clicked, we might suggest restarting your browser. If that doesn't do the trick, please try clearing your browser cookies and then attempt to sort.
When searching for a particular folder from your list of folders, the search bar will now search across the entire folder name instead of requiring the first word and exact name (Discovery + Litigation).
For example, if you are looking for all Review Sets, you can search for "set", and Nextpoint will return all folders which have "set" anywhere in the folder name.
Note: In Litigation DOCUMENTS Batches, we have removed the option to search the list of batches, but the list remains scrollable. You may also reference MORE Data Imports to review all import batches within your database.
Previously, only the document counts for each folder or document issue (Litigation) was hyperlinked. We have now added a link to each folder or document issue which will lead you to the full document count for each.
If you leave the REVIEW or DOCUMENTS tabs (Discovery and Litigation, respectively) and return using the back arrow in your browser, your location in the list will be remembered and highlighted.
User Interface Improvements
Empty state has been updated for REVIEW folder list page, as well as Folders, Document Issues, and Batches tabs in Litigation/DOCUMENTS.
Folder Icons will now include the folder color you set when creating or editing the folder.
No functionality changes have taken place with these UI updates; however, the Manage Trash button in Review was previously located at the bottom left of your folder list in the REVIEW tab, and it is now located at the top right.
When Filters are open, the Manage Trash button will shrink to only display the trash can icon.
Folder Management + Navigation
Folder Categories provide users the opportunity to organize folders of similar type and create one layer of 'subfolders'. Unlike the traditional subfolders you may find on your computer desktop, categories can be applied to more than one folder. This flexibility in navigation gives Admins and reviewers alike easier and more efficient access to relevant folders when they are needed.

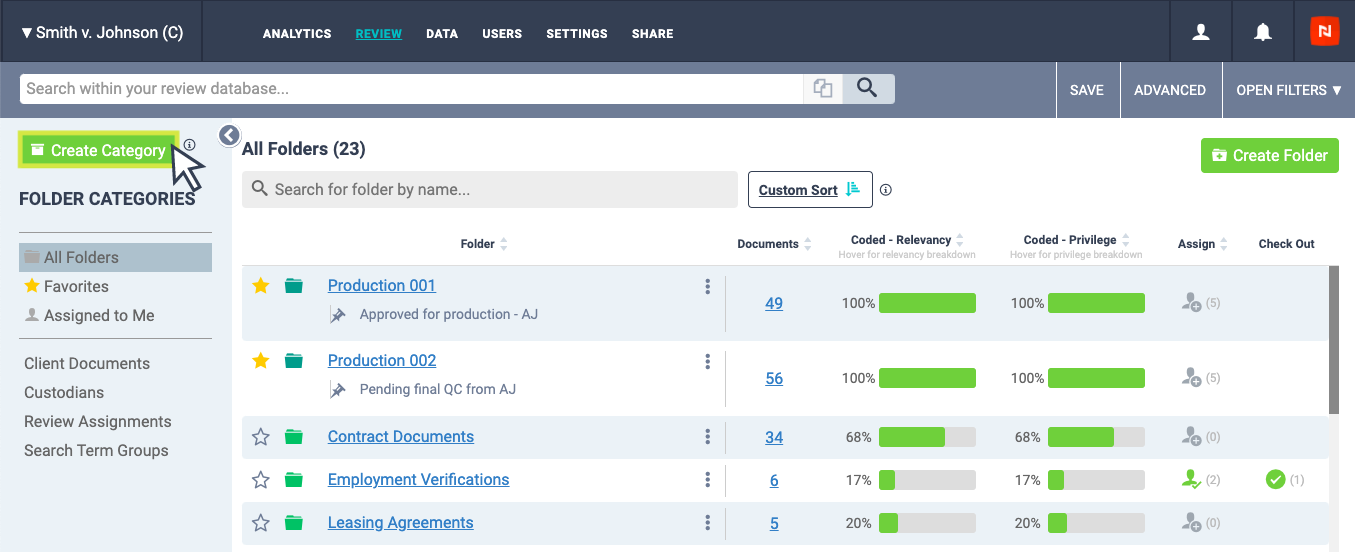
To get started adding Categories to your case organization, simply click the green Create Category button from the folder list in any Discovery or Litigation database. Follow the prompts in the pop-up modal to set the Category Name, and select to which folders the Category should be applied. Click Create to finalize the setup, and your Category and associated folders will be immediately available in the Category sidebar on the left.
See more below on working with categories >>
Any default and/or user created categories can be found in any Nextpoint database in the sliding Category sidebar on the left and can be managed by an Advanced user from the folder list or folder settings page in both Discovery and Litigation.
Category Use Case Examples
- One example as to how you can leverage Categories is with Client Documents. You may create a category titled Client Documents, and within that category organize the folders Client Email Collection, Staffing Documentation, Contracts, etc...
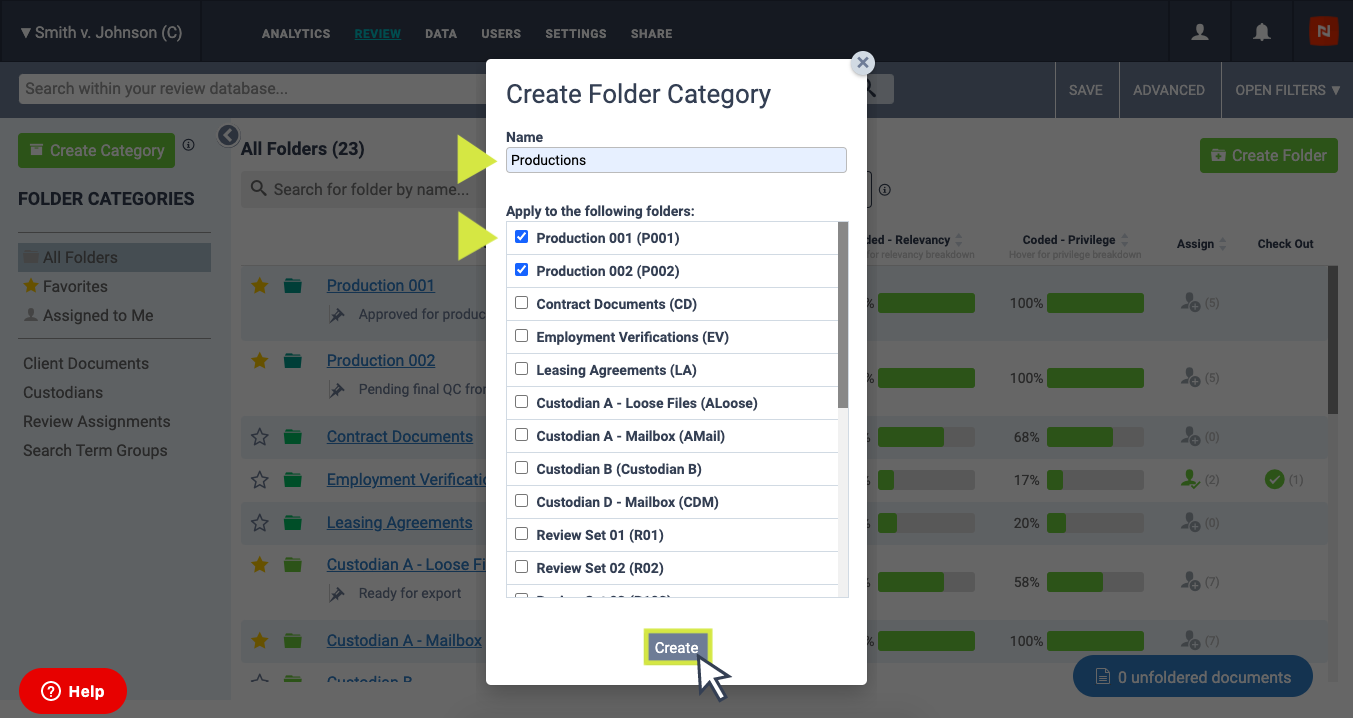
- Another example is to create a category titled Productions, and within that category organize the folders Prod 001, Prod 002, etc.. (as shown below).
How to Work with Categories
Outlined below are instructions for creating, managing, editing, and deleting Categories. But first, a couple of notes on accessibility of the Category function:
- Every Discovery and Litigation database is equipped with two default Categories: All Folders and Favorites. In Discovery only, there is an additional default category of Assigned to me which houses all folders which have been assigned to your username.
- Any Category navigation can be seen by all users with varying default categories depending on user level.
- The ability to create, edit, and manage Categories is limited to Advanced users in both Discovery and Litigation.
Create a Category
Advanced users can create a new/custom category from the folder list in both Discovery and Litigation databases.
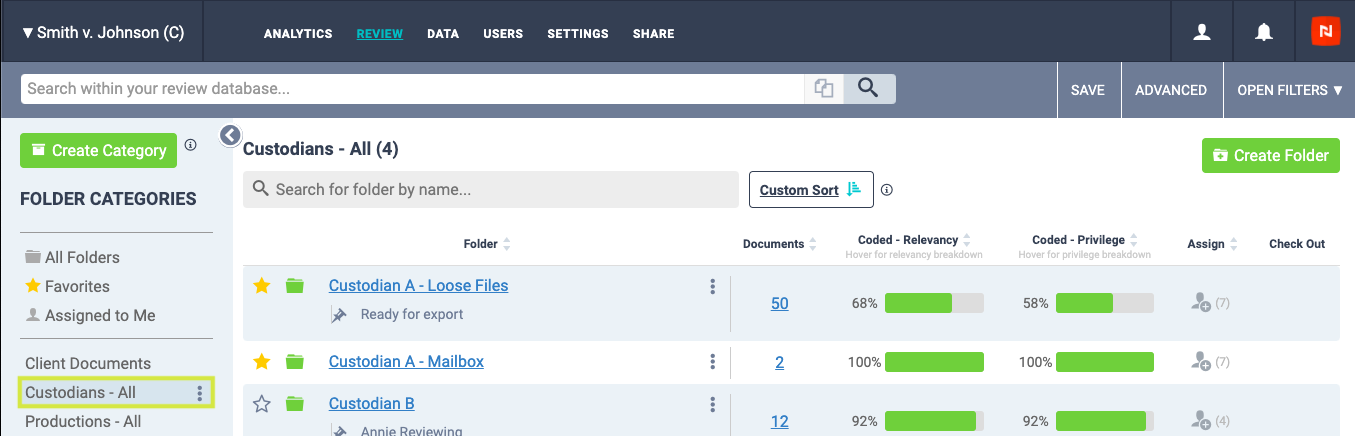
In Discovery, navigate to the REVIEW tab, open the Category sidebar with the arrow button at the top left, and then click the green Create Category button.
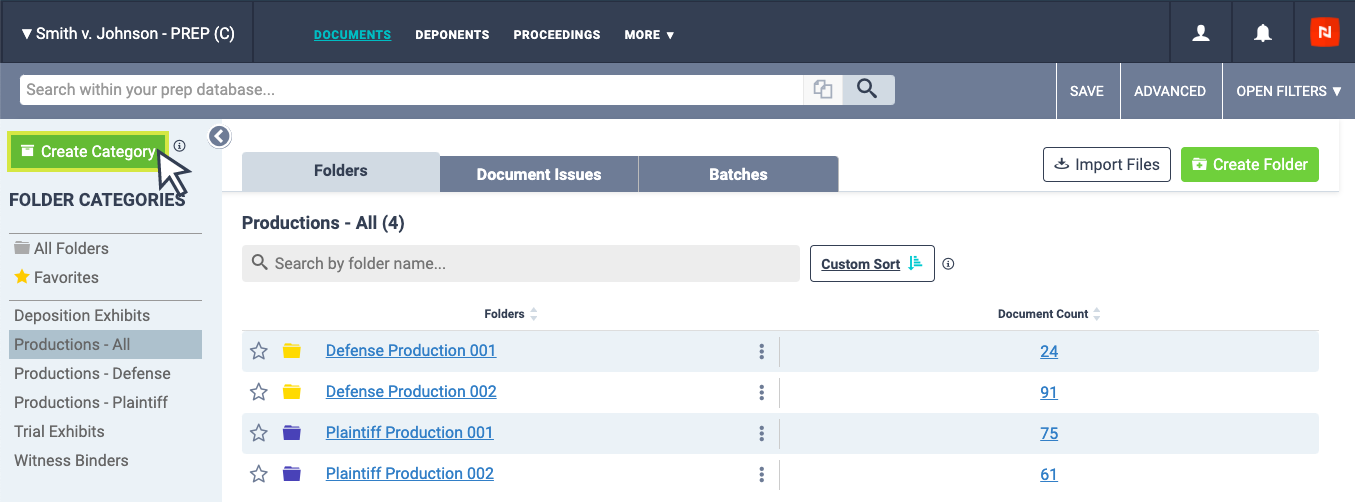
In Litigation, navigate to the DOCUMENTS tab, open the Category sidebar with the arrow button at the top left, and then click the green Create Category button.
Note: You must have the Folders tab displayed in order to open the Category sidebar in Litigation.
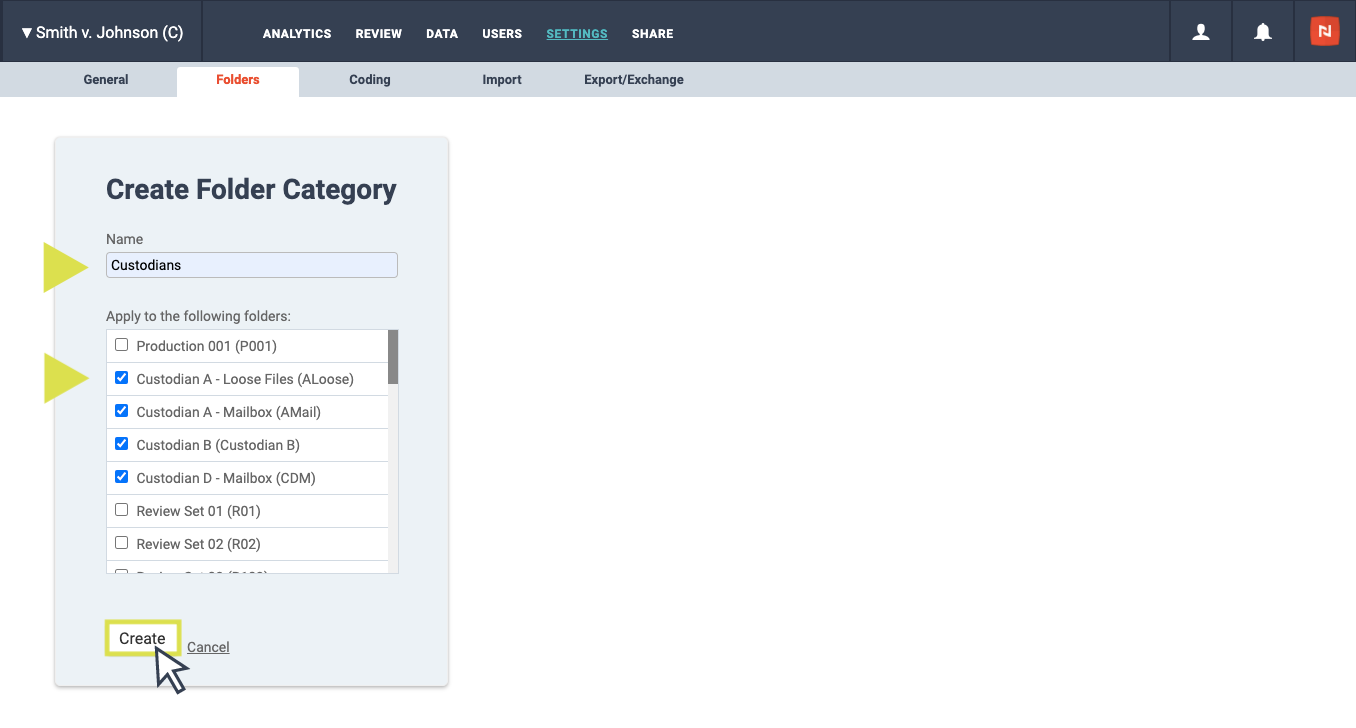
Once you click the green Create Category button, a pop-up modal will appear and prompt you to enter the Category Name, and select to which folders the Category should be applied (folders must be existing).
Note: Folders + Categories cannot have the same name. If you attempt to enter such during creation (or editing), you will be provided a warning.
After you've made your selections, click Create.
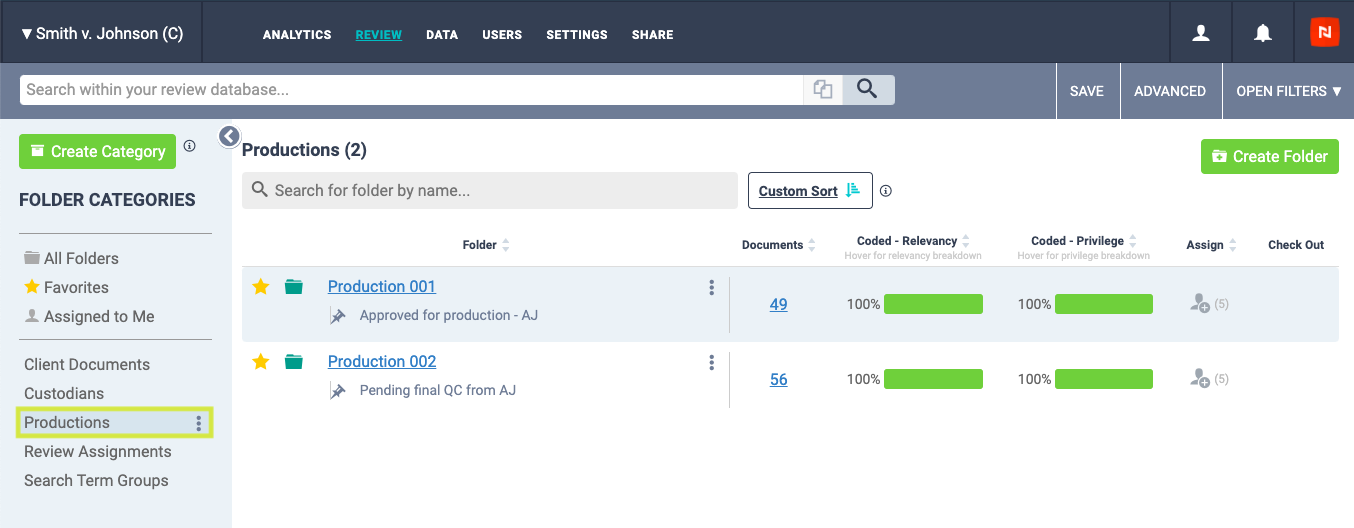
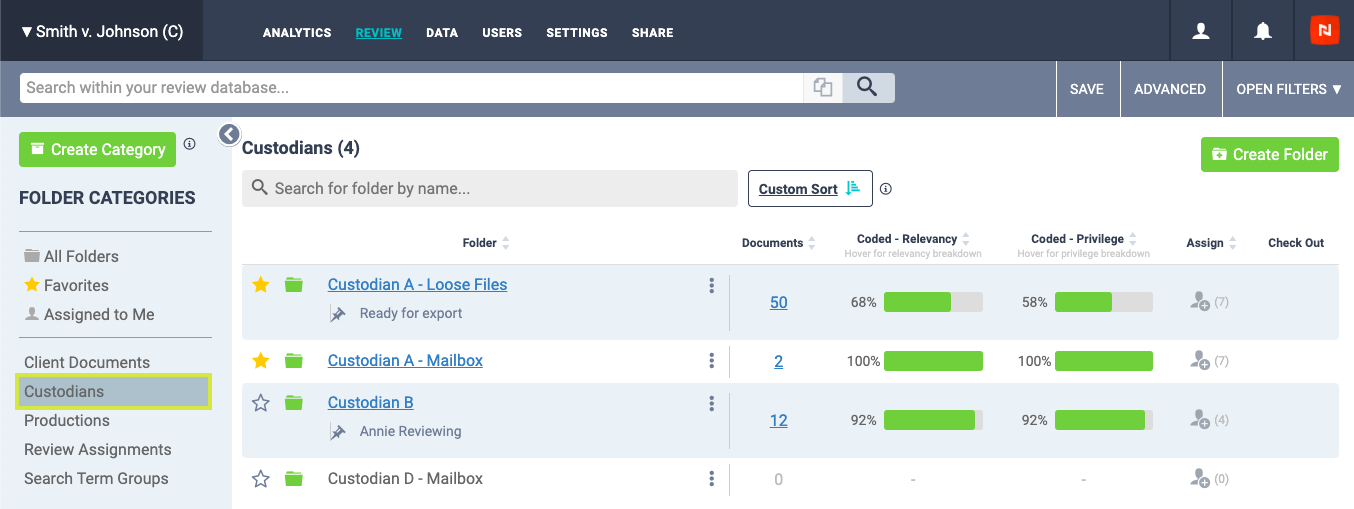
Once created, you will now see your newly created Category highlighted in the sidebar, and the associated folders displayed.
Advanced users can also create a new category from the SETTINGS tab in both Discovery and Litigation databases.
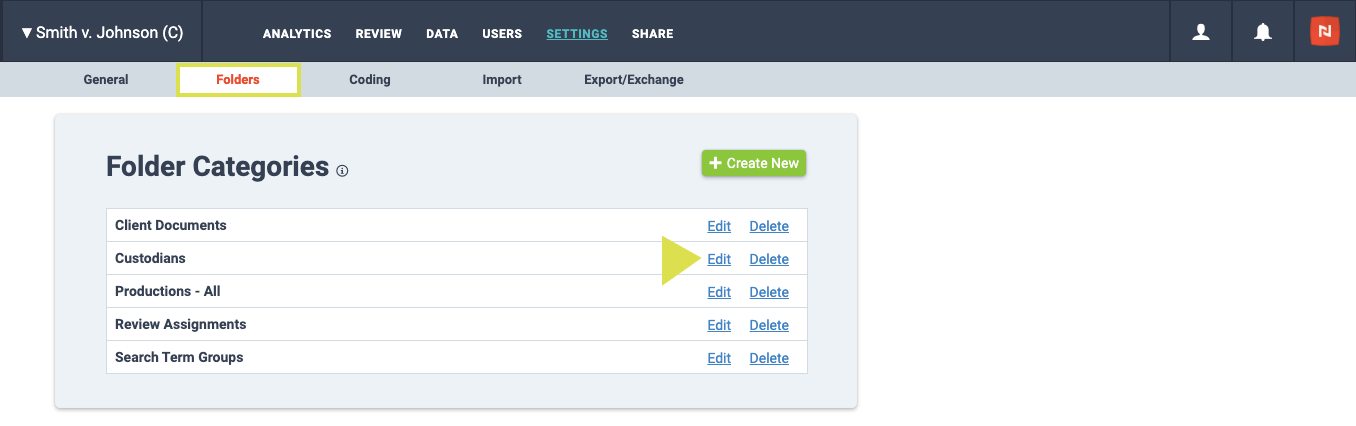
In Discovery, navigate to SETTINGS tab > Folders > Folder Categories, and click Create New.
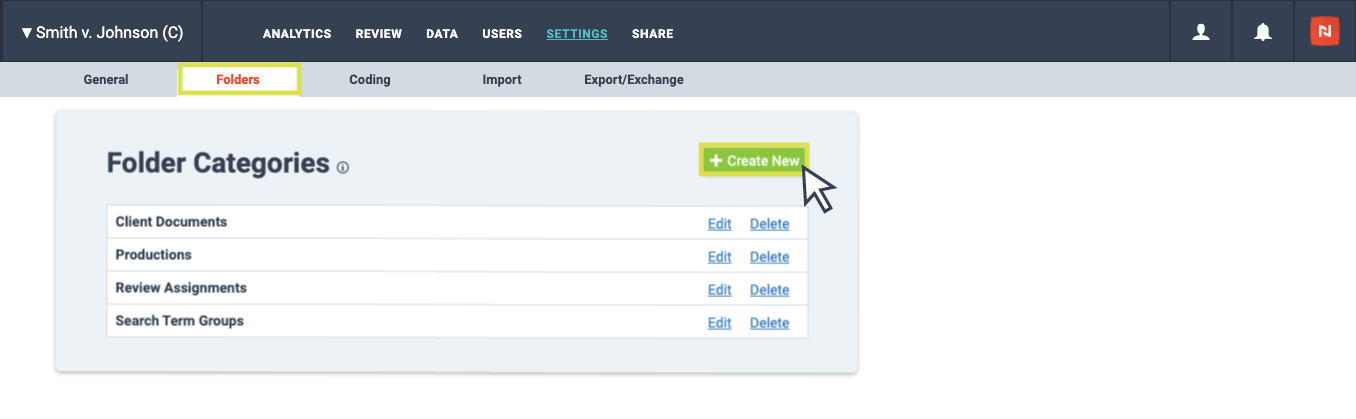
In Litigation, navigate to MORE drop-down tab > Settings > Documents > Folder Categories, and click Create New.
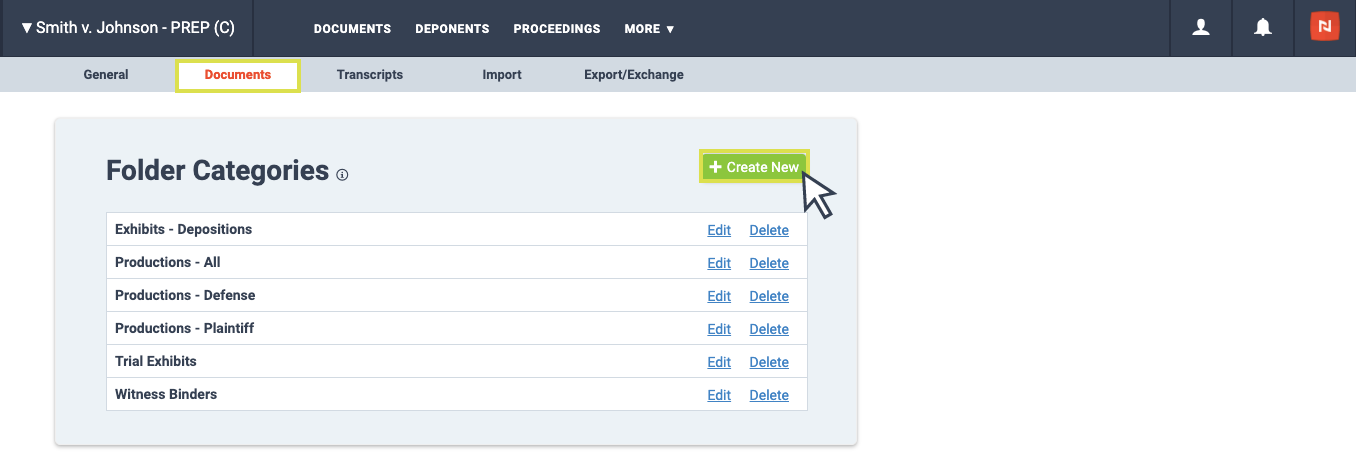 Once you click the green Create New button, you will be prompted to enter the Category Name, and select to which folders the Category should be applied (folders must be existing).
Note: Folders + Categories cannot have the same name. If you attempt to enter such during creation (or editing), you will be provided a warning.
After you've made your selections, click Create.
Once created, navigate back to the REVIEW or DOCUMENTS tab (Discovery and Litigation, respectively), and you will now see your newly created Category highlighted in the Category sidebar, and the associated folders displayed.
Edit a Category
Advanced users can edit any user-created Category from the folder list in both Discovery and Litigation databases.
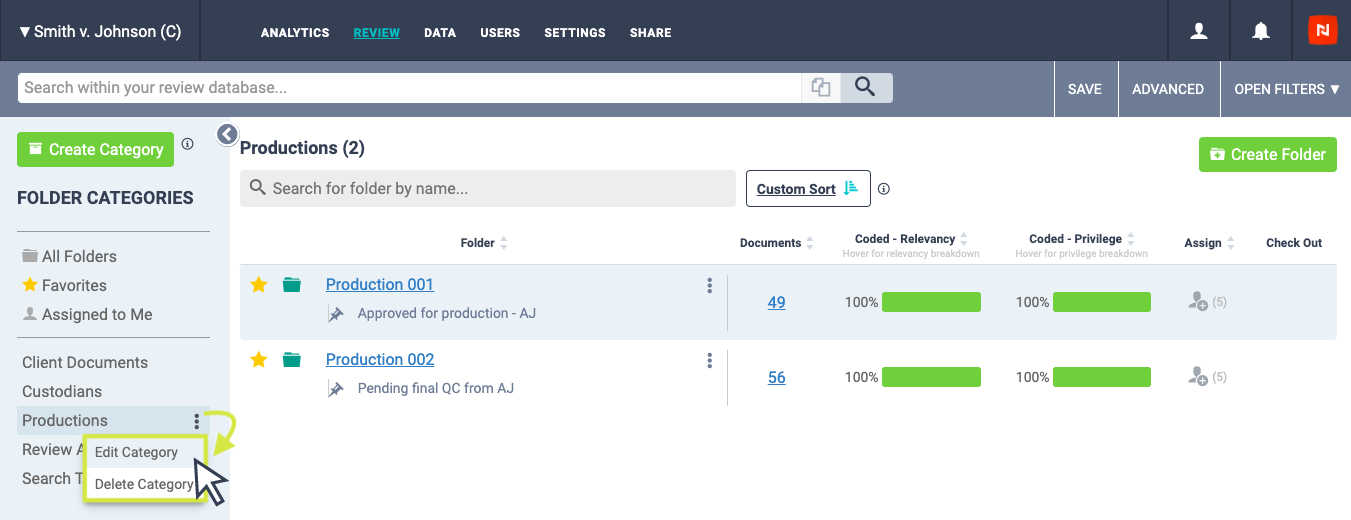
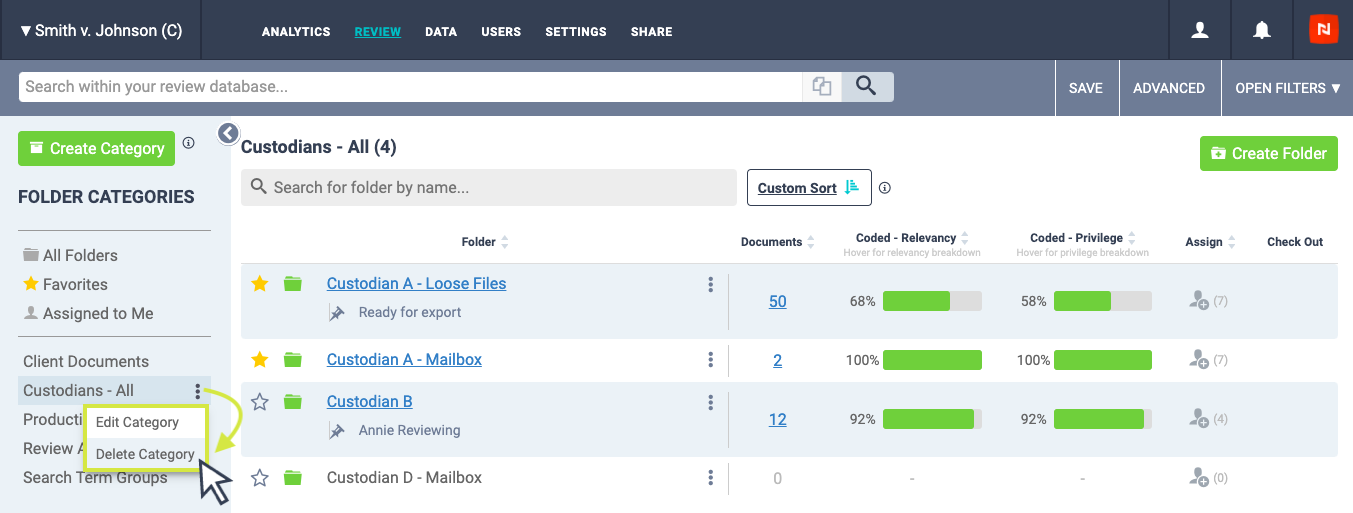
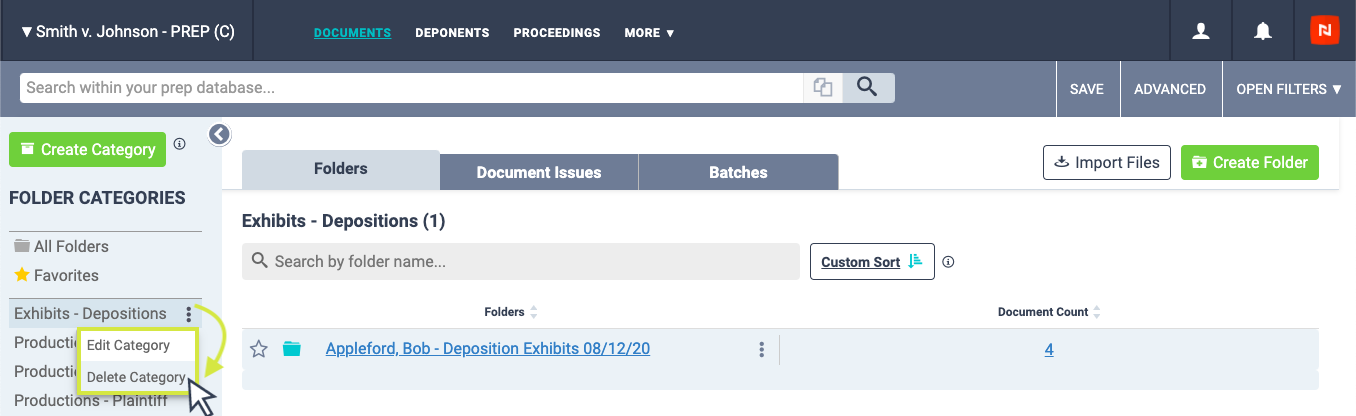
In Discovery, navigate to the REVIEW tab, open the Category sidebar with the arrow button at the top left, hover over the Category which you would like to edit, click the three-dot drop-down, and select Edit Category.
In Litigation, navigate to the DOCUMENTS tab, open the Category sidebar with the arrow button at the top left, hover over the Category which you would like to edit, click the three-dot drop-down, and select Edit Category.
Note: You must have the Folders tab displayed in order to open the Category sidebar in Litigation.

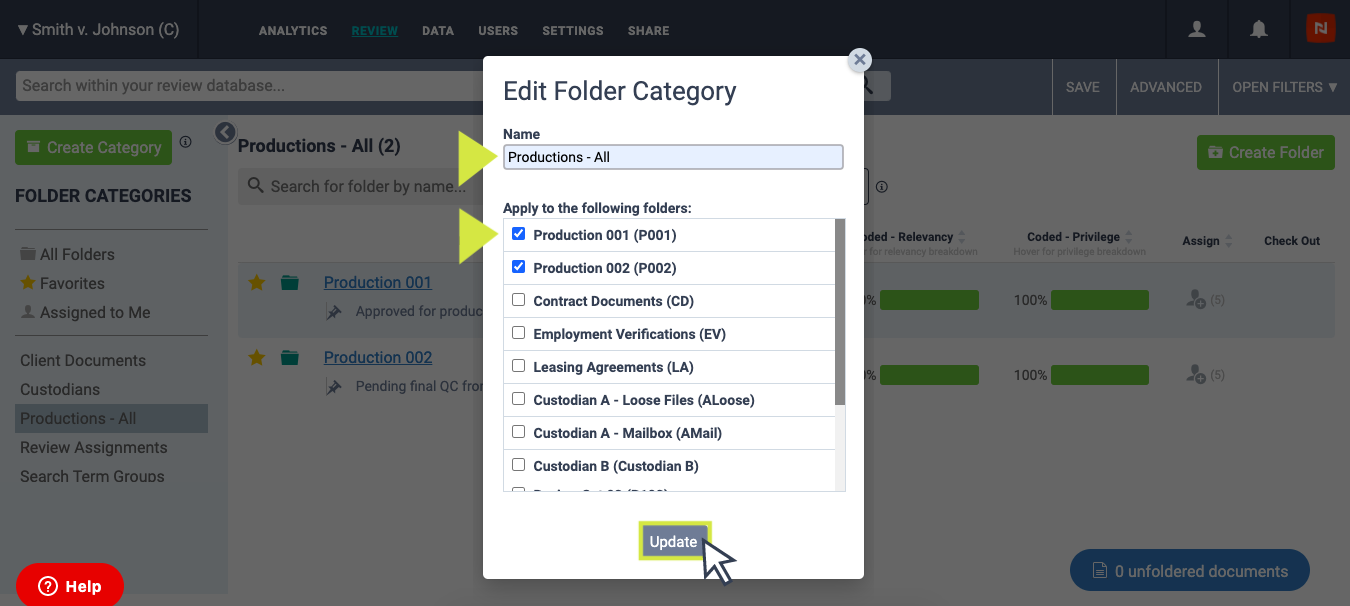
Once you click Edit Category, a pop-up modal will appear and prompt you to make any desired edits to the Category Name, and to which folders the Category should be applied (folders must be existing).
After you've made your selections, click Update.
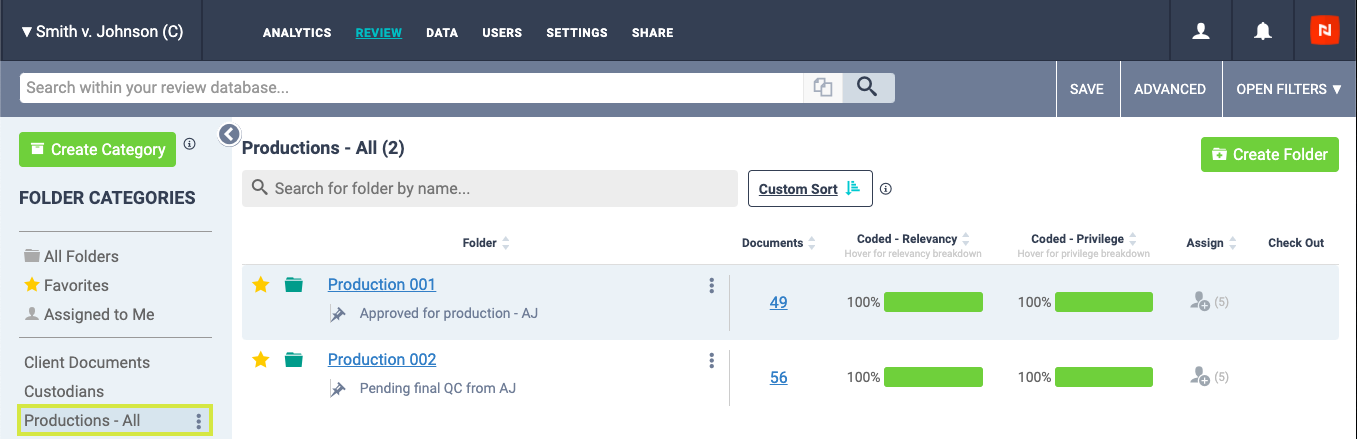
Once edited, you will now see your updated Category highlighted in the sidebar, and the associated folders displayed.
Advanced users can also edit a user-created Category from the SETTINGS tab in both Discovery and Litigation databases.
In Discovery, navigate to SETTINGS tab > Folders > Folder Categories, and click Edit.
In Litigation, navigate to MORE drop-down tab > Settings > Documents > Folder Categories, and click Edit.
Once you click the Edit option, you will be prompted to make any desired edits to the Category Name, and to which folders the Category should be applied (folders must be existing).
After you've made your selections, click Update.

Once edited, navigate back to the REVIEW or DOCUMENTS tab (Discovery and Litigation, respectively), and you will now see your newly updated Category in the Category sidebar, and the associated folders displayed.
Delete a Category
Advanced users can delete any user-created Category from the folder list in both Discovery and Litigation databases.
PLEASE NOTE: Deleting a Category will not affect any associated folders or documents.
In Discovery, navigate to the REVIEW tab, open the Category sidebar with the arrow button at the top left, hover over the Category which you would like to delete, click the three-dot drop-down, and select Delete Category.
In Litigation, navigate to the DOCUMENTS tab, open the Category sidebar with the arrow button at the top left, hover over the Category which you would like to delete, click the three-dot drop-down, and select Delete Category.
Note: You must have the Folders tab displayed in order to open the Category sidebar in Litigation.
Upon clicking the Delete Category option, you will be prompted to confirm you would like to delete the Category and after confirmation it will be removed from the Category lists in both the Category sidebar and Settings.
Advanced users can also delete a user-created Category from the SETTINGS tab in both Discovery and Litigation databases.
PLEASE NOTE: Deleting a Category will not affect any associated folders or documents.
In Discovery, navigate to SETTINGS tab > Folders > Folder Categories, and click Edit.
In Litigation, navigate to MORE drop-down tab > Settings > Documents > Folder Categories, and click Edit.
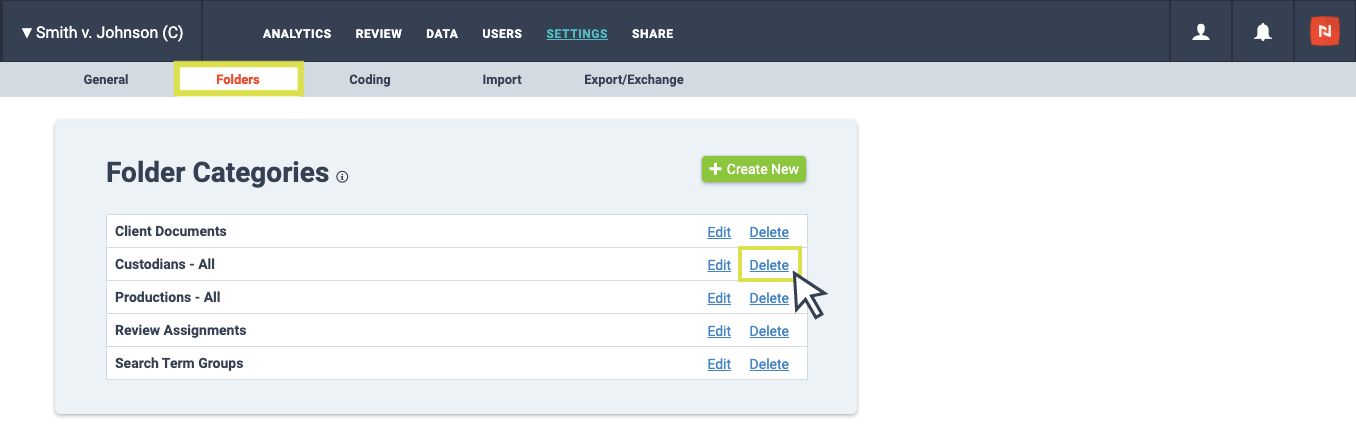
Upon clicking the Delete option, you will be prompted to confirm you would like to delete the Category and after confirmation it will be removed from the Category lists in both Settings and the Category sidebar.

Apply a Category during Folder creation
Advanced users can associate any existing (custom) Category to a Folder when creating an individual Folder. This is applicable in both Discovery and Litigation databases.
In Discovery, navigate to the REVIEW tab, click the green Create Folder button.
In Litigation, navigate to the DOCUMENTS tab, click the green Create Folder button.
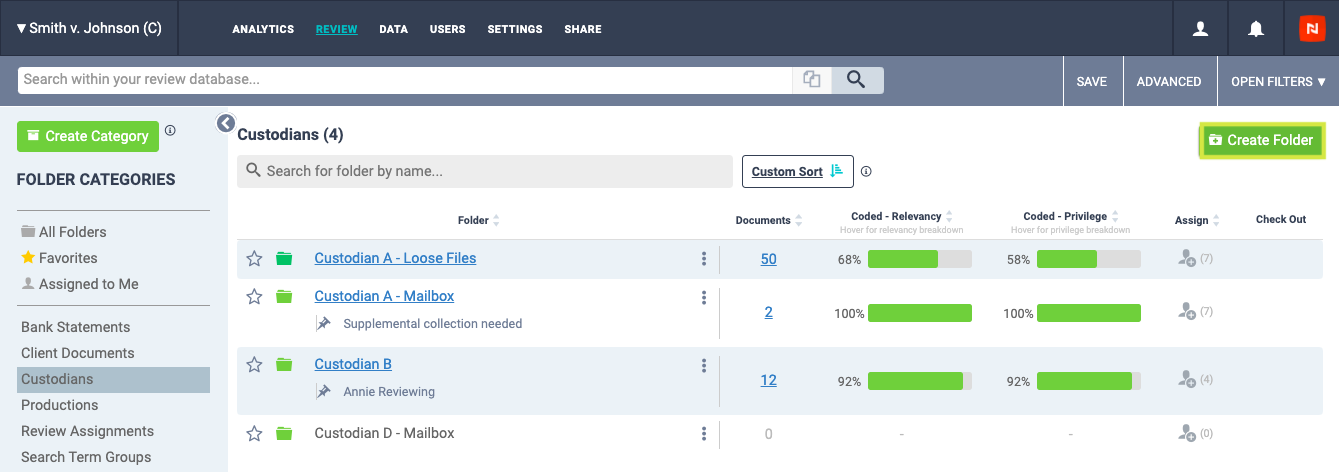
Once you click the green Create Folder button, a pop-up modal will appear and prompt you to enter the Folder Name, Abbreviation/Prefix, and select to which Categories the Folder should be associated (categories must be existing).
Note: Folders + Categories cannot have the same name. If you attempt to enter such during creation (or editing), you will be provided a warning.
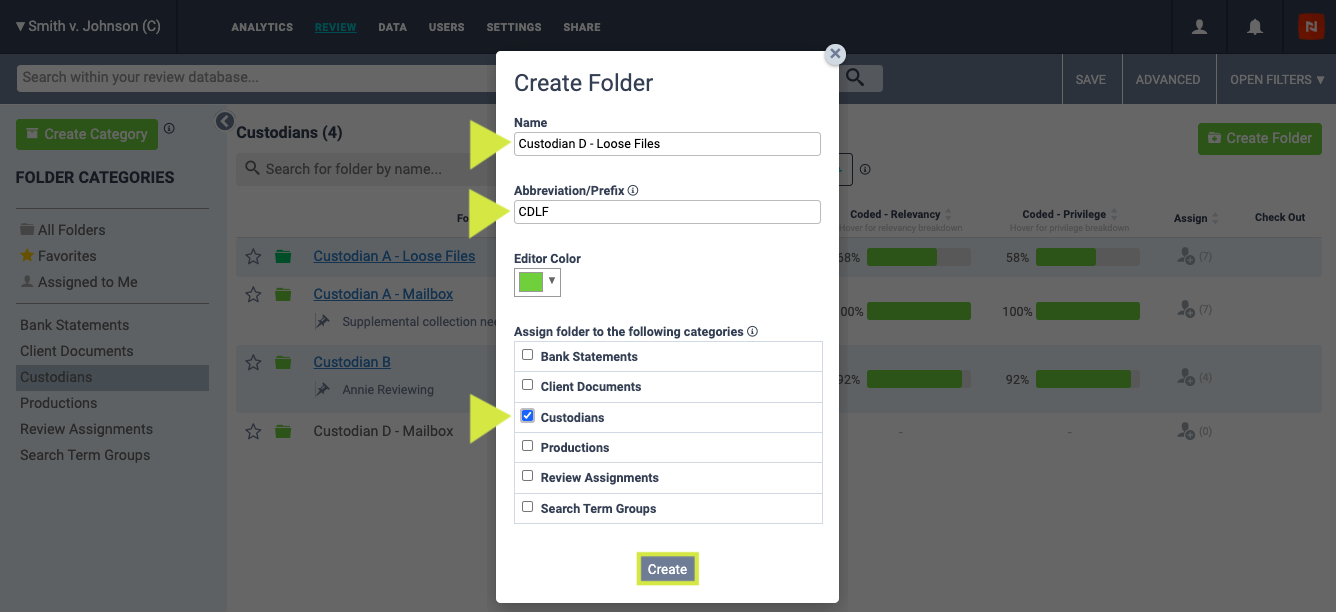
After you've made your selections, click Create.
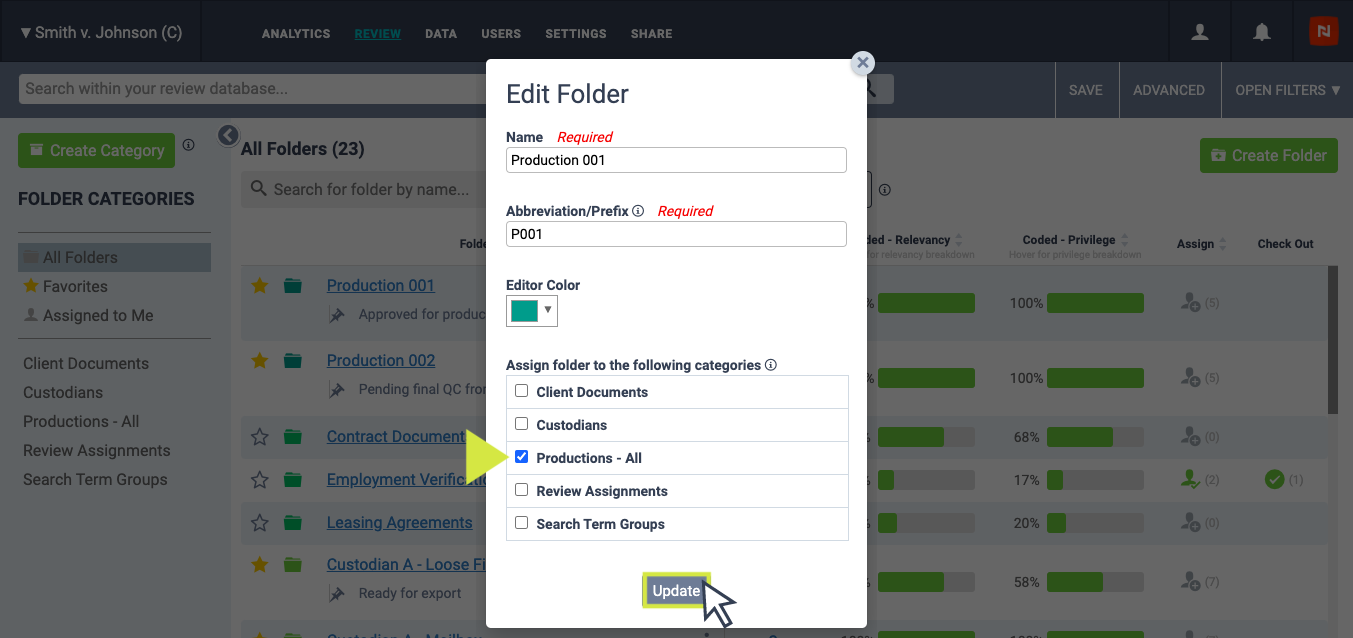
Advanced users can associate any existing (custom) Category to a Folder when creating an individual Folder. This is applicable in both Discovery and Litigation databases.
In Discovery, navigate to the REVIEW tab, navigate to the Folder you would like to edit, click the three-dot drop-down to the right of the folder name, and select Edit Folder.
In Litigation, navigate to the DOCUMENTS tab, navigate to the Folder you would like to edit, click the three-dot drop-down to the right of the folder name, and select Edit Folder.

Once you click Edit Folder, a pop-up modal will appear and prompt you to make any desired edits to the Folder Name, Abbreviation/Prefix and select to which Categories the folder should be associated with (categories must be existing).
After you've made your selections, click Update.
Once edited, you will now see your updated Category highlighted in the sidebar, and the associated folders displayed.

Working with Folder Categories
Release date: August 25, 2020
Every Discovery and Litigation database is equipped with two preset Categories: All Folders and Favorites.
While All Folders has always been an existing view, the addition of Favorites makes it simple to manage your most accessed or top of mind folders in one location. Favorites are unique to each user and available for all access levels.
To get started organizing your favorite folders, navigate to your folder list. In Discovery, the folder list is located via the REVIEW tab. In Litigation, the folder list is located via the DOCUMENTS tab.
To add a folder to your Favorites category, simply click the star icon and it will turn yellow.
To remove a folder from your favorites, click the star icon again so it is a gray outline. Doing so will remove it from your Favorites list but the folder will remain in All Folders and any other associated custom categories.
Managing your 'Favorites' Folder Category
Overview
Gain insight into your Discovery status with the progress bars for relevancy and privilege coding. Take advantage of these relevancy and privilege insights as you track progress to understand "what you have left," QC a production folder for consistent coding before Bates endorsements are applied, and more.
To access Discovery folder insights, first navigate to the REVIEW tab in any Nextpoint Discovery database. At first glance, the green + gray progress bars will display the percentage of documents in a particular folder which have been coded for Relevancy and Privilege. Coded is defined as any status other that "Not Reviewed."
If you want a closer look at the specific review statistics, simply hover over a particular progress bar.
Coded - Relevancy progress bars will display the specific counts for Responsive, Non-Responsive, Requires Follow-up, and Not Reviewed. The number of each will be displayed on hover will be clickable.
Coded - Privilege progress bars will display the specific counts for Privileged, Not Privileged, and Not Reviewed. The number of each will be displayed on hover and all counts will be clickable.
Add Notes for Streamlined Collaboration
Folder Notes enable all users to annotate at the folder level. These notes can indicate information such as the status of the review (e.g. "Ready for final QC), Bates ranges of the documents contained within the folder, and more. These notes are completely up to you.
To apply a folder note, simply click the three-dot drop down next to any name in your folder list, select Add Note, and enter your text.
As an added bonus, Folder Notes are now available in Litigation in an effort to streamline functionality across Discovery and Litigation.
FAQ: What if I am unable to access the three-dot drop down next to folders?
If you are suddenly unable to access any three-dot drop-down in your database, we first recommend refreshing your browser in order to clear the browser's cache. There are several ways to accomplish this:
- PC: Hold Ctrl and click Refresh in your browser
- PC: Hold Ctrl and click F5
- Mac: Hold Ctrl + Shift and click R
If this does not do the trick, please try closing your browser completely and open a new window.
More Information on Folders
- Read more on our first phase of folder management and navigation updates here >>
- Read more on creating Folders in Discovery here and in Litigation here >>
Advanced Folder Insights for Discovery & Litigation
*This functionality is available for Advanced users only.
In the top navigation of your Discovery Database, click SETTINGS and choose the Folders tab. Find the Folder you would like to add the user to, select the box next to the Folder, then click Bulk Actions.
To add a user click Assign, to remove a user click Un-assign.
Add a Reviewer to a Folder
*This functionality is available for Advanced users only.
When working in Nextpoint Discovery, folders can be assigned, unassigned, inactivated or deleted in bulk from SETTINGS > Folders. When working in Nextpoint Litigation, the same can be done through More > SETTINGS > Documents.
Assigning Folders
If you have a team of reviewers which like to assign folders (batches) of documents to, you can add those users at a Reviewer Access level. When they log in to the database, they will only be able to access, search and code documents in folders assigned to them.
Once your users have been added at the Reviewer access level, to assign folders, take the following steps:
- Navigate to SETTINGS
- Within SETTINGS, click on Folders (In Litigation, click on Documents)
- Select the review Folders you would like to assign by checking the box to the left of the folder name
- Use the "All" link on the top left of the folder list to quickly select all folders
- Select Assign from the Bulk Actions dropdown menu on the right
- Folders may also be reordered from this screen by using the "Reorder" button
- Click on the user(s) to indicate a folder assignment to the selected folders in Step 3
- Finalize your assignment by clicking Assign
How do I know which users are assigned to a folder?
When a folder is selected, hovering your mouse over the profile icon ![]() will show a listing of all users to which the folder has been assigned.
will show a listing of all users to which the folder has been assigned.
Viewing & Checking Out Assigned Folders (Discovery Databases Only)
After assignments are complete, Reviewers can navigate to the Review tab and see a list of folders to which they have been assigned.
If more than one Reviewer is assigned to a folder, users can check folders in/out via the "Check Out" column to indicate to others they are working on that particular folder.
Indicates someone else has "checked out" the folder.
Indicates nobody has "checked out" the folder.
Indicates you have "checked out" the folder.
If you click this icon, you can assign the folder to yourself. As well, you can hover over any of the counts to see who has been assigned or who has checked out any given folder.