Evidence, Exhibits, and Presentation in Litigation
Litigation Chronology and Evidence
The Litigation Chronology tab allows users to sort and filter their facts, issues, and people and export a CSV list of their case chronology. Here's how it works:
- Click on the "CHRONOLOGY" tab.
- Click on the tab to view your Facts, Key Documents, Issues, or People. This will pull up a grid view of set that you select.
- Inside that grid view, you can create a new fact/issue/person. You can also do this directly inside of a document you are reviewing (see the Facts, Issues, and People support article).
- To view all of the documents associated with a specific fact, issue, or person, click on the number hot link on the right side of that row.
Quick Tip
One of the greatest values of the Chronology Tab is that it can let you know, at a glance, which facts, people, or issues have a lot of document evidence, and which ones are lacking. Aside from being a link to each set, the number in the document column can serve as a guidepost for your team to determine where additional research may be required.
- You can also edit an existing Fact, Issue, or Person by clicking on the name of the one you want to change. This will generate a pop-out window.
When editing (or adding) a Fact, you can update its name, description, date, and color. The fact name should succinctly state the fact. The description can be longer, often using text evidence excerpts from the documents themselves. The date is important to add if possible as it will allow you to sort things in order by date. If you do not have an exact date and time associated with the fact, you can also flag it as "Approximate." Start and/or end dates are not required to create or save a fact. Changing a fact's color will change the color of the flag seen to the left of the fact name and can be used to organize and group facts.
When editing (or adding) an Issue, you can update its name, abbreviation, description, and color. The abbreviation will appear in grid view and make the issues identifiable at a glance. While the name of an issue is typically just a few words, the description can explain it and include context specific to the case. Just as with facts, the color of an issue will appear to the left of it's name in the grid view.
When editing (or adding) a Person, you can update their name, abbreviated name, role, type, email and color. The role and type fields allow you to repeat selections through the dropdown or "Add new" values for these fields. Like with facts and issues, the color of a person will appear to the left of it's name in the grid view. - Above the grid view in the Chronology Tab, you can sort or filter your Facts, Key Docs, Issues, and People by each of the fields that appear on the grid view. You can isolate date ranges or even filter Facts by key word.
- When you have a list of Facts, Issues, or People you want to view or report on outside of Nextpoint, you can select the rows you want to include with the checkboxes to the right and click the "Export as CSV" button at the bottom of the grid view to download a chart containing the information from the grid view.
- Case Connections (Coming October 3, 2023) - In the Facts, Issues, and People tabs, you can see your other case connections. For example, you can view which people and issues are associated with each fact and filter your fact list to view only specific issues or people.
Next Up - Evidence Dashboard
Litigation Chronology Tab
The Evidence Dashboard allows you to visualize key case elements to help build your case story. Similar to the Analytics tab in a Discovery database, the Evidence Dashboard provides a high-level view of the components in your Litigation database, with clickable links that take you directly to each component. The dashboard is also designed to highlight where your case is well supported by document evidence and where gaps may exist that require additional research and analysis.
- Access the Evidence Dashboard by clicking the Evidence tab.
- View counts of key components in your Litigation database across the top row. These links are clickable and will take you to the corresponding component.
- The Fact Overview card shows how many facts are supported by evidence connected to specific documents, helping you identify strengths and gaps in your case. Both supported and unsupported sections of the donut chart are clickable and display the related facts.
- The Document Issues card displays document counts for each issue, making it easier to see which issues are supported by a large volume of documents and which may require further review.
- The Top Tagged People card shows which individuals have been tagged with the most document evidence.
- The Document Overview timeline displays a histogram of all documents or key documents in your database. This helps you identify time periods that are well supported by evidence and those that may be missing documentation.
- Case Notes allow you to store additional case information, including scheduling details, links to court documents, and other notes that may be useful to all users in the database.
-
Your Favorite Folders are unique to each user and provide quick access to folders you work in regularly. You can add a folder as a favorite by clicking the star icon next to it in the Documents tab.
- The Most Viewed Documents list shows the documents viewed most frequently by all users in the database. This is not a user-specific metric and is the same for everyone in the database.
- The Deponents and Linked Exhibits card provides an overview of each deponent along with a count of exhibits linked to their depositions.
-
The Search Bar allows you to run searches across your Litigation database.
Note
Using the search bar in the Evidence Dashboard will take you directly to search results in a grid view in the Documents tab.
Evidence Dashboard
The Nextpoint Litigation Suite offers you the ability to build your case story by linking the Facts, People and Issues to the various pieces of document evidence in your case directly in the app. When you assign dates to the facts, you can also view your case story in chronology format. This allows users to quickly and easily filter aspects of the story by a date range, the specific individuals, or the issues involved in the case for deposition and trial prep.
- Facts can be used to underscore the anatomy of a dispute, including important events, legal claims and defenses of each party.
- Issues are those vital questions of law on which the court must rule.
- People are important individuals or organizations in a matter.
Tagging Exhibits in the Document View
- While viewing a document, expand the “Case Connections” tab on the right.
- Select the “Facts”, “Issues”, or “People” section to add or create a new item for this document. You can also remove a fact, issue, or person by clicking on the red circle
next to an item. Clicking on a selected item at the document level will also allow you to edit that Fact/Issue/Person.
- Expand the drop down and select the item you would like to add to this document, or advanced users can select “Create New” to add a new item to this list directly from the Document View.
You can add any additional facts, issues, or people to each document as you review.
Key Documents
Nextpoint's "Key Documents" field appears at the top of each database's "Hot Fields" section by default and is a way for users to flag and identify important documents for later use. Simply click on the checkbox to tag a document and be sure to save your update.
To code multiple documents as "Key Documents" at once, select them from your grid view, and bulk code them under the "Fields" section.
Searching on Facts, Issues, and People
To search for facts, issues, or people in your database, type in the name of the field, a colon, and the value in quotation marks. The following examples would work as searches in your litigation database:
fact:"Enron admits to overstating 600M in profits since 1997"
issue:"Fraud"
people:"John Smith"
person:"John Smith"
You may also run searches for specific terms within each set (e.g. facts:"Enron") to identify facts, issues, or people that contain specific terms. Additionally, to search for "people" you can search on either "person:" or "people:" as seen in the examples above.
If you want to search for different case connection items within the same document with an "AND" search:
issue:"Fraud" AND person:"John Smith"
Facts, Issues, and People are also available in the "More Tools" section of the advanced search tool.
Note
Facts and People are currently not available in the Document Filters at this time. But you can search on the fields directly or through the advanced search tab, or you can click on the document count in the Chronology tab for both Facts and People. For more information, view the support article on the Litigation Chronology Tab. Issues (formerly Document issues) have always been available in the Advanced Search tab and in Filters and will continue to be available there.
Overlaying Facts, Issues, and People
You can overlay Facts, Issues, or People onto specific documents in your database, just like you can overlay other fields. Add a key field like Nextpoint or Bates Start, and then columns for your facts, issues, or people. You can apply existing facts, issues, or people or you can create new ones directly from the overlay. When mapping your fields during your overlay, select the field title "Facts", "Issues", or "People" and run the overlay.
Currently, you cannot add dates, descriptions, or other facts, issues, or people properties while running an overlay. To edit these properties, click into the fact, issue, or person you created (see #5 in this article) and manually apply the additional information.
Next up - The Litigation Chronology Tab
Facts, Issues, and People
The Visual Timeline Builder feature in Nextpoint's Litigation suite allows users to create visual timelines from the lists of facts that they have added to their database. These visuals can be used for organization, trial and witness prep, or even as demonstratives in a trial.
Creating a Visual Timeline
From your list of facts, select those you want to add to the timeline. If it is helpful, you can filter your facts by issue or person.
After selecting your facts, click on the "+ Add to Visual Timeline" link at the bottom of the grid view.
You can export your timeline as a PDF or PNG file, by clicking on the "Export" link in the upper right corner of your screen. Additional options for export and viewing the timeline in "full screen" are available by right-clicking on the timeline.
Adding or Removing Events
You can add or remove events from your timeline without returning to the Fact Chronology section of your database.
When viewing your timeline, click on the "Fact Selection" tab to change which facts you want to include in your timeline. Once you select all of the facts you want to include, click back to the "Visual Timeline Builder tab to view your results.
To exit the Timeline Builder and return to your Chronology tab, click on the "Exit Timeline Builder" button.
Note
Click "Save" on the toolbar to store your Timeline and come back to edit at any time.
Adjusting Timeline Format
You can name your timeline so that it appears on your timeline export(s) by clicking on the pencil icon at the top of the screen.
You can also edit how each individual fact appears on your timeline by clicking on the box, and then turning on or off the Fact Name, Fact Description, Start/End Date, or changing the color of the Fact in the resulting tab.
You can also reset to default settings by clicking on the "Reset to Default" link on the upper right corner of your screen.
Litigation Visual Timeline Builder
Theater View
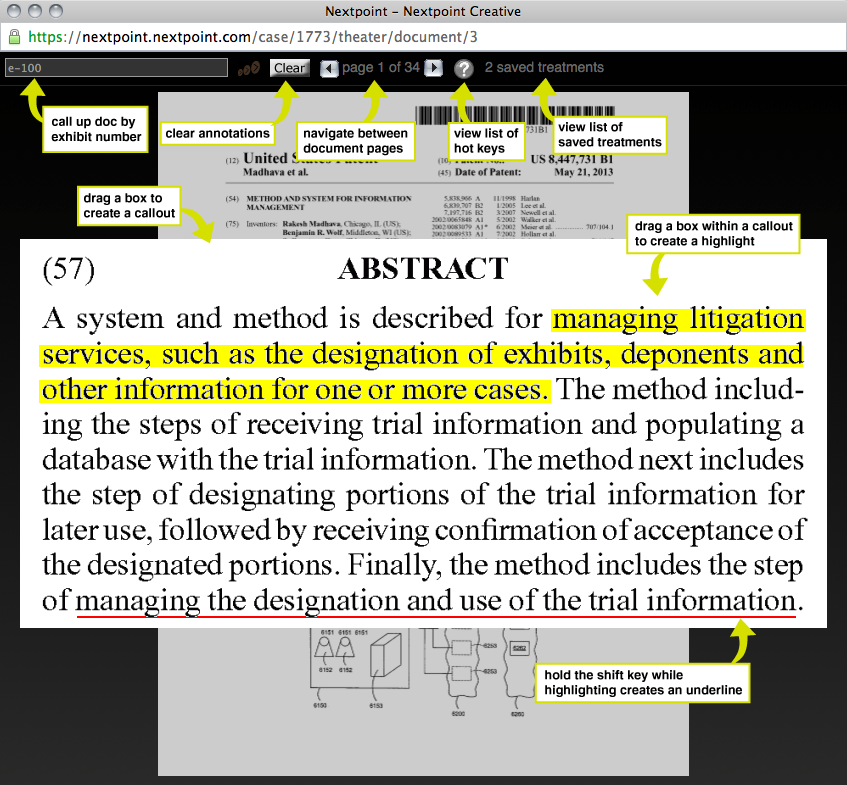
You can use Theater in Nextpoint Litigation to create, present, and annotate document callouts and highlights. Using Nextpoint Theater, you can pull out specific sections of documents and highlight or underline key text. You can select multiple sections of a document, and the tool will automatically resize the text boxes. These documents can be displayed live through Theater or downloaded for use in offline presentation tools.
How to Access Theater
1. Open Theater from the main documents page
Go to MORE > Theater to launch a blank Theater window.
2. Open Theater when viewing search results
In grid view, click the and select the Theater icon
 to view the document in Theater.
You can also include the Theater icon in your Grid View Template for one-click access.
When in Chron View, click the Theater icon  next to a document to view it in Theater.
3. Open Theater when viewing a document
Go to Document options > View in Theater to launch the Theater window.
Creating Treatments in Theater
Creating a treatment begins in Theater by clicking, dragging, and releasing your cursor to call out a section of the document. From there, you can:
- Drag to create highlight treatments
- Shift + drag to create a red underline
Treatments can be saved, downloaded, recalled, and exported in bulk for presentation or review.
Pro Tip: Use the visual hints below and the available keyboard shortcuts. These shortcuts are also accessible via the question mark (?) menu in Theater.
Document Hotkeys & Shortcuts
| Shift | Create an underline |
| W | Create a whiteout box |
| n, > | Go to next page |
| p, < | Go to previous page |
| f | Find by designation (e.g. CEX-10) |
| j | Jump to specific page |
| s | Save the current document treatment |
| 1-0 | Load a saved document treatment |
| z, u | Undo a callout/highlight |
| Z, y | Redo a callout/highlight |
| c | Clear all callouts |
| r | Reveal all callouts |
| d | Normal Resolution |
| D | Higher Resolution |
| Esc | Close the document/Clear a Screen |
| ? | Show/hide help |
| Shift + left or right arrow | Rotate image |
Saving Treatments in Theater
To save your treatment, type "s" after creating the treatment to open the dialogue box shown below. You can save your treatment to an Issue, Folder (great for witness prep), or None.
Click Save, and your treatment will be available for recall.
Recalling Saved Treatments
While in Theater
To view the saved treatments in Theater, click "saved treatments" to see thumbnails of your treatments.
Clicking on a thumbnail will open the saved treatment. You can also type the number of the saved treatment to recall it in Theater.
While viewing an individual document
- While viewing a document, click Document options > Saved treatments to see thumbnails of saved treatments.
- Click a treatment thumbnail to launch it in Theater.
- Click the
to delete a treatment.
- If a newly saved treatment doesn't appear, click the
to refresh the list.
Export Saved Treatments
When viewing search results
From any grid view list of results, click OPEN FILTERS and drop down the Work Product section. Once open, scroll to the Treatment Label section and select all treatments, or only a certain folder or issue for which you would like to export treatments (e.g., John Smith Depo Prep).
Presenting Documents in Court with Theater
Theater can be used as a live presentation tool for trial or hearing settings.
For best results, use a dual-monitor setup with your screen extended:
- Use your Primary Monitor to search for documents and prepare treatments (visible only to you).
- Use your Secondary Monitor to display documents in Theater, which can be mirrored to the courtroom display.
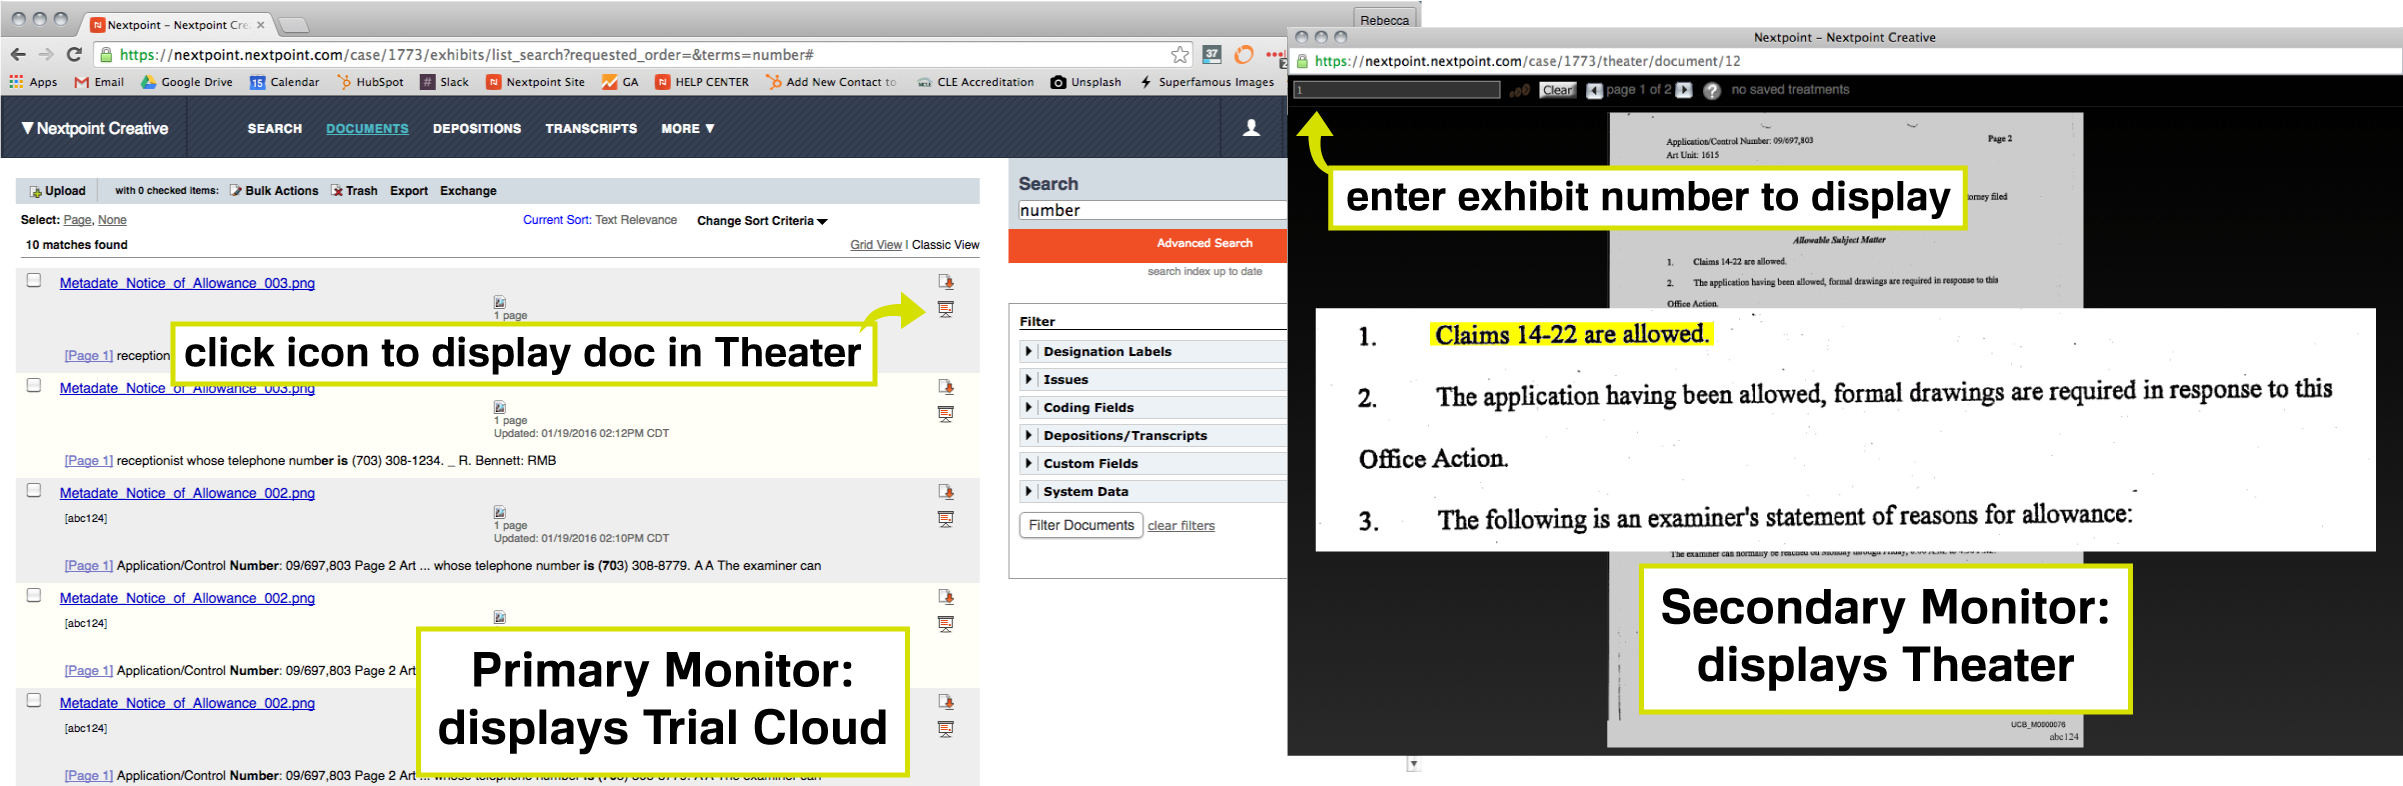
You can open documents in Theater using the Theater icon ![]() from search results or by entering an exhibit or designation number directly in Theater.
from search results or by entering an exhibit or designation number directly in Theater.
Return to Litigation Workflow
Working with Nextpoint Theater
Full Screen Video Deposition Viewing
Launch Theater by clicking the Theater icon, , next to a deponent or proceeding name.
The Open in Theater button is now also located under the video player in the side panel when viewing the deponent.
You can watch a deposition video from the beginning, or cue up to designations.
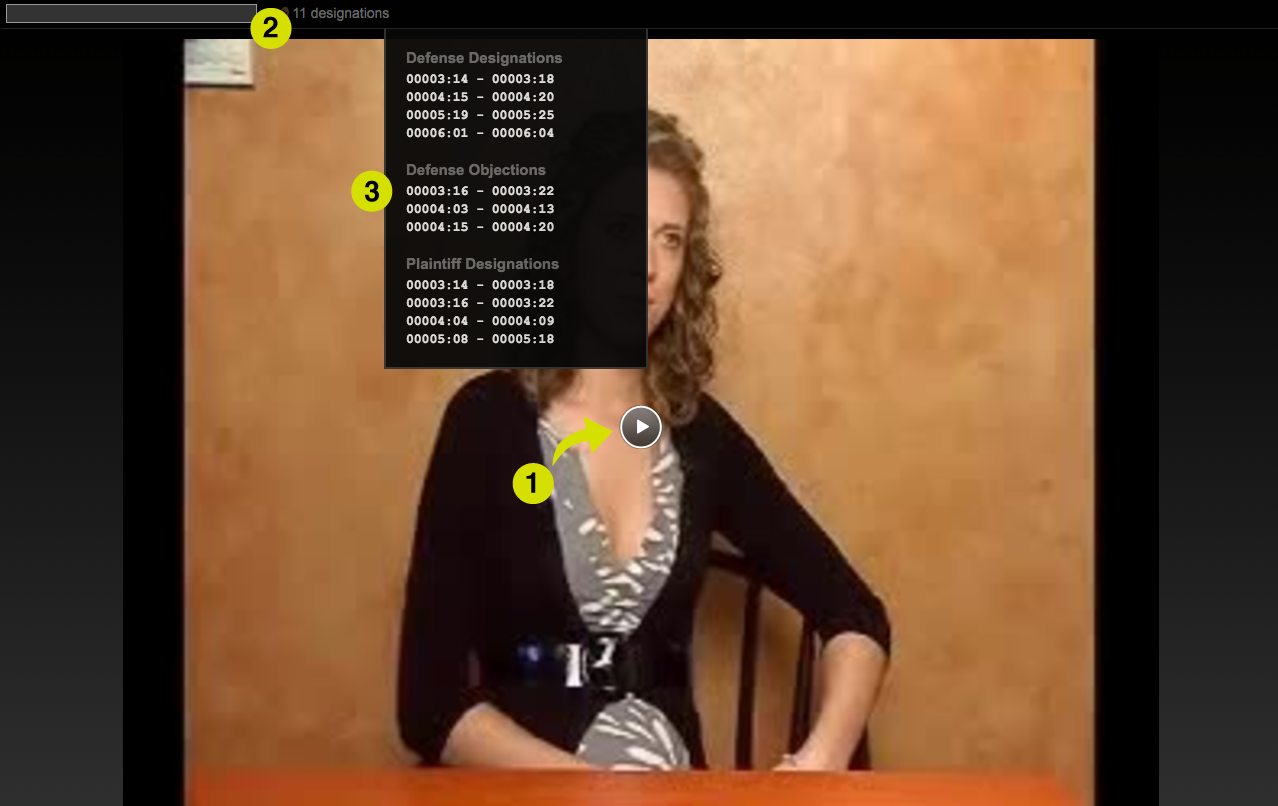
1. Click on the video to play from the beginning.
2. Click on designations to open a list of clips.
3. Click on a clip to play it.
Return to Litigation Workflow
Viewing Deposition or Proceeding Video in Theater
Working with Exhibits
Nextpoint Litigation allows you to link exhibits to transcripts in two ways. You can relate a document to a deposition or proceeding transcript, and once a document is related, you can create hyperlinks within the transcript. See information on both below.
Relating Documents to a Transcript
To relate exhibits to their associated transcript, first import the transcript via the DEPONENTS or PROCEEDINGS tabs. You can then import and relate the associated exhibits in one of two ways:
This option is beneficial for importing and relating multiple documents/exhibits:
- Navigate to MORE > Data > File Room and upload the transcript exhibits, Import accordingly.
- After import, create and apply a folder for the particular transcript's exhibits (e.g. "John Smith Exhibits").
- Once the exhibits have been imported and the folder applied, navigate to the related transcript via DEPONENTS or PROCEEDINGS and click "Relate Folder" under the Related Documents drop-down.
- Select the folder of exhibits you would like to relate to the transcript, and click "Submit"
- The documents/exhibits contained within the selected folder will then show as being related to the transcript in both the transcript viewer and from the DEPONENTS or PROCEEDINGS tab.
This option allows for the import and relation of only one document at a time.
- Navigate into the desired transcript via DEPONENTS or PROCEEDINGS.
- Click blue "Import" under the Related Documents drop-down.
- A new window will prompt you to give enter a Title and Shortcut for the document, as well as any Link names that will become hyperlinks in the transcript. Add File From File Room/Computer or Drag and Drop the document file, and click "Import Related Document".
- The document/exhibit selected for import will then show as being related to the transcript in both the transcript viewer and from the DEPONENTS or PROCEEDINGS tab.
Hyperlink a Document in a Transcript
After you have related a document to a transcript, you can add hyperlinks for quick access when viewing the transcript. Click on the button to open the edit window. Enter the Names you would like to create hyperlinks for, then click Make Edits.
The Document Names will now appear as hyperlinks within the transcript.
- Clicking on the hyperlinked title within the Related Documents section will toggle amongst each entry of that specific exhibit in the transcript.
- Clicking on the hyperlink within the transcript will open that exhibit in a new tab of your browser.
Using Related/Linked documents in a Transcript:
- Import a new document to relate to the transcript.
- Click on the document name to jump to each entry of that particular exhibit in the transcript (when hyperlinked).
- Add or Edit hyperlinking to the document
, or delete the relation
.
- Open the document in a new tab of your browser.
- Insert text which should be hyperlinked within the transcript.
- View a list of all the related documents in a new tab of your browser.
Return to Litigation Workflow
How to Relate Exhibits to Transcripts & Create Hyperlinks
Which database type should I follow?
If you see the
badge next to your database name, follow the
NextGen tab below. Otherwise, switch to the
Legacy tab.
Exhibit Stamp Template
The Exhibit Stamp Template screen allows you to customize how exhibit stamps appear on documents. You can control the stamp’s structure, content, placement, and color, with a live preview showing how your changes will look.
Use the Structure section to design the layout of your exhibit stamp. You can include up to four rows of content.
Each row may include:
- Plain text (for example, Exhibit)
- Special characters
- Dynamic placeholders
Available placeholders:
- %F — Folder name
- %f — Folder prefix
- %e — Exhibit number
To modify the stamp structure:
- Enter text or placeholders into each row field.
- Click Add row to include an additional line (up to four total).
- Click Remove to delete a row.
- Use the drag handle to reorder rows.
The Preview panel updates automatically to show how the exhibit stamp will appear on a document based on your current settings.
Use the Settings section to control the default placement and appearance of the stamp.
- Vertical Placement — Choose where the stamp appears vertically (Top or Bottom).
- Horizontal Placement — Choose where the stamp appears horizontally (Left, Center, or Right).
- Color — Select whether the stamp appears in white or uses the folder’s assigned color.
You can reposition the stamp on individual documents after it has been applied.
- Click Update to save your changes.
- Click Cancel to discard changes and exit without updating the template.
Start by going to MORE > Settings.
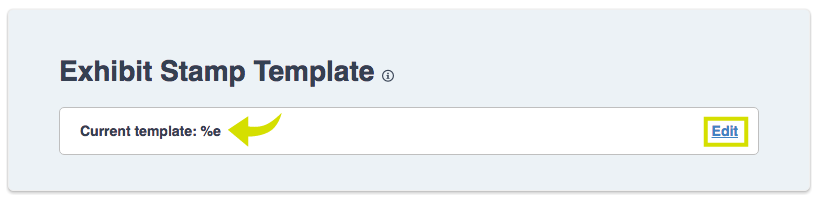
Exhibit Stamp Template
Nextpoint exhibit stamps include three rows of information, each serving a specific purpose.
Stamp Row Structure
- Row 1 — Displays the name of the folder from which you are stamping (for example, DEFENSE).
- Row 2 — Displays the word EXHIBIT.
- Row 3 — Customizable row that can include placeholders and freeform text. The exhibit number (%e) must be included in this row.
Available Placeholders
- %F — Folder name
- %f — Folder prefix
- %e — Exhibit number
Example
Including the placeholders %f-%e in the third row would result in a stamp similar to the example shown when applied to the first exhibit in the Defense folder.
Updating the Third Row
To change the third row of the stamp, select one of the common placeholder options or enter your own combination of placeholders and freeform text (for example, adding a court docket number).
Return to Litigation Workflow
Setting Up the Exhibit Stamping Template in Litigation
To create your trial exhibit list, first create a folder in which you will organize your exhibits.
To build your trial exhibit list document-by-document:
When viewing a document, open the Related Folders drop-down list.
- The gray folders listed indicates that the document is already a part of that folder set.
- Clicking the pencil icon will allow you to make edits.
Click the dropdown menu to choose another folder you'd like to add to related.
You can enter the Exhibit Number by clicking the pencil icon. If you leave it blank, the next available number will be used.
You can also enter Offered and Admitted dates, as well as any Notes for the exhibit.
When you are done, click "OK" and then Save. Your document is now a part of the exhibit set.
Export and Download your Exhibit List
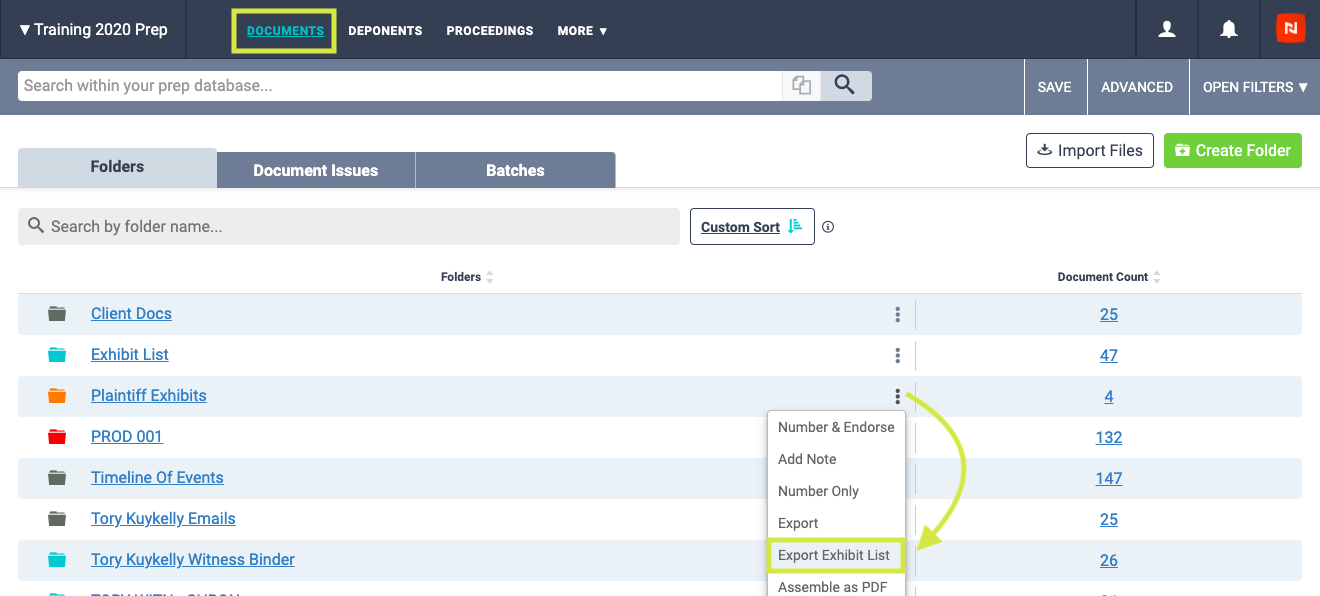
To quickly download a trial exhibit list, go back to the main Documents tab and select Export Exhibit List from the dropdown menu next to the Folder containing the trial exhibit list you wish to download.
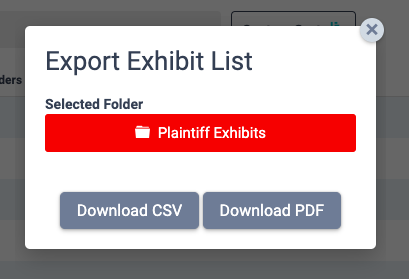
Choose whether you would like to Download CSV or Download PDF.
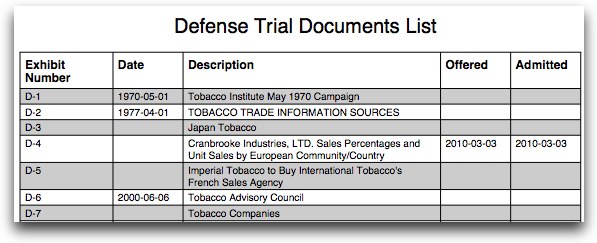
You will be able to download an exhibit list like the one below.
If you wish to add multiple documents to your exhibit list at the same time, click here to learn how.
When you are ready to stamp your trial exhibits, click here to learn how.
Return to Litigation Workflow
Creating a Trial Exhibit List
Exhibit stamping allows you to label documents with court-ready identifiers (such as exhibit numbers, case details, or docket information) for use in depositions, hearings, and trial. The steps for applying exhibit stamps differ depending on whether your database is NextGen or Legacy.
Which database type should I follow?
If you see the badge in the top left next to the name of your database, follow the NextGen steps below. Otherwise, switch to the Legacy tab.
Before stamping exhibits in either version, you must create a folder and add your documents to it.
Note: Have you considered exhibit marking prior to depositions to consolidate your master exhibit list? If so, see our suggested exhibit stamping workflow here.
Applying Exhibit Stamps in NextGen Databases
Set the Exhibit Stamping Template
Before stamping, configure your template using the Exhibit Stamping Template.
Apply Exhibit Stamps
- Open any document within your stamping folder.
- Expand the Related Folders section in the upper-right panel.
-
Click the blue stamp icon next to the stamping folder.
- The exhibit stamp appears instantly on the document.
- Advance to the next document to continue stamping.
Once you navigate away from a stamped document, the stamp is saved and the stamp icon turns green.
Note: A document can only have one exhibit stamp at a time. Re-stamping replaces the existing stamp.
Resize, Modify, or Remove Stamps
- Click the exhibit stamp to reveal resize handles.
- Drag to resize as needed.
- To remove a stamp, open the Layers panel and delete the exhibit stamp annotation.
Stamping Behavior
- Stamps appear instantly without re-processing.
- Stamps are branded into documents at export time.
- Stamps can be resized or removed without re-imaging.
Applying Exhibit Stamps in Legacy Databases
Set the Exhibit Stamping Template
Before stamping, configure your template using the Exhibit Stamping Template.
Apply Exhibit Stamps
Click on the first document in the population, look in the Related Folders section in the right sidebar. Click the icon to open the folder window and click the
icon to open the stamping interface.
When the stamping interface appears in the next window, use the following steps:
- Click the checkbox to add a stamp.
- Place the stamp where you'd like on the document.
- To apply a stamp only to this document, click Apply & Close.
- If you want to continue to the next document in the label set, click Apply & Next.
Your documents will re-process to burn the exhibit stamp onto the image, and the icon will change to green
to indicate that the document has been stamped.
If you need to re-stamp, don't worry, you can remove the document from the folder set, and the stamp will be removed.
Return to Litigation Workflow