Search and Analyze
- Nextpoint Search Guide
- Subfoldering Setup Guide
- NextGen vs. Legacy: What's Different?
- Locked Metadata Fields
- Search Hit Highlights
- How to Report the Page Count of a Folder
- Global Account Search
- Discovery Analytics
- Advanced Search
Whether you're running simple keyword searches or building complex queries using Boolean operators and metadata filters, this guide walks you through everything you need to know. You’ll find clear explanations of search syntax, operators, and field-specific commands, along with practical examples to help you get the most out of your searches.
If you would like to download a PDF version of this search guide, click here.
Search Topics Below
- Where to Search in Nextpoint
- Search Syntax Operators - Search_Text, Search_Fields, AND, OR, NOT, Proximity, Exact Phrase, Wildcard
- General Metadata - Author, Date, Document Type, File Extension, File Name, File Path, Title, Root Folder, App Name, Encrypted, Page Count
- Email Metadata - Email Author, Recipients, CC, BCC, Domain, Sender Domain, Receiver Domain, Email Subject, Email Sent, Email Received, Mailbox File, Mailbox Path, Email Message ID
- Document Metadata - Document Title, Document Subject, Document Author, Document Last Author, Created Date Time, Modified Date Time, Last Print Date
- Document Identifiers - Nextpoint ID, Bates, Bates Prefix, Bates Range
- Work Product - Folder, Category, Issue, Responsive Status, Privilege Status, Highlighted, Highlight Notes, Page Notes, Treatments, Exhibit Stamped, Custom Fields, Tags
- True/False Fields - Privileged, Confidentiality, Redacted, Email Thread, Bates Stamped, Native Placeholder, Non-Imaged Placeholder
If you are still having difficulty building your search syntax after viewing the search guide, please contact our Product Support team at support@nextpoint.com.
Where to Search in Nextpoint
Users can log into any Nextpoint Discovery database to view the ANALYTICS tab.
ANALYTICS presents powerful, interactive visualization of your data in graphical form.
Simply click on any of the graphs to view a complete list of the documents in that specific category. The overall progress of your review project is also quickly viewable in the interactive 'doughnut chart’ near the bottom of the page.
To refine the data in your visualizations, just add terms to the SEARCH TO REFINE box on the upper right, and hit return on your keyboard. All data visualizations will redraw correspondingly.
View further details on the Analytics page here >>
The Search bar is available in both Discovery and Litigation databases, and when working in Litigation, can be utilized for searching documents and transcripts. Simply enter your search syntax (additional details on building searches below) and click the eyeglass icon.
Below, we illustrate how you can begin with a simple keyword in the search bar and continually add criteria in order to further refine your results.
If you are learning the nuances of building more complex searches and/or just want some help building your search syntax, there is an Advanced Search functionality to assist.
Building an Advanced Search
To build and run an Advanced Search, start by selecting ADVANCED next to any search bar (as shown above). Here's a breakdown of some of the basics:
- Search syntax builds as you enter terms or make coding selections
- Search by Discovery, Privileged and/or Confidentiality statuses
- Use Boolean operators (AND, OR), look for exact phrases, and enter proximity searches
- More search tools are available via the "More Tools" dropdown, such as word exclusions and fuzzy searches
- Search within specific Bates or Date Ranges
- Search within specific metadata or (custom) coding fields
- Click Advanced Search when all terms are entered, and you will be taken to a results page
Filters are available in any Nextpoint database to the right of the search bar and are extremely useful when looking to return documents which match a particular set of coding or metadata.
It is important to note:
- Filters produce “AND” search results. For example, filtering would be useful if you were looking for all documents containing the Folder “Defense” and the Issue “Contract Performance".
- Additionally, Filters CAN NOT be used in conjunction with the search bar. For example, you can not run a search in the search bar and then use the Filters to further narrow. If you do such, the secondary user of Filters will override any search you have input in the search bar.
To use the Filters, click the arrow next to the identifier you wish to search by and press Filter Documents.
If you were looking to run an “OR” search, this can be easily performed using Boolean logic in the search field. For the aforementioned example, you would type folder:defense OR issue:"contract performance".
While the aforementioned search functionalities can be employed to search, analyze, and cull documents across your database, please note there is also search functionality within each individual document.
For databases created on or after December 6, 2021: to search within an individual document, click the PDF search in document viewer, input your search at the top right, and hit return on your keyboard. This will prompt the PDF Search Toolbar and search hit highlights shown on the word(s).
For databases created prior to December 6, 2021: to search within an individual document, once you are in the document viewer, input your search at the top right, and hit return on your keyboard or click search immediately below your input.
Want your keyword searches persistently highlighted when they hit on a document? Read more about setting up and utilizing Key Terms here >>
Search Syntax Operators
| Operators | Description |
|---|---|
| Term(s) / Words |
For any keyword search, simply input the term in your search bar and click return/enter to execute the search. Doing so will query the database for any search text or metadata which hits on your keyword and return resulting documents to your grid view. EXAMPLE: patent will return all documents containing the term patent anywhere on the document or in the metadata. |
| Search_Text: |
Will return all documents containing the term in the search text of the documents, only. If an input search hits on only a metadata field (e.g. Document_title), but not in the search text, that document will not be returned in your results. EXAMPLE: search_text:patent will return all documents containing the term patent in the search text of the document, only. |
| Search_Fields: |
Will return all documents containing the term(s) in the coding and metadata of the documents, only. EXAMPLE: search_fields:patent will return all documents containing the term patent in the coding/metadata of the document, only. USE CASE: Depending on the quality of any scanned documents and/or handwritten notes, your document search text may not always be comprehensive or extremely useful. Instead, many users will annotate or code documents using fields. As coding takes place over the years, the coding can become inconsistent and users have a difficult time knowing which field to search. In the above example, search_fields:patent will allow the users to search across fields without knowing the exact field(s) the term patent could appear (e.g. attorney_notes:patent OR reviewer_notes:patent OR title:patent). FORMATTING NOTE:
|
| Operator Hierarchy |
General hierarchy is NOT > AND > OR Without parentheses present in your search syntax, any NOT search will be performed before any AND search, and any AND search will be performed before an OR search. If you would like to segment your search syntax so a particular group of criteria are considered together (e.g. this OR that OR that), then make sure to enclose that portion of your syntax in parentheses. EXAMPLE: (batch:2 OR batch:3) AND confidentiality:CONFIDENTIAL will look for any documents in batch 2 or batch 3 that are marked confidential. The OR search component will be performed before the AND search because the parentheses were input as a directive to consider that section as a segment. |
| AND, + |
Connecting two (or more) terms/fields with AND will return results with both terms - this AND that. You can also replace the AND with a plus sign (+). If doing so, ensure there are spaces on each side of the + as shown in below example. EXAMPLE: patent AND invention (or patent + invention) will return documents which contain both terms. If a document does not contain both of those terms, it will not be returned for this search. |
| OR, ( ) |
Connecting two (or more) terms/fields with OR will return results with either terms or fields - this OR that. EXAMPLES: patent OR invention will return all documents which contain patent or invention. So long as a document contains one of those terms, it will be returned for this search. custodian:"smith, john" OR custodian:"miller, barbara" will return all documents from either of the two custodians. TIP: You can also enclose two or more terms (not applicable to fields) in parentheses to imply an OR search, so the aforementioned would be (patent invention). |
| NOT, - |
Excludes term or field from results - this NOT that. You can also replace NOT with a minus sign (-). If doing so, make sure the - is immediately preceding the second term as shown in the below example. EXAMPLE: patent NOT invention; patent -invention - Documents with the term patent but without the term invention |
| ~ |
Proximity search, searching within n words EXAMPLE: “patent invention”~5 - Documents containing the term patent within five words of invention |
| “ ” |
Surrounding any sequence of terms in quotation marks will imply an exact phrase when searching. EXAMPLE: "prior art" - Documents which contain the exact phrase "prior art" |
| * |
You can input an asterisk(*) after a word to account for variations (e.g. report* will return reporting, reported, reporter, etc..). There is no limit on characters when a wildcard is placed at the suffix of a word. EXAMPLES:
IMPORTANT FORMATTING NOTES:
|
| ? |
You can input a question mark mid-term to indicate a word that will contain "at most" one character. Examples:
|
General Metadata
General Rule of thumb for searching within any coding/metadata field is field_name:value
| Command | Description |
|---|---|
| Author |
Combined field identifying the author of an email or document. EXAMPLE: Author:smith@nextpoint.com |
|
Document_Date or Date |
Combined date field with the following priorities — Emails: Sent date then received date. Efiles and non-email attachments: modified date, then created date. EXAMPLES: Specified Date >> Document_date:01/10/2020 - can also use Document_Date:01/10/2020 Date Range, Years >> Date:[2001 2019] - returns results for all documents within that range of years. Can also use exact dates to narrow your date range. Date Range, Specified >> Document_Date:["January 10, 2020" "January 20, 2020"] - returns results for all documents within the specified date range. Date Range, Greater/Less than >> Date:>2001-09 - returns results for all documents after September 2001; can also use Date:>09/2001 |
| Document_Type |
Category of document based on its origins:
These values can be overwritten via otherwise provided values in a loadfile. EXAMPLE: document_type:email AND Date:["January 10, 2020" "January 20, 2020"] - all emails dated between 1/10/2020 - 1/20/2020 |
| File_Extension |
File extension of the processed document EXAMPLE: File_extension:xl* - all versions of Microsoft Excel documents (i.e. xls, xlsx, etc.) |
| File_Name |
Original file name of native file — contains subject of email message for email records EXAMPLE: file_name:mountain* - all documents containing "mountain and anything thereafter" in the File Name. |
| File_Path |
Location from which the file was collected EXAMPLE: When a document has a File Path field with the value: \John.Smith@ClientFirm.com.pst\Top of Outlook data file\John.Smith@ClientFirm.com (Primary)\Recoverable Items\Purges\woof.pdf This list of searches is not exhaustive, but is indicative of the searches that return this document:
|
| Title |
Combined field that pulls the email subject from emails and the title field from e-files and attachments. EXAMPLE: title:report - all emails containing report in the Email Subject line, and all documents containing report in the document title |
| Root_Folder |
Root folder location in your database's File Room at time of processing. This encompasses any loose files imported from File Room without a load file. EXAMPLE: root_folder:EDRM_Data* - all documents stemming from a File Room folder beginning with "EDRM_Data" and ending with anything thereafter (e.g. EDRM_Data_001, EDRM_Data_002, etc...) |
| App_Name |
Application Name field value pulled from metadata of native file. EXAMPLE: app_name:"Microsoft Excel" - all documents containing Microsoft Excel within the App Name Field. Note: If looking for something like "All excel files", we recommend relying on the file_extension:xl* search as the App Name may not always be populated and/or consistently named when populated. |
| Page Count |
Count of processed image pages for a document. EXAMPLES: page_count:0 - all documents which have zero imaged pages in Nextpoint (can assist in identifying identifying documents which didn't image) page_count:>8 - all documents which have more than eight (8) imaged pages in Nextpoint (can assist in identifying documents which are "more or less than X number of pages") page_count:[11 24] - all documents which between 11 to 24 imaged pages in Nextpoint |
Email Metadata
General Rule of thumb for searching within any coding/metadata field is field_name:value
| Command | Description |
|---|---|
| Email_Author |
Author of an email. EXAMPLE: Email_Author:smith@nextpoint.com |
| Recipients |
Recipient(s) of an email; Plural regardless of singular or multiple recipients; *only values for the recipients field (does not include cc: or bcc: values) EXAMPLE: Recipients:smith@nextpoint.com |
| CC |
Recipient(s) carbon copied on an email. EXAMPLE: cc:smith@nextpoint.com |
| BCC |
Recipient(s) "blind copied" on an email EXAMPLE: bcc:smith@nextpoint.com |
Above searches are dependent on what format your data is brought into Nextpoint. Often inboxes are set where an individual’s actual name appears in the To/From/CC/BCC fields, in lieu of their email handle. For example, cc:smith@nextpoint.com could also be formatted as cc:"John Smith" or cc:smith. Before performing your email search, we suggest reviewing a couple sample emails or the Analytics "widget" section for further, quick insight. | |
|
Email Searching: Nextpoint stores email addresses as a whole and split up for ease of searching. EXAMPLE: When a document has text with the email address ‘russel.wilson@nextpoint.com’ this list of searches is not exhaustive, but is indicative of the searches that return this document:
The term `badger2` will also return documents with the email address bucky.badger2@uwbadgers.com | |
| Domain |
Returns all emails to or from a particular domain. This includes the author, recipients, cc, and bcc fields. EXAMPLE: Domain:nextpoint.com - all emails containing @nextpoint.com in the author, recipients, cc, or bcc fields. Note: We recommend against using an @ in your search. This character is treated like a space, and thus, you may return unexpected results. |
| Sender_Domain |
Returns all emails from a particular domain. This includes the author field. EXAMPLE: Sender_Domain:nextpoint.com - all emails containing @nextpoint.com in the author field. Note: We recommend against using an @ in your search. This character is treated like a space, and thus, you may return unexpected results. |
| Receiver_Domain |
Returns all emails to a particular domain. This includes the recipients, cc, and bcc fields. EXAMPLE: Receiver_Domain:nextpoint.com - all emails containing @nextpoint.com in the recipients, cc, and bcc fields. Note: We recommend against using an @ in your search. This character is treated like a space, and thus, you may return unexpected results. |
| Email_Subject |
Subject line of an email. EXAMPLE: email_subject:lunch - all emails containing lunch in the subject line |
|
Email_Sent + Email_Received |
Date-time of a sent email, or date-time of an email that was received. EXAMPLES: Specified Date >> email_sent:01/10/2020 - can also use Document_Date:01/10/2020 Date Range, Years >> email_sent:[2001 2019] - returns results for all documents within that range of years. Can also use exact dates to narrow your date range. Date Range, Specified >> email_received:["March 13, 2019" "April 6, 2019"] - returns results for all documents within the specified date range. Date Range, Greater/Less than >> email_received:>2015-09 - returns results for all documents after September 2015; can also use Date:>09/2015 |
| Mailbox_File |
If present, filename of mailbox archive email was extracted from. EXAMPLE: mailbox_file:john.smith444_gmail.com.mbox - all emails and attachments which stemmed from the compressed mailbox file of "john.smith444_gmail.com.mbox" TIP: Want to find only the emails from a particular mailbox_file? Try searching mailbox_file:john.smith444_gmail.com.mbox AND document_type:email |
| Mailbox_Path |
Mailbox path represents the full sequence of mailboxes and sub-mailboxes that specifies the location of a certain, named mailbox. EXAMPLE: mailbox_path:inbox - all emails + attachments which stemmed from a particular location within a mailbox_file. TIP: Commonly, we see structures like "top level mailbox/Inbox", "top level mailbox/calendar files", "top level mailbox/contacts", but it is dependent upon how emails were organized and collected from the source. If there are no mailbox subdirectories contained within the source Mailbox_file, then this field will not be populated. |
| Email_Message_ID |
Email message ID field value extracted from the metadata of the native file. EXAMPLE: email_message_id:"<ABC1deF23gHHIJk445LM@mail.gmail.com>" - all documents with a particular Email Message Id TIP: A direct link to a particular message ID search syntax is always available at the bottom right in your document viewer under the section titled "Extracted Metadata" |
| Email_thread:true | True if email conversation starter |
| Is_attachment:true | True if file is attached to an email |
| Has_attachment:true | True if email has an attachment |
Document Metadata
General Rule of thumb for searching within any coding/metadata field is field_name:value
| Command | Description |
|---|---|
| Document_Title |
Title field value extracted from the metadata of the native file. EXAMPLES: document_title:"calendar wizard" - all documents which have the exact phrase "calendar wizard" in the Document Title. document_title:expert* - all documents which have the keyword expert* (the asterisk accounts for "anything after" expert, like expert, experts, expertise..) |
| Document_Date |
EXAMPLES: Specified Date >> Date:01/10/2020 - can also use Document_Date:01/10/2020 Date Range, Years >> Date:[2001 2019] - returns results for all documents within that range of years. Can also use exact dates to narrow your date range. Date Range, Specified >> Date:["January 10, 2020" "January 20, 2020"] - returns results for all documents within the specified date range. Date Range, Greater/Less than >> Date:>2001-09 - returns results for all documents after September 2001; can also use Date:>09/2001 |
| Document_Author |
Author field value pulled from metadata of the native file. EXAMPLES: document_author:(robert david) - all documents containing Robert OR David in the Document Author Field document_author:(robert AND putnam) - all documents containing Robert AND Putnam in the Document Author field document_author:* - all documents containing any value in the Document Author field (is not blank) |
| Document_Last_Author |
Last ‘Saved By’ field value pulled from metadata of the native file. EXAMPLES: document_last_author:(robert david) - all documents containing Robert OR David in the Document Last Author Field document_last_author:(robert AND putnam) - all documents containing Robert AND Putnam in the Document Last Author field document_last_author:* - all documents containing any value in the Document Last Author field (is not blank) |
|
For any date searches Context Aware: Any date_time search will take into consideration any context you do or don't provide.
Flexible Formatting: You can search for a date (or range of dates) in a variety of common formats.
| |
| Created_Date_Time |
Creation date and time of the native file when imported without produced images. EXAMPLES: created_date_time:2003-01-22 - all documents with a created_date_time of 2003-01-22. created_date_time:>1-17-09 - all documents with a created_date_time greater than (after) 1/17/2009 created_date_time:[3/19/09 2015-04-01]- all documents with a created_date_time between 3/19/2009 - 04/01/2015. |
| Modified_Date_Time |
Date and time the native file was last modified EXAMPLES: modified_date_time:2003-01-22 - all documents with a modified_date_time of 2003-01-22. modified_date_time:>1-17-09 - all documents with a modified_date_time greater than (after) 1/17/2009 modified_date_time:[3-19-09 04-01-2015] - all documents with a modified_date_time between 3/19/2009 - 04/01/2015. |
| Last_Print_Date |
Date the native file was last printed (MS Office documents) EXAMPLES: last_print_date:2003-01-22 - all documents with a last_print_date of 2003-01-22. last_print_date:>1-17-09 - all documents with a last_print_date greater than (after) 1/17/2009 last_print_date:[3-19-09 04-01-2015] - all documents with a last_print_date between 3/19/2009 - 04/01/2015. |
Document Identifiers
General Rule of thumb for searching within any coding/metadata field is field_name:value
| Command | Description |
|---|---|
| Nextpoint ID |
Unique number assigned to every document upon creation in your Nextpoint database. EXAMPLES: ID:1234 ID:(1234 5678 9101) - Becomes an OR search, and pulls all three documents |
| Bates |
Bates number assigned to a document, whether it was stamped through Nextpoint, or elsewhere. EXAMPLES: Bates:ABC000001 - Returns the document that contains this exact stamp on a page of said document Bates:ABC* - Returns all documents containing a Bates prefix of ABC Bates:ABC001* - Returns the document with ABC001 AND any other documents where a Bates number begins with ABC001 (e.g. ABC0012, ABC00123, etc.) Bates:* - Returns all Bates assigned documents within your database Bates:(ABC000001 ABC000015 ABC000027) - Returns each document that hits on that particular Bates number. Essentially this becomes an OR search instead of a range search TIP: Bates numbers with spaces need to be in quotes. Bates:"ABC 000001" |
| Bates Prefix |
The alphabetical portion of the Bates stamp. EXAMPLES: Bates_prefix:ABC - Returns all documents with Bates Prefix ABC. TIP: If your Bates prefix has any separating characters like underscores _ , hypens - , spaces, periods, etc.. you do not need include those characters in your search. |
| Bates Range |
Documents with Bates numbers within an identified range EXAMPLE: Bates:[ABC000001 ABC000015] Bates numbers with spaces need to be in quotes. Bates:[“ABC 000001” “ABC 000015”] |
Work Product
General Rule of thumb for searching within any coding/metadata field is field_name:value
| Command | Description |
|---|---|
| Folder |
Will return all documents contained within a particular folder in Nextpoint. EXAMPLE: Folder:”John Smith Inbox” - Will return all documents within the John Smith Inbox" folder in Nextpoint FAQ: How do I search for a certain range of documents in a folder (e.g. the first 1,000 documents in the folder)? folder:"folder name":[1 1000] |
| Category |
Will return all documents associated with a particular category via their folder assignment. Searching for a particular category will translate on the back-end as an OR search across all folders within that category. EXAMPLE: Category:”Productions” - Will return all documents within the folders associated with the Productions category. The back-end syntax for Category:"Productions" translates as (folder:"prod1" OR folder:"prod2" OR folder:"prod3") |
| Responsive_Status |
Will return all documents tagged as “Responsive” EXAMPLE: Review_status:responsive - Will return all documents tagged as “Responsive” |
| Issue |
Will return all documents tagged with a particular responsive issue EXAMPLE: Issue:damages - all documents tagged with issue damages |
| Privilege_Status |
Will return all documents tagged with a particular privilege reason EXAMPLE: Privileged:Work-Product - all documents tagged as privileged, work-product |
| Tags |
Manually added work product tags applied via Bulk Actions or at the document-level EXAMPLE: Tags:AJEML - all documents which have been tagged by an end user with the specific tag AJEML. TIP: If your tag is specific enough (e.g. AJTAG), you can simply enter the tag text in your search bar and click enter/return |
| Highlighted |
Will return all documents with highlight image markups AND any associated highlight issue. EXAMPLE: Highlighted:true TIP: If you would like to find all documents with highlights, regardless if an issue has been assigned, it is recommended you use the FILTERS. Open your Filters > navigate to the Work Product section > Document Annotations subsection > select Documents with Highlights > Filter Documents. |
| Highlight_Issues |
Will return all documents with highlight image markups AND a particular highlight issue. EXAMPLE: Highlight_Issues:"Fraud Claim" will return all documents highlighted and associated with Fraud Claim issue. |
| Highlight_Notes |
Documents with highlight image markups associated with a particular note. EXAMPLE: Highlight_Notes:collusion will return all documents with the term collusion in the highlight notes. |
| Page_Notes |
Documents with page notes associated with your specific criteria. EXAMPLES: page_notes:"for redaction" - Returns all documents with the exact phrase "for redaction" on a page note. page_notes:* - Returns all documents with a page note(s) TIP: You can also find documents with Page Notes by using your Filters. Open Filters > Work Product > Select “Documents With Notes Only” |
| Redaction_Notes |
Documents with redaction notes associated with your specific criteria. EXAMPLES: redaction_notes:SSN - Returns all documents with SSN in the redaction note(s) redaction_notes:* - Returns all documents with a redaction note |
| Designation_Notes |
Transcripts with designation notes associated with your specific criteria. EXAMPLES: designation_notes:"present at scene of accident" - Returns all transcripts with the exact phrase "present at scene of accident" associated with a page/line designation note. designation_notes:* - Returns all transcripts with a designation note(s) |
| Treatments |
Utilize the filter to narrow to all documents with treatments applied in theater mode Open Filters > Work Product > Select “Has Treatments” |
| Stamped |
Will return all documents with a specified exhibit name (folder) and number. The search syntax for a particular exhibit is Folder:'folder abbreviation':stamp number EXAMPLES: folder:PX:5 - Returns Plaintiff Exhibit 5 Stamped:* - Will return all documents that contain an exhibit stamp applied within Nextpoint folder:px:[1 10] - Will return Plaintiff Exhibits 1-10 (the brackets [ ] indicate a range of exhibits) |
| Fields (Documents and Transcripts) |
General rule of thumb for searching is field_name:value DOCUMENT EXAMPLE: Attorney_notes:important - Search for a term or phrase from a note that you may want to locate Request_for_Production:5 - Search a value from a picklist. Use case: If you had all of your request for production numbers listed in a custom picklist field, and coded documents to each request, you could pull up all documents that pertained to a particular request through the above search. TRANSCRIPT EXAMPLE: Volume:2 - Search for a specific transcript volume Deposing_Attorney:Smith - Returns and transcript(s) containing "Smith" in the Deposing Attorney transcript field. |
| Batch |
You can search on a specific import batch by finding the batch number on the imports page and searching on the number. Example:
|
| Export |
Pull all documents associated with a specific export by searching by the export number. Examples:
Please note: The export number can be found by clicking into the export, and then finding the number in the url. Example:
|
True/False Fields
General Rule of thumb for searching within any coding/metadata field is field_name:value
| Command | Description |
|---|---|
| privileged:true | True if document has at least one privilege tag |
| confidentiality:true | True if one document is marked with Confidentiality in Nextpoint |
| redacted:true | True if one document is marked with redactions within Nextpoint |
| Email_thread:true | True if email conversation starter |
| Is_attachment:true | True if file is attached to an email |
| Has_attachment:true | True if email has an attachment |
| Bates_Stamped:true | True if Bates stamped within Nextpoint |
| Has_native_placeholder:true | True if native placeholder was inserted and Bates stamped, as it was a file type that needed to be produced in its native/original form, even though it does have an image in Nextpoint (i.e. excels) |
| Non_imaged_placeholder:true | True if a non-imaged placeholder was inserted and Bates stamped, because it was a file type that does not image through traditional software (I.e. audio/video files) |
| Encrypted | True if native document was encrypted on import. Helpful to search for encrypted:true to locate all files which need a password |
Nextpoint Search Guide
When you import documents into Nextpoint, the platform stores them in folders — but by default there's no native way to browse your original subfolder structure the way you would in Windows Explorer or Finder. The Subfoldering file path browser is a standalone HTML add-on that reconstructs that folder tree, letting you navigate directly from any folder or file into your Nextpoint database.
This guide walks through the full setup process, from exporting the required load file to sharing the configured browser with your entire case team.
Before You Begin
Before setting up the file path browser, ensure that:
- Your documents have already been imported into your Nextpoint database.
- Your documents were imported by selecting the highest folder level possible, allowing Nextpoint to capture the Root Folder and File Path metadata.
- You have downloaded the Subfoldering file path browser HTML file (
filepathbrowser.html). - You have permission to access the Settings tab in your database.
Important
Always import documents at the highest folder level possible. If you click into subfolders and select individual files during import, the full File Path field will not be populated — preventing the file path browser from reconstructing your original folder structure.
Table of Contents
- Step 1: Create the Export Template
- Step 2: Export the Load File CSV
- Step 3: Load the CSV into the File Path Browser
- Step 4: Configure Database Settings
- Step 5: Save and Share the Browser
- Keeping the Browser Up to Date
- Frequently Asked Questions
- Quick Reference Checklist
Step 1: Create the Export Template
The export template only needs to be created once per database. It defines which metadata fields will be included in the CSV used by the File Path Browser.
- Navigate to Settings.
- Select Export & Exchange.
- Click Create New.
- Name the export template (for example, File Path Browser).
- On the Files screen, do not select any files. This export will only generate a load file. Click Next.
- Skip the naming screen since no files are being exported. Click Next.
- On the Load File screen, enable Include Load File and select CSV as the format.
- Click Create New to create a new load file template.
- Name the template File Path Browser.
Configure the Load File Template
Add the following fields to the load file template:
Note
The order in which fields are added does not affect the file path browser's ability to read the data, so there is no need to rearrange them into the sequence shown above. If you'd like the field list to match that order for readability, using your mouse wheel while dragging fields makes it easier to reorder them in the template editor.
- Save the load file template.
- Save the export template.
Step 2: Export the Load File CSV
The exported CSV serves as the data source for the file path browser. It represents a snapshot of your database at the time of export.
Note
If additional documents are imported later, you will need to generate a new CSV and update the browser. Instructions for updating the browser are provided later in this article.
- Go to the Review tab and search for an asterisk (
*) to return all documents. - Alternatively, from the Analytics tab, click the Total Documents count.
- Select all documents.
- Click Export and choose Load File.
- Enter a descriptive export name, such as:
FPB_06-11-26_[DatabaseID] - Click Export.
- Monitor the export under Data > Exports.
- When the export completes, click the folder icon to download the ZIP file.
- Extract the ZIP file.
- Locate the CSV file inside the extracted folder. This file contains the metadata required by the file path browser.
Good to Know
Since only a CSV is being exported, the process typically completes much faster than a standard production export. However, if other export jobs are already running, your job may wait in the queue until system resources become available.
Step 3: Load the CSV into the file path browser
- Open the file path browser HTML file in your web browser (double-click to open it locally).
- Click Load Data.
- Navigate to your Downloads folder, select the CSV file from your export, and click Open.
You will see the folder tree populate, including:
- Documents with no root folder (imported loosely)
- Folder structures from your imported load files
- Mailbox folders — PST and MBOX files show their internal folder hierarchy using the Mailbox Path field
Not Linked to Nextpoint Yet
At this stage, clicking files will not navigate to Nextpoint. You still need to configure the database URL in Step 4.
Step 4: Configure Database Settings
- In the file path browser, click the Settings icon (gear icon).
- Paste in the URL of your Nextpoint database. You can copy it from anywhere in the database — the browser parses the relevant portion automatically.
- Confirm the database type indicator at the bottom of the settings panel. It displays D for Discovery or L for Litigation next to your database name.
- (Optional) Set a default Grid View template. To find the template number, go to Settings > General in Nextpoint, click Edit on your default template, and note the number in the URL.
- (Optional) Configure a sort order for documents opened from the browser.
- Click Apply.
Tip
If you have custom Grid View templates that include File Path or Mailbox Path columns, consider pointing the browser to one of those for the most useful review experience.
Once configured, clicking the arrow icon next to any file opens that document directly in your Nextpoint database. Clicking the arrow next to a folder name opens a Grid View showing all documents in that folder.
Step 5: Save and Share the Configured Browser
After configuration, save a fully intact copy and share it with your case team so they do not need to repeat setup.
- In the file path browser, click Download. The file saves as an HTML file named after your original CSV export.
- In your Nextpoint database, go to the Share tab.
- Click Share a File.
- Give the file a descriptive name (for example, File Path Browser) and add version notes such as the date or V1.
- Click To My Device, navigate to your Downloads folder, and select the HTML file you just saved.
- Click Share a File to upload.
Anyone with access to the Share tab can now open the file path browser without any additional setup — they click the file name and the fully configured browser opens in their browser window.
Keeping the Browser Up to Date
The file path browser is a point-in-time snapshot. If you import additional documents after the initial setup, update the browser to include them.
- Re-run the export using the same file path browser template (Step 2).
- Open the existing file path browser HTML file and click Load Data.
- Load the new CSV file.
- Click Download to save the updated HTML file.
- In Nextpoint, go to the Share tab, click on the file path browser entry, and select Share New Version.
- Add a date or version note, upload the new HTML file, and click Share New Version.
The Share tab will serve the updated version to anyone who opens it.
Frequently Asked Questions
Documents imported loosely — not at the folder level — will not have a root folder or file path value. To avoid this going forward, always import by selecting the folder itself rather than drilling down and selecting individual files.
This is mostly an issue in Legacy databases. Certain documents that originate from containers such as zip files will not preserve the file path hierarchy.
When deduplication is enabled during import, copies of the same file across multiple folders are imported only once. The root folder and mailbox path fields for the deduplicated file contain the original root folder and mailbox path for each of the duplicate copies. In the file path browser, the file is represented at each of its original locations to reflect how the copies were kept at the source, but each entry points to the same file in the Nextpoint database.
Mailbox data from PST files uses the Mailbox Path field rather than the File Path field. Confirm that both Mailbox File and Mailbox Path were included in your load file template. If those fields are present in the CSV, the browser will display mailbox folder trees automatically below the section listing files by file path.
Go to the Settings icon in the file path browser and verify the URL you pasted. Make sure it is from the correct database. The browser reads only the base URL and database identifier — the specific page you copied it from does not matter.
No — you only need to redo Steps 2 through 5. Your export template and load file template are already saved in the database. Run a new export, load the new CSV, download the updated browser, and upload a new version to the Share tab.
Yes. The export template and load file template need to be created once per database (Step 1). Steps 2 through 5 are repeated for each database whenever you want to set up or refresh the browser.
Quick Reference Checklist
- Import documents at the folder level (not file-by-file)
- Create export template with file path browser load file template (once per database)
- Add required fields: Nextpoint ID, File Path, Root Folder, File Name, Mailbox File, Mailbox Path, Import Batch
- Export all documents as CSV load file
- Download and unzip the export
- Open file path browser HTML and load the CSV
- Configure database URL via the Settings icon and click Apply
- Download the configured HTML file
- Upload to the Share tab in Nextpoint for team access
Subfoldering Setup Guide
NextGen is the next evolution of the Nextpoint review experience. While Legacy databases continue to be fully supported, NextGen introduces enhancements to document processing, review workflows, imports, exports, and annotation management.
Many Core Workflows Remain Familiar
While NextGen introduces several enhancements, the core workflows used in Legacy remain largely the same. Importing data, reviewing documents, applying coding decisions, and creating productions continue to follow familiar processes, allowing teams to transition smoothly while benefiting from new functionality.
Use the sections below to explore some of the key differences between NextGen and Legacy databases.
Legacy
- Uses a PNG-based imaging workflow.
- Many review actions require documents to be re-imaged.
NextGen
- Uses a PDF-based processing workflow.
- Reduces the need for repeated document imaging.
- Supports faster annotation and review actions.
These changes help streamline review workflows and improve document handling throughout the review lifecycle.
NextGen expands support for a variety of modern file types that may require conversion or special handling in Legacy workflows.
- HEIC image files
- DWG and CAD files
- GIF files
- PDF Portfolios
- Password-protected PST files
- Password-protected ZIP archives
- OST files
- RAR archives
- TAR archives
- Microsoft Office files with tracked changes
Note on password-protected files: NextGen provides improved import warnings when password-protected files are detected — including container files such as ZIP, RAR, TAR, PST, and PDF. Nextpoint does not unlock or bypass file passwords. If a file is password-protected, the password must be obtained and the protection removed outside of Nextpoint before the file can be reimported successfully. For more information on import warnings, see Common Import Warnings and Solutions.
For a more detailed list of supported file types in both Legacy and NextGen, see our Supported File Types article.
Legacy
Imports process in the background with limited visibility into detailed progress and troubleshooting information.
NextGen
NextGen provides enhanced visibility into import activity through the Import Status Monitor and Batch Details.
- Real-time progress updates
- Estimated completion times
- File-level error reporting
- Detailed warning and error information
- Actionable troubleshooting guidance
For help resolving import errors and warnings, see Common Import Warnings and Solutions.
Legacy
Traditional review workflows rely on image-based rendering and annotation processes. Repeated values must be identified and redacted manually throughout a document.
NextGen
NextGen introduces Instant Annotations, allowing comments, highlights, and redactions to appear immediately without waiting for document reprocessing.
- Highlights, comments, and redactions appear instantly
- Layer-based annotation management
- Review annotation history
- View which user modified a document and when
- Toggle annotation layers on or off
- Revert to the original document when needed
Auto-Redactions can automatically identify and redact commonly sensitive information throughout a document.
- Email addresses
- Phone numbers
- Social Security numbers
- Custom user-defined terms
For step-by-step instructions on working with redactions, see How to Apply Redactions.
NextGen Improvements
- Higher-quality document rendering
- Improved text recognition
- Improved extraction of inline content and images
- More Outlook-like rendering of email messages
- Enhanced readability during review
Legacy
Exported PDFs contain searchable text, but text selection may not always align precisely with the original document. Large exports may result in a high number of individual download packages.
NextGen
NextGen introduces several improvements to both PDF quality and export packaging.
- Selectable, searchable text in exported PDFs — text can be selected word-by-word with improved alignment and positioning
- Closer representation of the original document layout
- Enhanced usability outside of Nextpoint
- Large-volume exports are automatically packaged into 20GB containers, significantly reducing the number of downloads required on the receiving party's side
Legacy
Exhibit stamp options are limited in terms of the information that can be included, and the process for applying, modifying, or removing stamps requires additional steps.
NextGen
The exhibit stamping experience in NextGen offers greater flexibility and a more streamlined workflow.
- More control over what information is included on exhibit stamps
- Streamlined process for applying, modifying, and removing stamps
For step-by-step instructions, see Applying Exhibit Stamps in Litigation and Setting Up the Exhibit Stamping Template.
Legacy
Annotation handling during database exchanges provides limited control over how annotations are transferred. Exchanges are limited to 5,000 documents per batch.
NextGen
NextGen provides more flexibility when exchanging databases, with an increased batch limit of up to 40,000 documents.
- Configure annotation behavior based on project needs:
- Transfer annotations (redactions, highlights, endorsements, etc.) as permanently applied
- Transfer annotations as editable layers
- Exclude annotations from the exchange entirely
Legacy to NextGen exchanges are not currently supported. If you need to migrate data from a Legacy database to NextGen, the Nextpoint Services team can assist. Please note that a service fee applies. Contact Nextpoint Support or your Client Success Director to discuss your options.
Legacy
Confidentiality designations must be applied before Bates numbering, requiring a specific order of operations during productions.
NextGen
NextGen separates Bates numbering and confidentiality designations into independent application layers. Users are no longer required to apply confidentiality designations before Bates numbering — each can be applied independently and in any order.
This provides additional flexibility when applying, managing, and reviewing production markings across a matter.
For more information, see How to Endorse (Bates Stamp) Documents and How to Create Endorsement Templates.
NextGen was designed to better support large data volumes and processing-intensive workflows.
- Improved support for large matters
- Enhanced processing scalability
- More consistent system performance during high-volume workflows
Quick Comparison
| Area | Legacy | NextGen |
|---|---|---|
| Processing | PNG-based imaging; re-imaging required for many review actions | PDF-based processing; reduces the need for repeated document imaging |
| File Type Support | Standard supported file types; limited handling of modern formats | Expanded support for modern file formats; improved warnings for password-protected files |
| Import Monitoring | Background processing with limited progress visibility | Real-time progress tracking, estimated completion times, and file-level error reporting |
| Annotations & Redactions | Annotations require document reprocessing; repeated values must be redacted manually | Instant Annotations with layer controls; Auto-Redactions for PII and custom terms |
| Document Imaging Quality | Standard rendering; text extraction may vary | Higher-quality rendering; improved text recognition, inline image extraction, and email display |
| Exports | Searchable PDFs with variable text alignment; large exports split into many download packages | Selectable, word-level text with improved positioning; large exports packaged into 20GB containers |
| Exhibit Stamping | Limited stamp customization; multi-step process to apply, modify, or remove | Greater flexibility over stamp content; streamlined application, modification, and removal |
| Database Exchanges | Limited annotation transfer controls; 5,000 document batch limit | Configurable annotation transfer — permanent, editable, or excluded; 40,000 document batch limit |
| Bates & Confidentiality Stamping | Confidentiality designations must be applied before Bates numbering | Independent Bates and confidentiality layers; apply in any order |
| Scalability | Standard infrastructure; performance may vary at high document volumes | Enhanced support for large-volume matters with more consistent performance |
Questions About NextGen?
If you have questions about NextGen functionality or would like assistance evaluating a workflow, please contact Nextpoint Support or your Client Success Director.
NextGen vs. Legacy: What's Different?
To assist our users in protecting the integrity of both native and user-generated metadata, Nextpoint has released the ability to prevent certain metadata fields from being edited.
Beginning on April 18, 2022, all of the pre-created metadata fields in new and existing databases will be locked by default, preventing users from changing any of the data in any of these fields. Advanced users have the ability to lock and unlock any fields in a database including custom coding fields. Once locked, fields cannot be edited at the document level or via bulk action unless they are first unlocked by an advanced user. The information will remain viewable, but at the document level, locked fields will be greyed out, preventing users from editing them. Nextpoint will maintain a "Field Modification History," so users can gain insight on who locked/unlocked specific fields.
Locking/Unlocking Fields
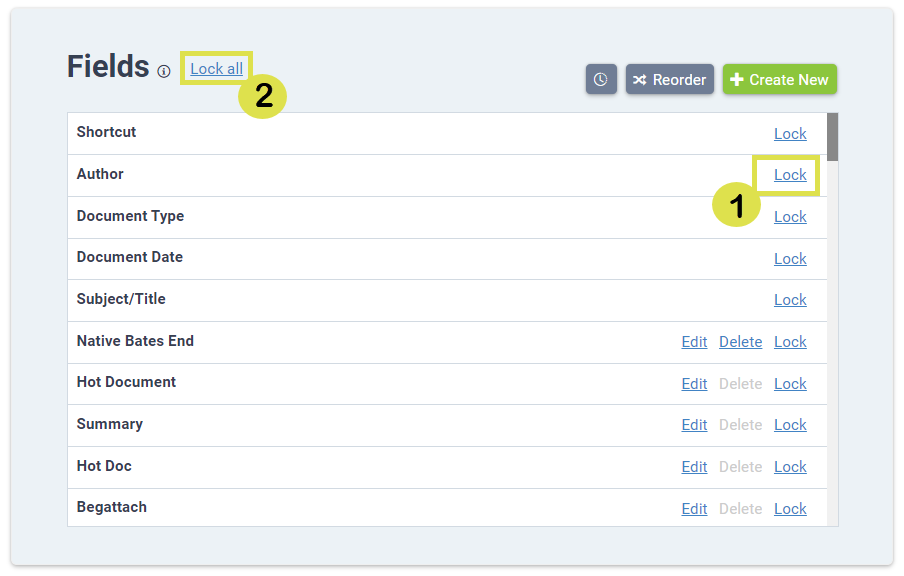
To unlock individual fields in your Nextpoint discovery database, navigate to "Settings" > "Coding" > "Fields." In a Nextpoint litigation database you need to navigate to "More" > "Settings" > "Documents" > "Fields." From there you can:
1. Unlock individual locked fields.
2. Unlock all fields at once.

Similarly, for the same location you can:
1. Lock individual unlocked fields.
2. Lock all unlocked fields at once. Note: the "Unlock all" button becomes a "Lock all" button when a majority of the fields are unlocked.
Field Modification History
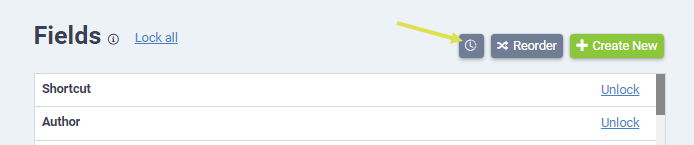
To access the "Field Modification History," select the clock icon at the top of the "Fields" section.
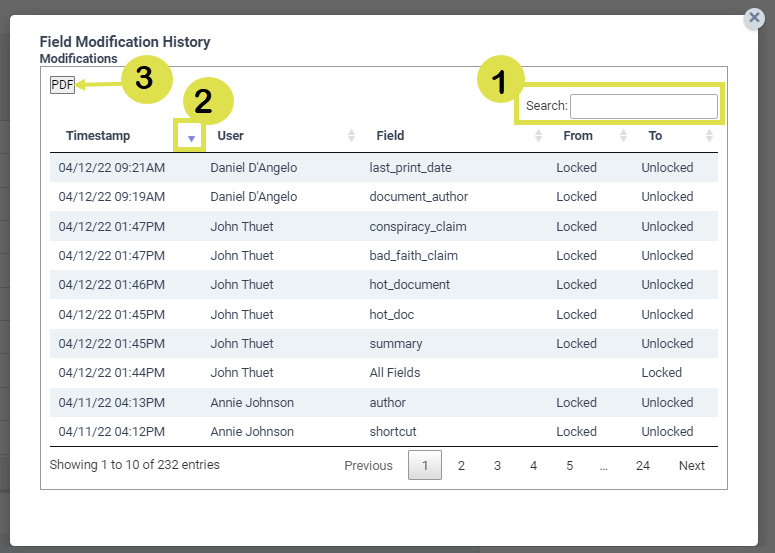
From here you can Search (1) on the list of field modifications, sort (2) the list, and export (3) the list as a PDF. The "Field Modification History" will also record when fields are added or deleted.
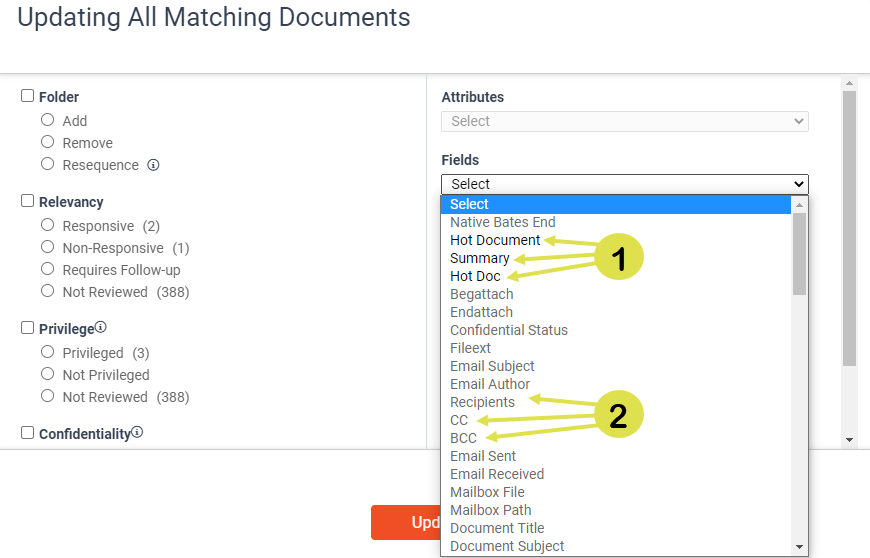
Editing Document Fields
At the document level, unlocked fields (1) will remain white and editable. While you will still be able to read information in locked fields (2), they will appear greyed out and will not editable.
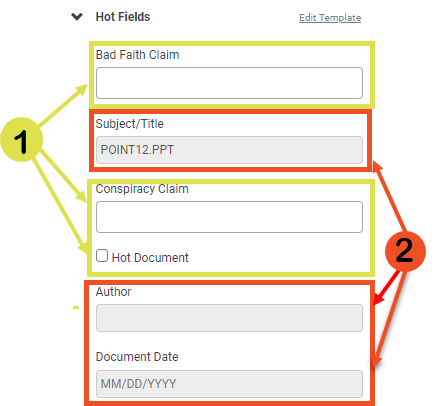
When attempting bulk actions on a set of documents, unlocked fields (1) will appear in black text and can be selected. Locked fields (2) will appear in grey text and can not be selected for bulk actions.
Locked Metadata Fields
Navigating Search Hit Highlights
When you run a search in a database with search hit highlights, Nextpoint will remove any field:value combinations, and carry any keywords through to the document-level.
For example, the below search reads folder:"BZ and BA Emails" AND (takeout test counting).
Upon clicking into any of the resulting documents and entering the document viewer, folder:"BZ and BA Emails" has been removed, but the terms takeout test counting remain in the search bar at the top center of the document viewer.
You will also notice you can search exact phrases in the document.
Questions? Feedback? Please contact our team at support@nextpoint.com.
Search Hit Highlights
In your Nextpoint database, there are several ways to obtain the page count of a particular folder of documents.
Get Page Count
*The below action is only available in Nextpoint Discovery.
- Click on the three-dot menu next to any folder title, and click "Get Page Count" from the drop-down list.
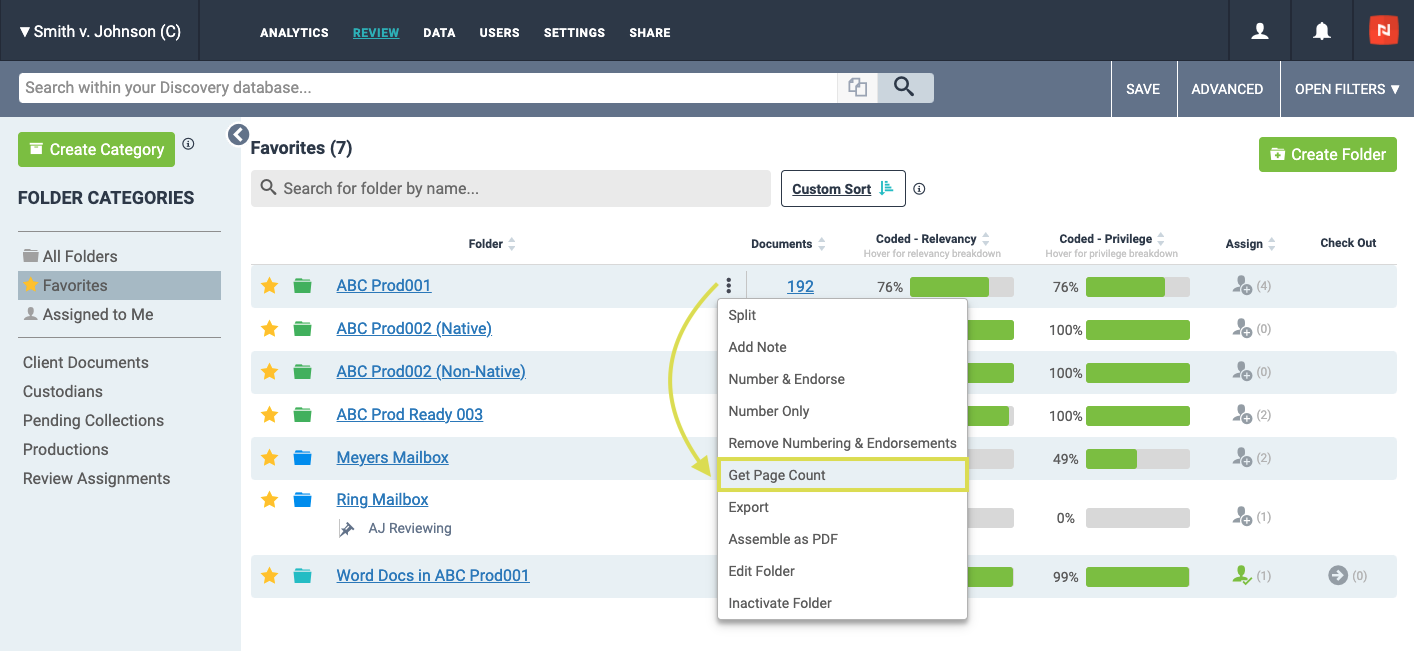
- A report will be generated and emailed to you, detailing page counts for each relevancy status within the folder.

Page Count on Export
*The below action is available in Nextpoint Discovery and Litigation.
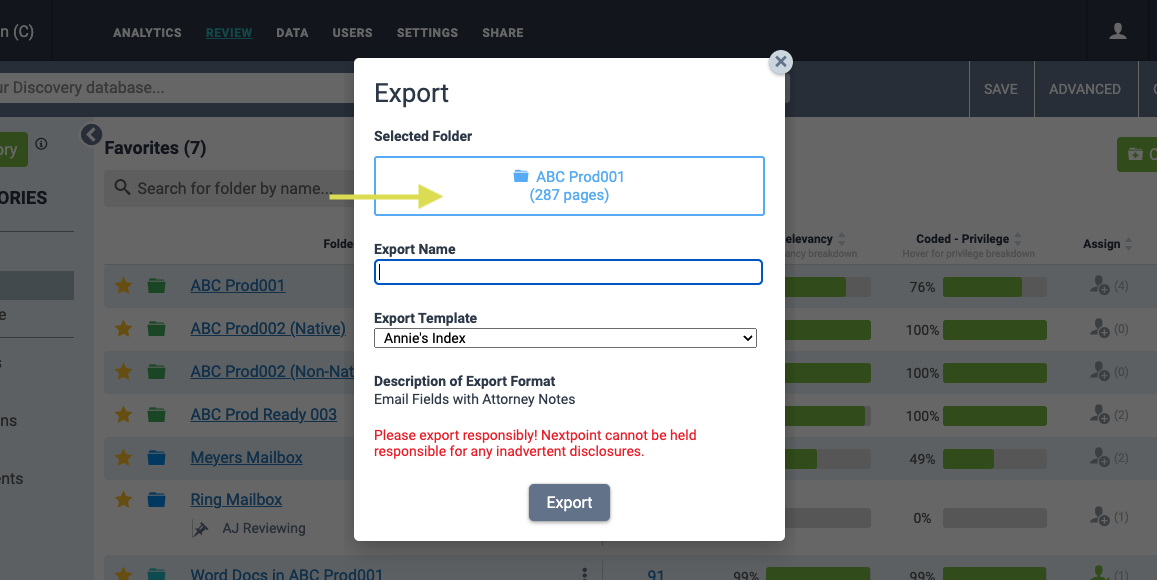
- Click on the three-dot menu next to any folder title, and click "Export" from the drop-down list.
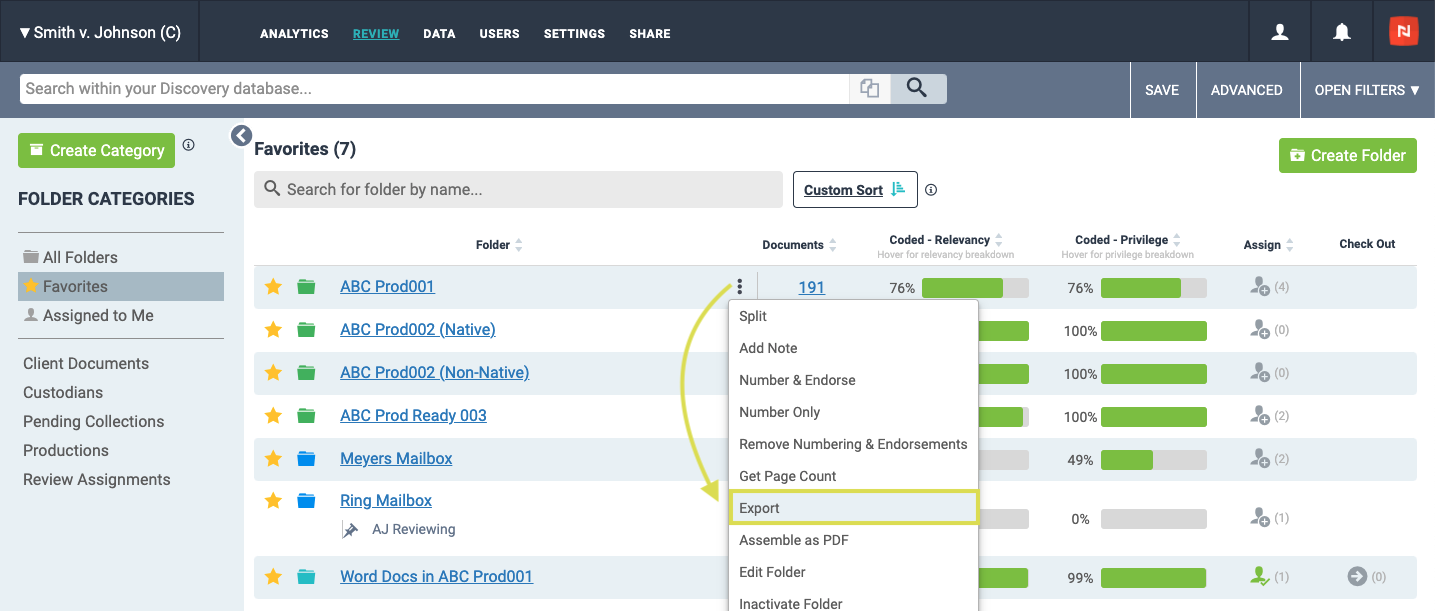
- A report will be generated and displayed in the blue box detailing the page count total for all documents in the folder.
How to Report the Page Count of a Folder
While often it is logical and beneficial to break up databases for performance, access, and/or organization reasons, we know it may also sometimes be helpful or necessary to be able to search across multiple databases with one search.
Global Account Search provides users the ability to search across databases (to which they already have access) and share those results with other users in the account.
Who can access Global Account Search?
Accounts on our All-Access plan have access to Global Account Search. To add Global Account Search to your Nextpoint account, please contact your Account Director.
If and when added, all users in the account can access the Global Account Search interface, but each user will only be able to search on and view results for databases to which they have access.
How to Use Global Account Search
Outlined below are instructions for locating and using Global Account Search. Whether you need to locate related documents across relevant litigation, pull testimony from a particular expert witness across different matters, research documents and testimony from previous litigations, or more, Global Account Search can assist in providing insight and transparency across all your matters in Nextpoint.
Global Account Search can be found via the top-left database drop-down when you are logged in to your Nextpoint account.
To get started, simply click the drop-down > select "Global Account Search"
When you first make your way to Global Account Search, the interface will display “No Results” and ask you to select databases to search. Click the underlined “Select Databases” OR the green Select Databases button.
Important Note on Database Access
Users are only permitted to search databases to which they already have access.
A “Select Database” slider will pop up, and you will see a list of databases to which you have access. If you do not have access to a particular database, it will not be available for selection in the list.
If you would like to refine the databases displayed in your list, enter criteria in the search bar provided at the top. This is helpful if you want to select and search all databases for a particular project, practice area, client, etc...
Once you are ready to select your databases to search, either click the top selection box to “Select All” from your list, OR click the down arrow beside the box to make one of the four following selections:
-
All account databases: Selects all databases in the account. Reminder, you will only see (and be selecting) databases to which you have access. If you later share these results with another account user, they will be able to view results from all databases in the account to which they have access.
-
My ## databases: Selects all databases to which you have access. If you later share these results with another account user, they will only be able to view results from the databases in your selection to which they have access.
-
## matching databases: If you refine the list of databases as mentioned above, “My # databases” will change to → “## matching databases”. This option selects all databases which matched your search entered in the “Refine Database List” box at the top. If you later share these results with another account user, they will only be able to view results within those matching databases to which they have access.
- None: Removes any existing selections, likely allowing you to “start over”
Once you have selected your databases, click “Set Databases”.
You are now ready to run your search. Insert the search criteria desired, keeping the below parameters in mind:
- Searching is limited to keywords, phrases, boolean, and proximity search syntaxes. These said searches will look in both document search text AND metadata.
- Date restrictions are currently not available in Global Account Search, but searches can be further refined in individual databases.
-
Search results are provided in real time, broken out by database, and include the counts of documents, deposition transcripts, and proceeding transcripts hits.
Your results return below the search bar and hyperlink any associated documents, transcripts, or proceedings hits. Click any of the hyperlinked numbers to navigate to the respective database (it will open in a new tab).
To share your results with another user in the Account, click the “Share Results” button from the main Global Account Search page.
A pop-up modal will appear from which you can select the user you would like to share your results with, insert a search title, and enter a corresponding message for the recipient.
If another user shares Global Account Search results, the recipient will receive an email similar to the following:
The receiving party can then click on the orange “View the Results” button and they will subsequently be redirected to the Global Account Search page to review the shared results.
Want to learn more about Global Account Search and how you can add to your firm's Nextpoint account? Contact your Account Director or our Client Support Team at support@nextpoint.com.
Global Account Search
*This functionality is available for Standard and Advanced users only.
Users can log into any Nextpoint Discovery database to view the ANALYTICS tab.
ANALYTICS presents powerful, interactive visualization of your data in graphical form. Simply click on any of the graphs to view a complete list of the documents in that specific category. The overall progress of your review project is also quickly viewable in the interactive ‘doughnut chart’ near the bottom of the page.
To refine the data in your visualizations, just add terms to the SEARCH TO REFINE box on the upper right, and hit return on your keyboard. All data visualizations will redraw correspondingly.
Here is a breakdown of each section of ANALYTICS:
Your Data - Totals
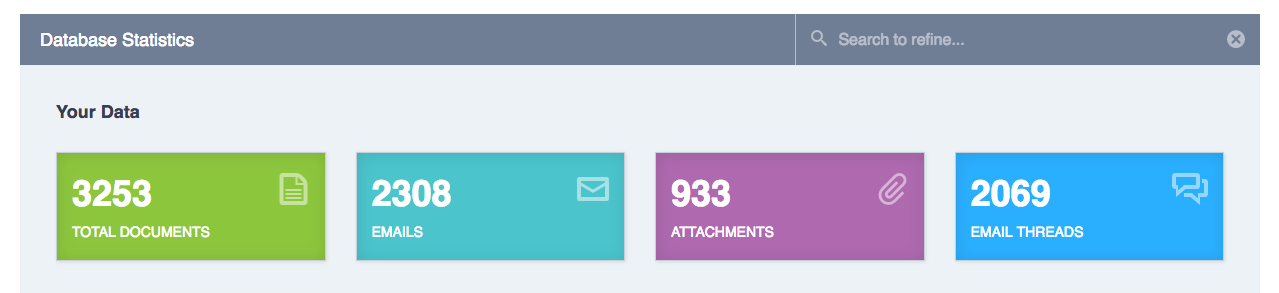
Database totals for the following categories: All Documents, Emails, Attachments, and Email Threads. Click on any box to return all corresponding documents in that category.
Please note: These totals correspond to the master "document type" field in your imported data set.
Your Data - Documents by Date Range
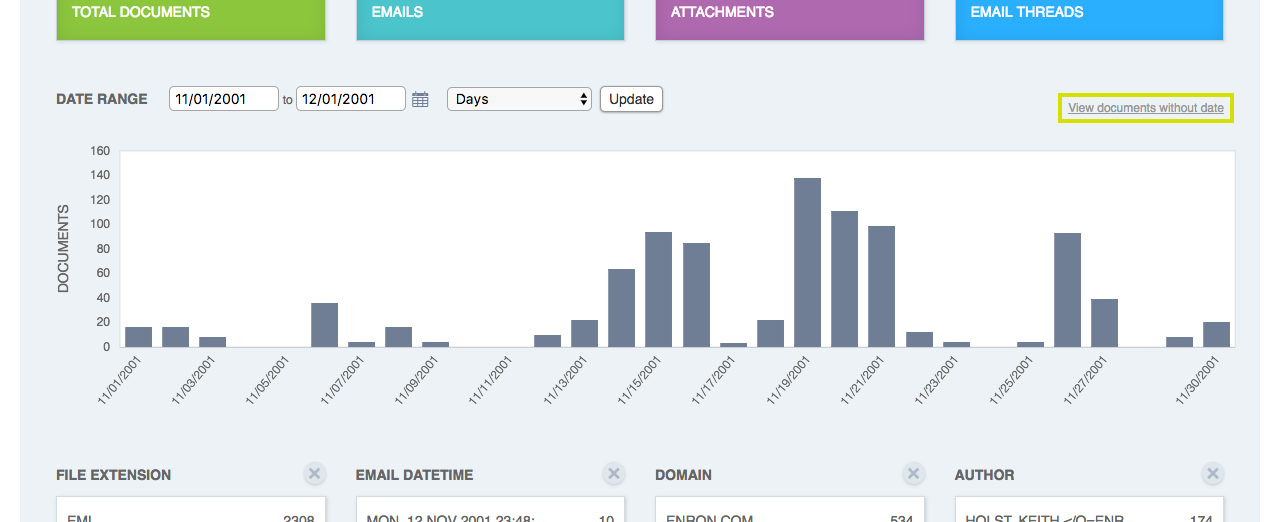
Database totals based on customizable date range. Update the date range by using the tool at the top. Hover over each bar in the chart to view the date and document count. Click on any bar to return those specific results.
Choose “View documents without a date” link at right to view all corresponding documents (and add dates if warranted).
Your Data - Custom Data Widgets
Choose which data is most important to you in this customizable widget section. Add or delete widgets to suit your needs. Click on totals to return those specific results.
Choose “View non-imaged documents” to view all corresponding documents.
Your Review
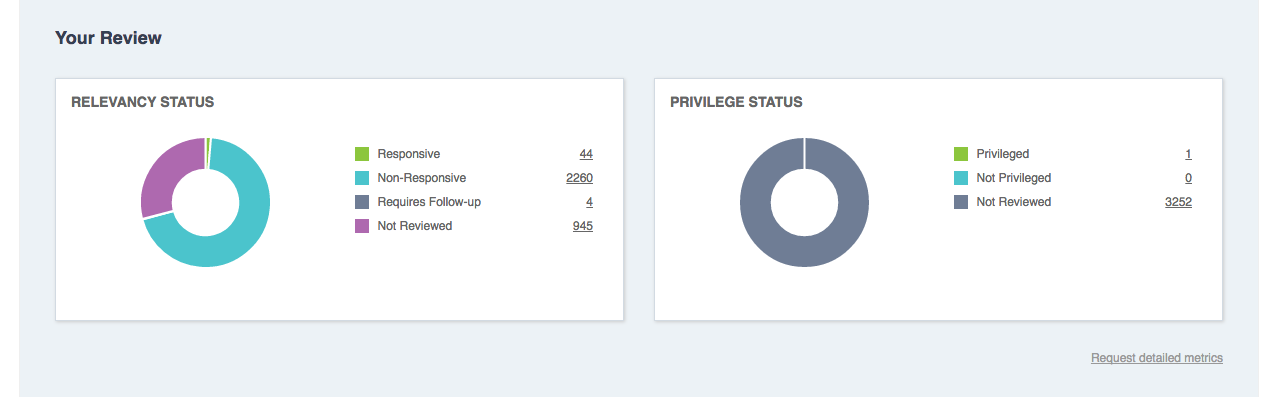
View the up-to-date progress of your Review regarding relevancy and privilege status. Click on the doughnut chart or any of the totals in the legend to return those specific results.
Want to see more, or different database analytics?
Press on the field you would like to replace and then click the empty box to choose which metadata field you would like displayed instead.
Please note: only the first 100 results will display when you click "show all". If you would like a full list of the results, reach out to us and we can compile a csv with the full list.
Need detailed reviewer metrics?

Choose "Request detailed metrics" located under the Privilege Status chart, fill out the form, and a member of the Nextpoint team will be in touch.
Discovery Analytics
The Advanced Search feature in Nextpoint provides a user-friendly interface for building complex searches without needing to manually write search syntax. Whether you're learning the nuances of building more complicated searches or just want assistance constructing your search terms, the Advanced Search functionality is here to help. This can be found to the right of any search bar under ADVANCED.
Check out some search tips, tricks, and FAQs here.
Building an Advanced Search
To build and run an Advanced Search, start by selecting Advanced next to any search bar (as shown above). Here's a breakdown of the basics:
- Search syntax builds as you enter terms or make coding selections
- Search by Discovery, Privileged and/or Confidentiality statuses
- Enter search terms in the "Where Pages Have..." section, which includes options for searching all of the words (AND), exact phrases, one or more of these words (OR), and words in proximity of each other
- Additional search tools are available via the "More Tools" dropdown, such as word exclusions and fuzzy searches
- Search within specific Bates or Date Ranges
- Search within specific metadata or custom coding fields
- Click Advanced Search when all terms are entered, and you will be taken to a results page