Export
- Grid View Export
- How to Download & Unzip Multiple Volumes
- Full Database Export
- Preparing a Native Production
- Merging Production Export Volumes to a Single Deliverable
- Production Specifications
- How to Set up an Export
- Native Placeholders in Production
- Image-Exception Placeholder
- Preparing a Folder for Production
- How to Create Export Templates
- How to Create/Edit Load File Templates
- How to Create Privilege Logs
- Nextpoint Field Index and Descriptions
- Exporting A Folder
- Exporting as Individual PDFs
- Exporting as a Combined PDF
- Searching on Exported PDFs
- How to Export a Document Family
- How to Export a Load File / Index
- How to View & Download Export Results
- How to Share an Export via Email
- How to Download a Shared Production
Overview
Export your grid view with just one click. Selected documents can now be downloaded as a .csv file based on the columns currently displayed — no template setup required.
How to Export from Grid View
- Navigate to your Discovery database.
- Open the Review tab.
- View your documents in grid view and select the ones you want to export.
- Click the Download .csv button in the bottom panel.
- Open the exported .csv file to review your selected documents, based on the columns currently visible in your grid view.
What's included in the export
Your downloaded .csv will include all columns currently visible in your grid view. Adjust your displayed columns before exporting to customize which fields appear in the final file.
Grid View Export
Large productions are exported into separate, smaller zip files. When you unzip a zip file, many extraction tools create a new folder named the same as the zip folder. This is problematic for importing a productions. You want one production folder with DATA/IMAGES/NATIVES/TEXT folders all located inside of it.
The contents of each zip volume would then show up as subfolders within each of the main folders (ie IMAGES/IMAGES0001, IMAGES/IMAGES0002, etc.). It is important to leave those subfolders unaltered as the load file will be looking for the above file path and any changes will prevent the system from properly locating it. Here is how you can do it:
1. Make sure you have pop-up blocker turned off - each folder will open in a new tab for download.
2. Select "Download All".
3. The load file and each volume will open in a new tab to initiate the download.
4. Once you have completed the download of every volume, you will want to combine these folders into one "main" production folder. Both Windows and Mac have a variety of unzipping programs that you can use to get your downloads organized into one folder.
5. Navigate to your Downloads folder on your local computer.
6. Click the first volume, hold shift, and click the last volume to highlight every folder.
7. Right click - navigate to WinRAR and from that menu select "Extract Here".
8. After the files are extracted, you will see the combined "ABCPROD" folder.
5. Once the files are finished downloading, open Peazip and locate them.
6. Click the first file, hold "shift" and scroll to the bottom of your list to click the last file. This will select all folders.
7. Then, right click and select "Extract all here" which will start consolidating those folders.
8. If the below warning shows up next to the progress bar, you can select "yes" as you are not changing the files and you will want to replace them to ensure they're going to the correct location.
There are other programs that will accomplish this but the Mac default Archive Utility does not have this capability. You'll want to find one that is able to combine all of the folders into one place.
In the resulting folder, you'll see one DATA/IMAGES/TEXT/NATIVES folder and within those, each volume's contents will be separated. The data folder is where the load file is contained, and the contents of the Images, Text, and Natives folders will accurately reflect the paths that exist in the load file.
How to Download & Unzip Multiple Volumes
This guide walks you through exporting all data imported into your database. You will create an export template, move all documents into a single folder, and then initiate the export using that template.
Export Best Practice
It is often best to split your export into two groups:
- Produced data, plus any documents with redactions or highlights that were not produced
- Documents without impacted images
The first group can be exported as described below. The second group can be exported in the same way, but without images and text files. If you need to reimport this group, you can use the "Image_File" option to reimage and re-OCR the native files, significantly reducing the overall export size.
For additional guidance, contact Nextpoint Support at support@nextpoint.com.
- Navigate to the Settings tab, then select Export/Exchange. Scroll to Export Templates and click "+ Create New".
- Enter a name for your template.
- In Step 2 – Files, ensure that text, images, and natives are included. PDF images are recommended, especially if you plan to import into a Nextpoint Legacy database. If you select TIFF/JPG images, it is best practice to include an image load file in OPT format.
- For natives, select "No Exceptions". Using "Smart Exceptions" may prevent natives from exporting for documents that contain highlights or redactions.
- In Step 3 – Naming, we recommend using a control number format (e.g., NXP000000001). This makes documents easier to locate and avoids duplicating metadata already included in the load file.
- In Step 4 – Load File, click "Create New", name the load file, and select all fields. Then scroll to "Extracted Metadata" and uncheck this option. Leaving it enabled may introduce unnecessary rows and disrupt load file formatting.
- Once your export template has been created, move all documents into a single folder so the export can be run at once.
- Enter * in the search bar to display all documents. Then select all results and click "Bulk Actions".
- Create a new folder and choose to add all documents to it. Consider how documents should be organized in this folder. In most cases, Date & Family is recommended, though you may also choose Family only or retain the current sort order.
- Click "Update" and wait for the documents to be moved.
Check for indexing warnings
Before running your export, check for the yellow warning icon next to the search bar. If documents have failed to index, they will not appear in your export folder and will not be included in the export.
- Confirm that indexing is complete.
- Click the three-dot menu next to the folder name and select "Export".
- Enter a name, choose your template, and click "Export".
Full Database Export
Planning for a Native Production
In the event you need to produce all documents natively to a receiving party, there are several questions to be thinking about as you get started to ensure you are properly planning for your native production:
- How will load files, emails, redacted, and privileged documents be handled?
- Which files will be produced natively? Audio/video files, Spreadsheets, Email and Office files? All natives unless excluded (e.g. redactions, emails with privileged attachments)?
- Will full email families be produced?
- If producing all natives, will you provide images too? This can help with maintaining consistent Bates ranges/page counts across platforms + ability to provide image in depositions, etc…
- Do you have a clawback agreement in place? Negotiating a clawback agreement in an ESI agreement or order can help protect you in the event there is an inadvertent release of privileged ESI due to a native relationship.
Setting Up for a Native Production
Once you have a good understanding of your production specifications, and are ready to start setting up for your native production, begin under the SETTINGS > Export/Exchange tab in the top-navigation.
Here, you will set up several reusable templates for your Endorsement/Bates stamps, Export formatting, and Load Files.
The steps to set up these various templates are outlined below:
First, create your endorsement template, which allows you to specify your Bates format.
During set up, you will also specify the file extensions which you would like to receive a native placeholder during the endorsement process.
Outline the following specifications in your Endorsement Template:
- Name your template: An internal point of reference to indicate which template you are selecting when you later submit your Endorsement/Bates stamping request. Ex: ABC Production
- Set your Prefix: The Bates prefix which will be assigned to your documents. Include any underscores, spaces, etc.. Ex: ABC_
-
Set your Next Number: The numbering pattern which will be assigned to your production documents in sequential order. Include any leading zeros; recommended 7+ digits. Ex: 0000001.
- The combined result of the above prefix and 'next number' would result in the Bates pattern of ABC_0000001.
-
Numbering exceptions: The file extensions which should receive a native placeholder during endorsing. For a native production, numbering may be left blank so that every page of every document is endorsed. However, if your production specifications call for certain file types, such as excels, to receive a native placeholder, please make sure to insert those file extensions here.
- TIP: Entering an asterisk after a file extension will encompass all variations of that extension (e.g. xl* = xl, xls, xlsm, etc...)
-
Additional Endorsements: Any language you would like endorsed immediately below the Bates number on any Bates stamped document.
- IMPORTANT: We recommend against inserting CONFIDENTIAL language here. Instead utilize the built in Confidential coding (helps with filtering and searching later).
Once your Endorsement template has been saved, you will then set up your Export template in accordance with your ESI Protocol/production specifications.
Export Templates provide Nextpoint with formatting instructions for how Images, Text, Natives, and load files should be treated during export. For example, do you need PDF images vs. single-page tiff/jpgs? Include or exclude search text files?
Outline the following specifications in your Export Template:
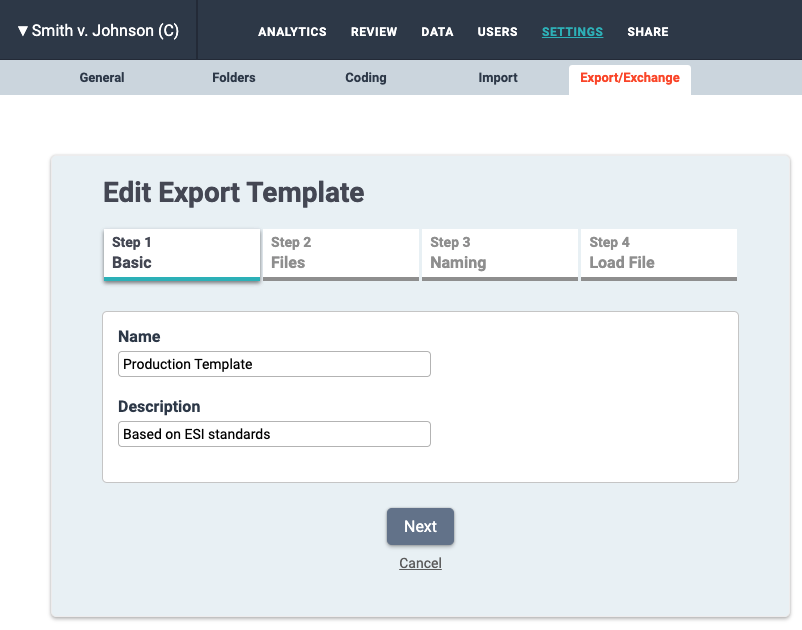
Step 1 - Name Your Template and provide a description (optional)
This is an internal point of reference which will later indicate the export template you are selecting when you initiate any export.
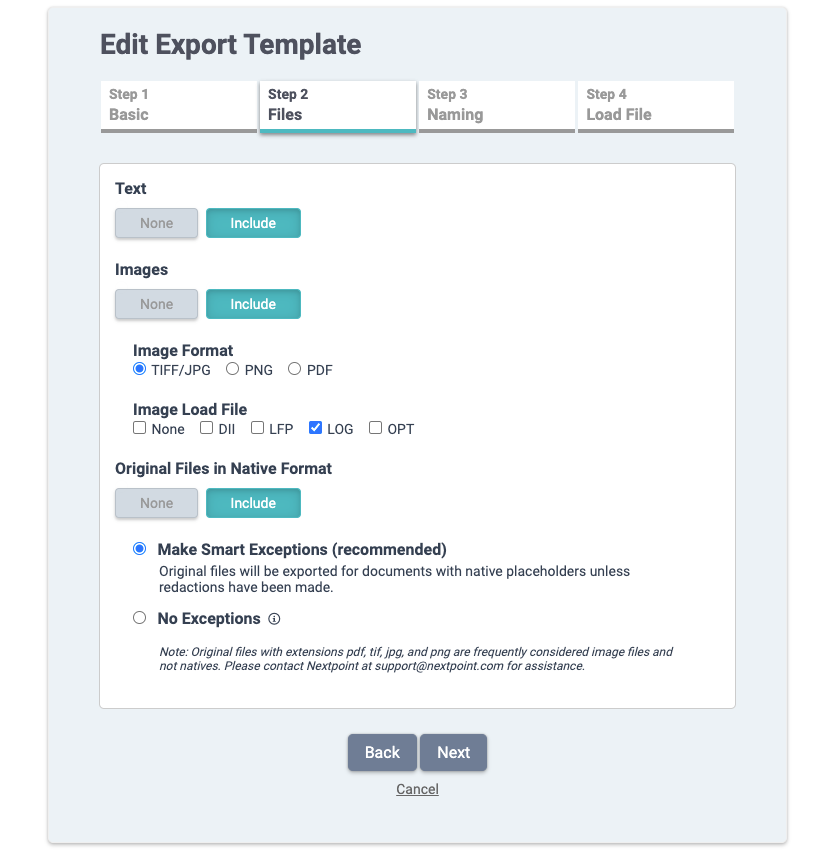
Step 2 - File type selection for Text, Images, Natives
These specifications will be outlined in your ESI protocol or production requests. It is recommended you reference any applicable production specifications agreed upon between parties prior to making selections.
- Text files: If included, will provide receiving party with the search text of each individual document.
-
Images: If included, will provide images for all documents in your production export. Options for single page tiff/jpg, png, or PDF available.
- If tiff/jpg is selected, it is recommended to include an Image Load File as it will define document boundaries for the receiving party. In other words, which single page tiffs/jpgs should be pulled and merged into unique documents.
- Include Images, if possible (in conjunction with natives which you will select next). Doing so will help keep Bates ranges consistent and available for use in depositions, as exhibits, etc…
-
Original Files in Native Format: If including all natives in your native production, make sure to check No Exceptions. This selection will include all original files in your export, including ones containing redacted content.
IMPORTANT: If your production has any redacted content, you will want to take careful consideration of how you export your production in the next steps. Ultimately, you will want to separate all redacted content AND their families into a secondary folder and use a different export template which doesn’t include natives.
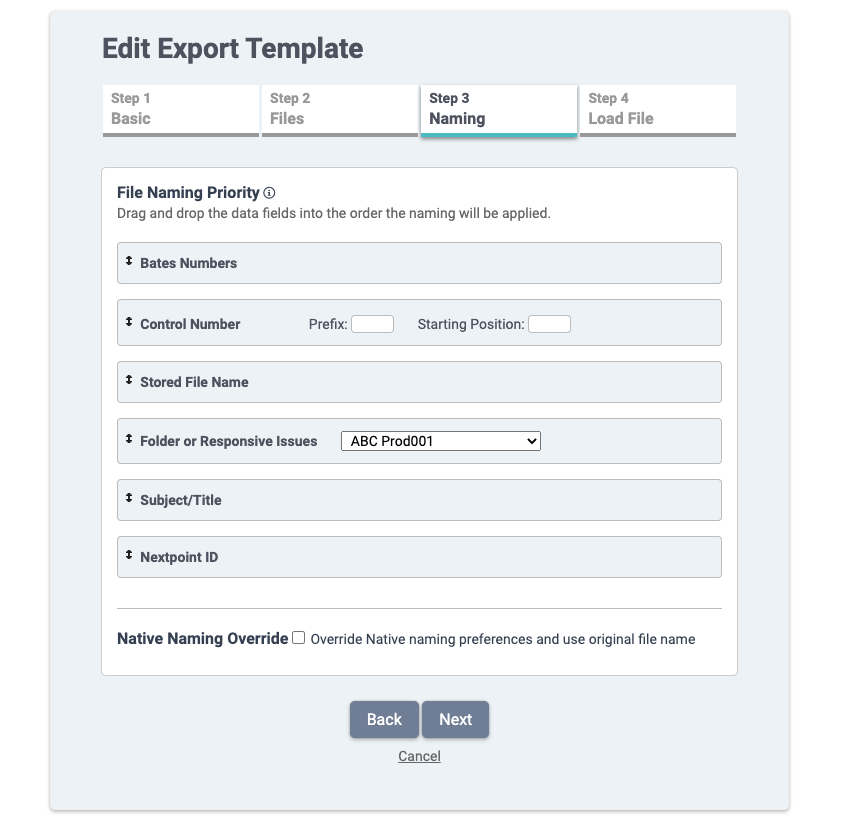
Step 3 - Naming Priority
The data field at the top of the list will indicate how your files will be named upon export. The default naming priority is Bates, but you can drag and drop the data fields if you would like to change the file naming schema.
Example, Bates Numbers is placed at the top of the list with Control Number following. If a document has a Bates assigned at the time of export, it will be named according to its Bates. If a document does not have Bates assigned, the naming format will default to the next naming priority, Control Number.
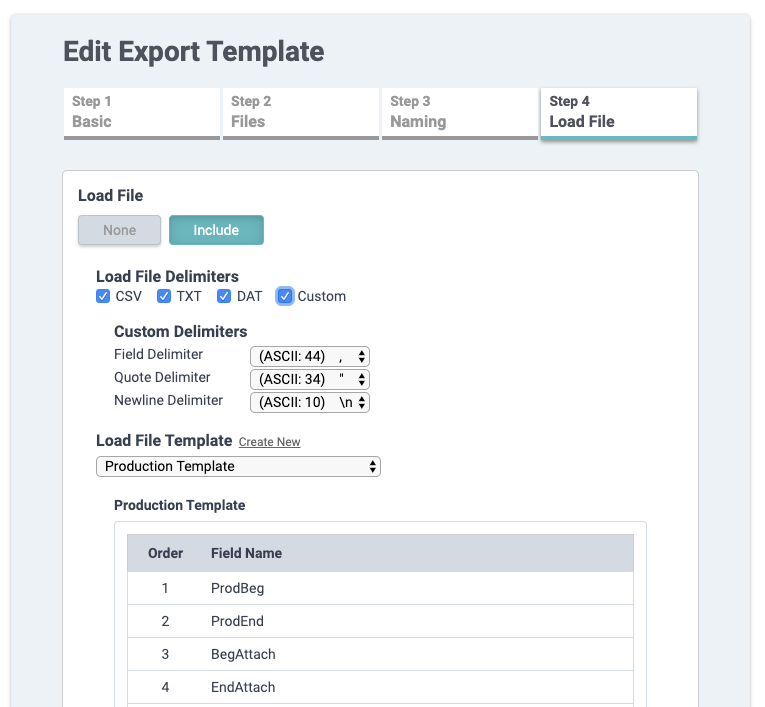
Step 4 - Load File Template
A load file, in the most simple description, serves as an index to your production deliverable. It is a map of instructions for how the Text, Images and Natives outlined in Step 2 of your Export template can be combined into unique documents, and also outlines key metadata for each of those unique documents.
If your production specifications require a metadata load file to be produced, click Include, select the load file format, select existing load file template, or click Create New.
TIP: Nextpoint's Production Template encompasses the most common metadata specifications we see. If you select such, and need to make slight modifications for your production, you can do so in the next section, Load File Templates.
If you choose to Create a new Load File Template, you will be brought to a secondary screen to Name your template, select/organize the fields to be included in your load file, and Save your new load file template.
Once you have verified the above specifications, make sure to SAVE your Export Template.
As noted in Step 4 above in the Export Template set up, you can select specific fields and/or document information to include in your Load File.
Load File Templates are only created as part of the Export Template process. Once created, the same load file template may be referenced by multiple export templates or used to export an index related to a set of search results.
If you need to modify any Load File Template, navigate to SETTINGS > Export/Exchange > Load File Template > Edit.
Preparing Your Production Folders
Once your production templates are set up, you are ready to begin building your production folders.
As you begin to prepare your native production, make sure to consider:
- Privileged Attachments: Consider privileged attachments to otherwise responsive/not privileged emails. If you were to produce the native email, the privileged attachments would be embedded in that native email and thus, the receiving party will have access to those files. These responsive/not privileged emails will need to be produced separately as images only to avoid unintentional disclosure of the privileged attachments.
- Redacted Docs: Consider redacted documents and their family members. In your Export Template, Step 2, when 'No Exceptions' is selected, natives for redacted docs will be exported. If you were to produce the native of a redacted document, all contents covered by the redaction would be disclosed. Therefore, production-ready redacted emails and/or loose documents will need to be produced separately as images only to avoid unintentional disclosure of the redacted content.
- Container Files: If you produce .zip, .pst, .mbox, or other container file natively, the receiving party will have access to all contents of the container, even those withheld from your production (e.g. non-responsive or privileged documents). Therefore, these files should be removed from your native production to avoid unintentional disclosure of the full contents of the container file.
When executing on a native production, you will often want to create at least two folders:
- The first for all production-ready documents.
- The second folder for the subset of production-ready documents which are redacted (+ their associated email family members), and also responsive/not priv emails with privileged attachments.
Go to SETTINGS > Folders and click Create New. You can also create your folders via the REVIEW tab or via the Bulk Action modal after you have narrowed your document universe for production.
See more here on the different opportunities to create folders.
- Enter your Folder Name and validate the auto-populated abbreviation/prefix is what you prefer.
- Assign a color to distinguish your folder visually in the database. Perhaps, all production folders are green, etc..
- Select which Folder Category (or categories) your folder should be associated with.
- Click Create to finalize the creation of your folder.
Next, on the REVIEW tab click the OPEN FILTERS button and select the drop down labeled Work Product to find documents marked as:
- Relevancy Status: Responsive
- Privilege Status: Not Privileged
- Bates Status: Bates Not Assigned
Once you have filtered your documents, add them to your production folder by clicking Select All > Bulk Actions.
The Bulk Action modal will pop-up.
- Select Add under the Folder action checkbox > select your main Production Folder from the dropdown. If you haven't created your production folder yet, you can click Create New Folder here.
- Make your selection as to which related documents should be added to the folder.
- We recommend selecting Email Family. This will ensure documents returned in your filter AND their related family members (Emails + Attachments) will be added to your production folder.
- Make your selection as to the order in which documents should be added to the folder - Family (with no date consideration) or Date & Family (chronological).
- Lastly, click Update to initiate the Bulk Action to add the documents in your Grid View list to your Production Folder.
Once your Production folder is populated, separate any documents which will not be produced natively. See considerations at the top of this section.
To do so, while in the REVIEW tab, you will run a series of FILTERS, and add the returned documents into your secondary folder created earlier.
Redacted Documents: Filter for your main Production folder + Redacted. Select all returning documents and click Bulk Actions.
Add to your Non-Native Production folder, making sure to include Email Family related documents.
Emails with Privileged Attachments: Filter for your main Production folder + Privileged. Select all returning documents and click Bulk Actions.
Add to your Non-Native Production folder, making sure to include Email Family related documents.
Container Files: Lastly, you may consider searching for folder:"your production folder name" AND file_extension:(pst mbox zip). This will return the most common container files within your production folder to ensure those files and their full contents are not unintentionally produced later.
Remove these container files from your production-ready folder by selecting all, click Bulk Actions, REMOVE from your Production folder, selecting 'None' for the related document inclusion.
Next, resolve any unintentional coding inconsistencies. These are created when an email family member (parent or attachment) is coded as Responsive-Not Privileged, but a corresponding family member is coded differently.
Review Coding Inconsistencies
Nextpoint makes it easy to check for inconsistencies in your folders. Navigate to the REVIEW tab and locate your newly populated production ready folders. Then, hover over the Coded-Relevancy or Coded-Relevancy progress bar(s) next to your Production folders. Any inconsistent coding (e.g. Non-Responsive, Requires Follow-up, Privileged, or Not Reviewed) will be calculated and hyperlinked for further review.
Click into the inconsistent coding categories and review to either clean up the coding or confirm the inconsistent family coding should stay in tact.
Resolve Coding Inconsistencies
In the below illustration, we are reviewing the 5 Privileged documents in an otherwise responsive/not privileged production-ready folder.
Go through each document family (email + attachments) and clear up any inconsistencies or remove them from this round of production. Are redactions are needed? Do you, in fact, want to exclude this document from production?
Once you have reviewed inconsistencies, make sure to go back to the REVIEW tab and hover over the Coded-Relevancy and Coded-Privilege progress bars. Any verified inconsistently coded documents should be removed from your production folder.
IMPORTANT: Make sure to perform this workflow for both Relevancy and Privilege coding in BOTH of your production folders.
Before endorsing, make sure there is no overlap between your Native and Non-Native production folders. In other words, remove your Non-Native production documents from the main Native Production folder. These will be endorsed and exported separately in the next steps.
Search for your Non-Native production folder (below, folder:"ABC Prod002 (Non-Native)").
Remove these non-native production documents from your main native production folder by Selecting All click Bulk Actions.
In the Bulk Action pop-up, REMOVE from your main Production folder, selecting Email Family for the related document inclusion to ensure families are removed together.
Once the Bulk Action update is complete, there should be no overlap between your two production folders.
Endorsing Your Production
After your production folder preparation is finalized, you're ready to apply Bates numbers to your document images (if including images alongside your production natives).
First, endorse main production folder. In REVIEW tab click three dot menu next to folder Number & Endorse.
NOTE: If do not wish to apply Bates stamps to each page, but you want a Bates number assigned to each page as a control number, you can select 'Number Only'.
In the pop-up, you will be warned if there are any files with zero pages, archive files (pst, mbox), and/or privileged documents in your production folder before you initiate the endorsement.
Verify any warnings, then select your Endorsement Template which you set up earlier, the start number (don't worry about leading zeros, they are there!), and when you are ready, click Endorse.
You will receive an email when the endorsements are complete.
Only once you receive the endorsement complete email, follow the same above steps to endorse your second, non-native production folder. The endorsement template will pick up where the last stamping job left off.
Wait until you receive the second endorsement completion email until you begin exporting.
I need to assign one Bates number per document.
If you need to apply one Bates number per document, please contact your Nextpoint Client Success Director to gain assistance from the Engagement team.
Export and Share Your Production Folders
Lastly, export and share your production folders.
First, export your main production folder. In REVIEW tab click three dot menu next to folder Export.
In the pop-up enter an Export Name select your Native Production Export template set up earlier click Export.
Your export will begin and you will receive an email when the export is complete.
Next, export your second, non-native production folder. Here, you do NOT want to use your Native Production Export Template used in your first export. Instead, you will want to export only images.
Which Export Template do I use?
The Nextpoint Production Export Template is set up to produce tiff/jpg images, with text files, and only natives with a placeholder that DON'T have redactions. You might want to use this Export Template for your Non-Native production, or the PDF Export template.
Either way, we recommend verifying the settings of the template you use before initiating your export. Do this via SETTINGS Export/Exchange Export Template click Edit next to the Export Template you intend to use and verify or update the settings.
Once you have verified the Export template you want to use for your Non-Native Production, in REVIEW tab click three dot menu next to Non-Native Production folder Export.
In the pop-up enter an Export Name select the Export Template you just verified (Reminder: NOT the Native Production Export Template) click Export.
Your export will begin and you will receive an email when the export is complete.
Quality Control Review
After your exports are complete, we recommend first downloading and run a quality control check on each export. Especially the Non-Native production to verify redacted content, native inclusion, etc...
Access your exports via the DATA tab click Exports click on the title/name of the exported volume(s) you would like to review. You will be brought to the Export Details page.
Once you have accessed the applicable Export Details page, download the exported volume(s) by either clicking on the name of each zipped volume OR click "Download All Files" to initiate a download of all ZIP files from that particular export.
These QC steps include, but are not limited to:
- DATA: Check all requested load file types are included. Open CSV to check data included.
- IMAGES: Check images which are expected to have redactions. If you included tiff/jpg images, check Bates range count in the load file matches the number of image files in your IMAGES folder. For example, if the range in your load file is ABC0001 - ABC0100, you expect to find 100 images in the IMAGES folder. If you included PDF images, check number of rows in your load file matches the number of PDF images in your IMAGES folder.
- TEXT: If included, check number of rows in your load file (less the header row) matches the number of text files in your TEXT folder.
- NATIVES: Check all natives are present for main, native production. Check that no, or limited natives are included for the Non-Native production.
Once comfortable with your exports, you can share a download link to the receiving party/parties from your Nextpoint database, or download all volumes and share in your preferred manner.
To Share, from the DATA tab, click Exports click the three-dot menu button to the right of the export and select Share Link.
On the next screen, complete the recipient details and add any notes you’d like to send to the recipient(s).
When you’re done entering recipient details, click the Share button. A confirmation link will pop up to ensure you’re sending the right export to the right recipient(s). Click Share this Export.
The recipient of your export will receive an email indicating that you’ve shared a file with them. They will also see the title of the export, a secure access notification, the download link, and when their access to the export will expire.
Need Help?
If you need further assistance in navigating your Native Production preparation, please contact our support team at support@nextpoint.com.
Preparing a Native Production
While you have the option to share an export via a link for a receiving party to access your production, there may be instances in which you would like to download and share via an alternative method (e.g. Sharefile link, internal FTP, etc..). If that is the case, many users prefer a comprehensive deliverable of all export volumes to send to the receiving party.
Outlined below are the steps for downloading multiple export volumes and combining them into one final deliverable.
1 | Access your Export
To access and download Exported document sets in any Nextpoint Discovery database:
- Navigate to the DATA tab
- Exports
- Click on the title/name of the exported volume you would like to download. You will be brought to the Export Details page.
Note: If you are working in a Litigation database, your Exports are accessible via MORE > Data > Exports.
Why are there multiple export volumes?
Export volumes are divvied up based on the number of pages in the volume, with a maximum of 2500 pages per volume.
2 | Download the Export Volumes
Once you have accessed the applicable Export Details page, download the exported volume(s) by either clicking on the name of each zipped volume OR click "Download All Files" to initiate a download of all ZIP files from that particular export.
A Note on "Download All"
Download All Files is a great (and recommended) option for when you have a larger export split into multiple volumes like the export illustrated below. When selected, all zip files from this export will be downloaded to your computer.
*Please enable "pop-ups" in your browser settings and leave this window open until ALL downloads have started.
When processing is complete, please verify all volumes downloaded successfully.
3 | Merge the Export Volumes
Once all volumes have been downloaded, the next step is to merge the various volumes into a comprehensive deliverable. Nextpoint Export Volume ZIP files that are part of the same export are built in a manner so they may be optionally merged together into a single deliverable directory after being unzipped.
The most efficient manner to unzip and merge your Nextpoint Export Volume Zips is as follows:
7-zip for PC
- Put the downloaded zip files into a single folder location (e.g. "Client ABC Productions" in your client/case folder of your local C:// drive)
- Select ALL zip files
- While selected, right click on any of the zip files and choose "Extract Here". This option should be available in either 7zip or Winzip menus
- When all the files have been unzipped, the full contents of the production will have been combined in the single production folder you created in Step 1
Note: There is a similar application for Macs, by the name of Winzip, but in our experience, each zip will need to be unzipped individually in Steps 2 and 3.
------------------
Windows 10 Built-in Functionality
If an additional application like 7-zip is not an option available to you, Windows does have a built-in functionality (albeit a bit more involved) which can make the merging of export volumes easier.
4 | Quality Control Check the Final Deliverable
Nextpoint recommends running a quick quality control (QC) check of your final deliverable after all export volumes have been unzipped and merged. These QC steps include, but are not limited to:
- DATA: Check all requested load file types are included. Open CSV to check remainder of folders (easier to open in excel)
-
IMAGES: If you included tiff/jpg images, check Bates range count in the load file matches the number of image files in your IMAGES folder. For example, if the range in your load file is ABC0001 - ABC0100, I would expect to find 100 images in the IMAGES folder.
If you included PDF images, check number of rows in your load file(less the header row) matches the number of PDF images in your IMAGES folder. - TEXT: If included, check number of rows in your load file (less the header row) matches the number of text files in your TEXT folder.
- NATIVES: If included, check number of rows in your load file with a NativeFile/NativeLink value populated matches the number of natives in your NATIVE folder.
5 | Compress Final Deliverable and Send
Once the above steps are complete, simply zip your top-level production folder (e.g. "ABC Prod001") and you're ready to send via your preferred method.
Merging Production Export Volumes to a Single Deliverable
When requesting produced data from opposing counsel or responding to requests for data by opposing counsel during discovery, there are important specifications to consider. Following are recommended production specifications for efficient data processing in standard review platforms.
In short, Production Specifications are:
- The digital format of electronic records production
- The data fields to be provided
A. Digital format of electronic records production
Recommended production formats:
1) Imaged and native production:
Bates-stamped images with associated metadata fields and searchable text files. These image files should be provided as TIFF/JPG (B&W/color) with the associated image load file (commonly OPT, LFP, or DII). File types that don't convert cleanly to image format, such as MS Excel spreadsheets (XLS) or audio files (WAV, WMV, MPG), are produced in native. An additional data load file containing all coding, metadata, and Bates numbers should also be included. These files are typically DAT, CSV, or TXT.
2) PDF production:
Individual PDFs named by starting Bates number with a delimited load file containing metadata fields and paths to the PDFs, any included natives, and TXT files. These load (or index) files are typically DAT or CSV file types.
B. Data fields to be provided
The metadata load file referenced in the aforementioned production formats, in the most simple description, serves as an index to a production deliverable. While every set of production specifications can differ in the slightest, the Nextpoint Data Strategy team reviewed hundreds of ESI protocols to ensure we were building a Production Load File Template that would fall in line with both Sedona and EDRM industry standards. The below Load File Template can be found in Step 4 of the Production Export Template in Nextpoint and can be modified to accommodate your specific production specifications in any given database.
| System Name | Column Name In Loadfile | Email/Attachment/Loose File |
|---|---|---|
| Bates Range Start | ProdBeg | All |
| Bates Range End | ProdEnd | All |
| Family Range Start | BegAttach | Email/Attachments |
| Family Range End | EndAttach | Email/Attachments |
| Custodians | Custodians | All |
| Produced Page Count | PgCount | All |
| Attach Count | AttachCount | |
| Document Type | DocumentType | All |
| Email Subject | EmailSubject | |
| Email Author | EmailAuthor | |
| Recipients | Recipients | |
| Cc | CC | |
| Bcc | BCC | |
| Email Sent | EmailSentDate | |
| Email Sent | EmailSentTime | |
| Email Received | EmailReceivedDate | |
| Email Received | EmailReceivedTime | |
| Email Message ID | EmailMessageID | |
| Mailbox File | MailboxFile | Email/Attachment |
| Mailbox Path | MailboxPath | Email/Attachment |
| Document Title | Title | Attachments/Loose Files |
| Document Author | DocAuthor | Attachments/Loose Files |
| Document Last Author | DocLastAuthor | Attachments/Loose Files |
| Created Date Time | CreatedDateTime | Attachments/Loose Files |
| Modified Date Time | ModifiedDateTime | Attachments/Loose Files |
| File Name | FileName | All |
| File Extension | FileExtension | All |
| File Path | FilePath | All |
| MD5 Hash | MD5Hash | Included Natives |
| Confidentiality | Confidentiality | All |
| Text Path | TextFile | All |
| Native Path | NativeFile | All |
C. Choice of production delivery
The choice of production delivery is guided by considerations of volume, cost, schedule (e.g., rolling productions), and data security.
Standard sharing options:
- Nextpoint Export Share
- Thumb Drive/Hard drive
- Third-Party Share site
Not sure where to begin?
Our Data Strategy team of experts is always available to consult on your ESI specifications and custom export templates. If you are interested in learning more about Nextpoint Production Export and Load File Templates, please contact us at support@nextpoint.com to discuss.
Production Specifications
Exchanging and producing reviewed information is simpler and more efficient in Nextpoint, as users can save templates of their most-used export settings and apply them to future jobs. This saves setup time and helps establish consistency.
How to Set Up for Export
Outlined below are the steps for setting up and running exports in Nextpoint. These instructions are geared toward a typical Production Export Workflow , but can be modified to suit your needs.
- First, create your Endorsement Template , which outlines any Bates stamping pattern(s) and specifies which file types should receive a native placeholder during the endorsement process (for example, Excel files).
- Next, define your Export Template for your production. Export templates define the formatting of images, text, and natives during export, and indicate whether a load file is included.
- Tip: You can verify or update Nextpoint’s default Production Export Template, or create your own custom template.
- If, during Export Template setup (Step 2), you choose to include a load file, you can later edit that load file via the Load File Templates section of SETTINGS > Export/Exchange.
- Tip: Load files are also a great way to generate an index of a particular set of documents. If you would like to export only an index (without images, text, or natives), create a new Export Template, provide a name in Step 1, and skip to Step 4 to include only a load file/index. Once your export and load file templates are saved, navigate to the appropriate folder or document set to export your load file index .
Alternative: Export an Index Using Grid View (No Load File Required)
As an alternative to creating a load file template, you can export a document index directly from Grid View. This option allows you to download selected documents as a .csv file based on the columns currently visible in your grid — no template setup required.
- Navigate to your Discovery database.
- Open the Review tab.
- Switch to Grid View and select the documents you want to export.
- Click Download .csv in the bottom panel.
- Open the exported .csv file to review your selected documents, based on the columns currently visible in your grid.
Note: The exported .csv will include only the columns currently displayed in your grid view. Adjust your visible columns before exporting to control which fields appear in the final file.
Utilize Your Export Settings
After you’ve set up your endorsement, export, and (if applicable) load file templates:
- Prepare your production folder
- Endorse your documents
- Export your production folder
- Share your production export via email (from Nextpoint)
Related Help Center Articles
How to Set up an Export
An endorsement template defines how images will be Bates numbered (endorsed) as part of an export, as well as define where native placeholders should be generated.
What's a native placeholder?
A native placeholder indicates that a single image (a “placeholder”) is included in the production, in lieu of an image-per-document-page. This image will retain a single number (e.g. Bates) representing the document.
This is desirable for content that is easier to review using a native application (e.g. .xls). In this situation, the native file is included in the export in addition to the placeholder (with a single number stamp).
Because native files will reveal content redacted on images, a native placeholder will never be generated for a redacted document. In this situation, a redacted .xls document will have each page individually imaged and numbers assigned.
Native Placeholders in Production
An image-exception placeholder normally indicates that you could not review a document yourself and therefore are providing notice of its existence to opposing counsel, but not the file itself.
In this situation, an image-exception placeholder is added to the production as a reference of the document. It will retain a single Bates number. Upon production the native file will not be included in the production. The document’s metadata will exist in the loadfile.
Note: All archives (files with extensions such as .pst, .mbox, .zip) will be automatically assigned an Image-Exception Placeholder during import. This will help prevent unintentional production of the full archive during the endorsement and export processes.
Assigning Image-Exception Placeholders
Image-exception placeholders may be assigned while examining individual documents or to all zero-page documents in a selected set via “Bulk Actions.”
NOTE:
Any document with both a image-exception placeholder and a native placeholder (an unusual situation) would have it’s native placeholder utilized and the corresponding native would be included in the production.
Image-Exception Placeholder
If your production needs to include consistently coded email families, we recommend you follow the workflow below.
Please contact the Engagement team at support@nextpoint.com if you would like to discuss a different production workflow.
Go to SETTINGS > Folders and click "Create New". You can also create your folders via the REVIEW tab or via a Bulk Action after you have narrowed your document universe for production.
See more here on the different opportunities to create folders.
- Enter your Folder Name and validate the auto-populated abbreviation/prefix is what you prefer.
- Assign a color to distinguish your folder visually in the database. Perhaps, all production folders are green, etc..
- Select which Folder Category (or categories) your folder should be associated with.
- Click Create to finalize the creation of your folder.
Next, on the Review tab use the Review Status filter to find documents marked as:
- Relevancy Status: Responsive
- Privilege Status: Not Privileged
- Bates Status: Bates Not Assigned
Once you have filtered your documents, sort them in your desired order by clicking the appropriate field at the top of the grid view screen.
To add these documents to a folder, click the Checkbox (1) then Bulk Actions (2)
The Bulk Action modal will pop-up.
- Select Add under the Folder action checkbox select your Production Folder from the drop-down.
- If you have not yet created your production folder, you can do so via Create New Folder option under the folder list.
- Make your selection as to which related documents should be added to the folder.
- We recommend selecting Email Family. This will ensure documents returned in your filter AND their related family members will be added to your folder.
- Make your selection as to the order in which documents should be added to the folder - Family or Data & Family (chronological).
- Lastly, click Update to initiate the Bulk Action to add the documents in your Grid View list to your Production Folder.
Navigate to the REVIEW tab and locate your newly populated production ready folder.
From here, you will want to check for coding inconsistencies. These are created when an email family member (parent or attachment) is coded as Responsive-Not Privileged, but a corresponding family member is coded differently.
Nextpoint makes it easy to check for inconsistencies in your folders. Simply hover over the Coded-Relevancy or Coded-Relevancy progress bar(s) next to your Production Ready folder. Any inconsistent coding (e.g. Non-Responsive, Requires Follow-up, Privileged, or Not Reviewed) will be calculated and hyperlinked for further review.
Click into the inconsistent coding categories and review to either clean up the coding or confirm the inconsistent family coding should stay in tact.
In the below illustration, we are reviewing the 4 Privileged documents in an otherwise responsive/not privileged production ready folder.
Go through each document family and clear up any inconsistencies or remove them from this round of production. Are redactions are needed? Do you, in fact, want to exclude this document from production?
Once you have reviewed inconsistencies, make sure to go back to the REVIEW tab and hover over the Coded-Relevancy and Coded-Privilege progress bars. Any verified inconsistently coded documents should be removed from your production folder.
After completing the above steps, your production folder should be ready for Bates stamping and exporting.
Preparing a Folder for Production
Export templates are used to define the treatment of natives, text, images and load files included in your export.
Create export templates in Discovery by clicking SETTINGS > Export/Exchange > "Create New". These same export template settings can be found in Litigation via More > Settings > Export/Exchange.
Create an export template for each format variation required in your export process. Templates may be reused on subsequent exports in a case to ensure uniformity and consistency.
Name your export template and add description.
Choose if you would like to include text, images, image load files, and original files in native format.
For images, you can select tiff/jpg, png or PDF formats.
For image load files, you can select None or from DII, LFP, LOG and OPT formats.
When including original files in native format:
- Make Smart Exceptions – Original native files will be exported for documents with native placeholders unless redactions have been made.
- No Exceptions – an export that will include ALL native files, including files that may contain redactions.
Drag-n-drop into desired priority for file naming. Upon export, each document will be evaluated to determine the availability of the various naming data fields.
For example:
If the top data field in your naming priority is “Bates Numbers”, followed by “Nextpoint ID” → any document that has a Bates number assigned prior to production will be named referencing that Bates value. Documents with no Bates number will be named with the next available data field in order of priority. Since everything has a Nextpoint ID, it will named accordingly.
If native files are included in the export, an option will be available to override these options and give the native files their “original” names in the export.
Choose to include/exclude a load file.
If a load file is desired for an export template, a load file template will need to be associated with it. Create a new load file template or select a pre-existing one from the pull-down menu.
Save your export template and reuse it whenever needed.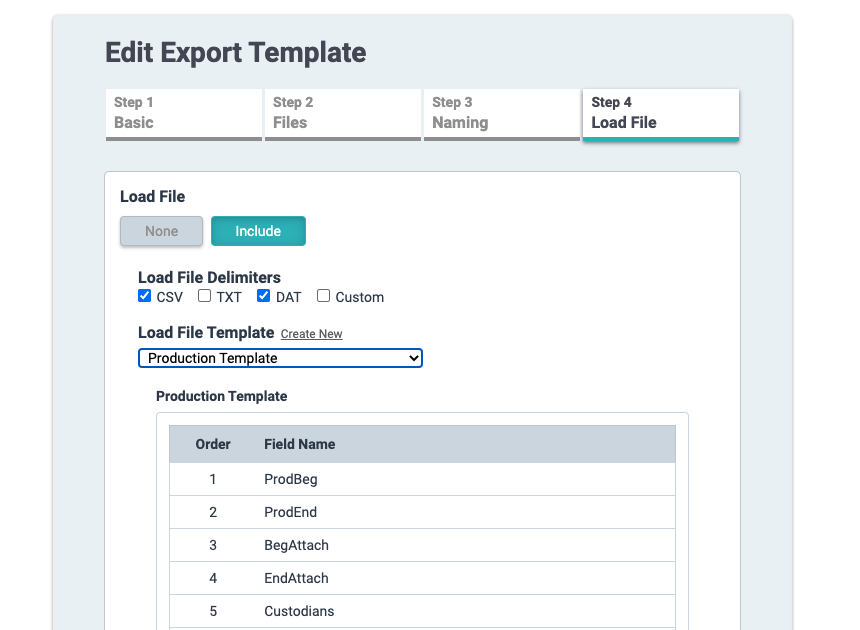
Note re: Load File Delimiters:
Nextpoint provides the most common delimiters, but if you need to utilize more customized delimiters, simply check "Custom" while in Step 4, and you will be prompted to make your selections.
How to Create Export Templates
Load file templates define the metadata used in exports, including which information is displayed and how columns are arranged. Using templates ensures consistency across multiple exports and saves time when generating load files for productions or data exchanges.
Load file templates are created as part of the export template process and can be reused across multiple export templates.
Creating a New Load File Template
To create a new load file template from the Export Template settings screen, go to Step 4 and click Create New:
This will open the Create Load File Template settings page. Here, you can:
- Name your load file template
- Select the fields you want included in the export
- Drag and drop selected fields to set the order in which they appear
Including Fields
Use the checkboxes next to field names to include or exclude fields in your export load files. Additionally, you can:
- Rename any field to match your desired output
- Apply formatting to date fields as needed (e.g., MM/DD/YYYY)
Making Changes
Any changes to a load file template will affect all export templates that use it. Exports generated before these changes must be re-exported to reflect updates. Important: Always re-export existing data after modifying a template.
To edit an existing load file template, navigate to: SETTINGS → Export/Exchange → Load File Templates → Edit
Deleting a Template
A load file template can only be deleted if no export templates currently reference it. This helps prevent breaking any exports that rely on the template.
To delete an unassigned load file template, select Delete next to the name
How to Create/Edit Load File Templates
An Intro to Privilege Log Templates
Privilege Logs can be generated in Nextpoint from a default or customized load file template. Load file templates define metadata to be exported, including which information is displayed and how columns are arranged in the final output index.
Most Discovery databases include a default Privilege Log Load File Template which can be modified and utilized anywhere exports can be conducted, but you can also create Custom privilege log templates, as needed.
Warning
Nextpoint is designed to produced or withhold full families of documents. As such, we do not generate placeholder slip sheets for privileged documents within a family (which some ESI protocols request). If you need a custom solution to your workflow, please connect our professional services team at support@nextpoint.com.
Default Privilege Log Load File Template
To locate and/or modify the default Privilege Log Load File Template:
- Navigate to SETTINGS Export/Exchange Load File Templates click Edit next to the Privilege Log Template.
- Next, check additional fields from the list which you would like to include, and uncheck any fields from the list which you would like to exclude.
- If you would like to reorder any of the checked fields, simply click, drag, and drop in the desired location.
- The "System Name" is how Nextpoint references the field, but you can modify the corresponding column titled Column Name in Loadfile in order to rename the column headers in the final privilege log output.
- Once you've made the desired changes, make sure to click Save Load File Template at the bottom of the field list.
Generating a Privilege Log
Once your Privilege Log Template has been verified, you are prepared to generate the associated privilege log output:
- Navigate to the REVIEW tab at the top navigation of any Nextpoint Discovery database.
- Open Filters at the top right - this should change to read "Close Filters" once opened.
- Drop down the Work Product section, and select Privileged from the drop-down beneath the section titled "Privilege".
- You may also filter for Privileged documents within a specific folder by dropping down the Filter section titled "Folders" and clicking the folder which you would like to filter within. Please note, if you select more than one Folder in the drop down, Nextpoint will look for privileged documents within (Folder A AND Folder B), NOT (Folder A OR Folder B).
- You may search for privileged:true in the search bar as an alternative to utilizing the Filter.
- Click the Orange Filter Documents at the bottom of the Filter section and all documents classified as Privileged will return in a Grid View list of results.
-
Select All documents in the resulting list via the top-left checkbox, and click Bulk Actions to initiate the process of adding the list of privileged documents to a folder.
- From the Bulk Action pop-up modal, select the folder to which would like to add the documents select None under "Apply update to related documents" select Family under "Choose Order" click Update to initiate your Bulk Action update.
- The aforementioned selections in the Bulk Actions modal will add the documents in your list to the designated folder without adding related documents, and will change the sort order to group emails and attachments together.
- Read more here on other ways you can organize your privileged documents and their family members using Bulk Actions.
- Once your Bulk Action update is complete, navigate back to the REVIEW tab and locate your Privilege Log Folder from the folder list.
Click on the three-dot drop down next to your Privilege Log folder click Export.
- Review any warnings input an Export Name select your Privilege Log Template under "Export Template" section Click Export.
- Nextpoint will provide you with a warning if your export contains documents without endorsements (Bates stamps). If you are aware of this and prefer to export a privilege log without having Bates numbered the associated documents, proceed as instructed in steps 8 and 9.
- If you prefer to endorse the privileged documents before exporting, exit from the pop-up and proceed with setting up an endorsement template and endorse the documents.
- Lastly, navigate to DATA Exports locate your export click the Load File .zip link to download your log.
How to Create a New (Custom) Privilege Log Template
If your database does not have a default Privilege Log template via the navigation mentioned above, or if you would like to create a custom template:
- First, you will need to set up an Export template by navigating to SETTINGS Export/Exchange Export Templates Click Create New.
- Export Templates define the treatment of natives, text, images and load files included in your export. This is where you will define for Nextpoint that you would like a load file and perhaps no other additional export components such as images, natives, text files.
- In Step 1, provide a name for your template (e.g. "Privilege Log").
- Skip Steps 2 and 3 unless you want to include images alongside the log in your export.
- When you reach Step 4, select Include check the box next to CSV (which can later be opened in Excel) click Create New.
- You will then be prompted to set up your Privilege Log Load File Template, similar to the earlier described default template.
Check fields from the list which you would like to include in your log, and reorder any of your selected fields by dragging and dropping in the desired location. - Click Save Load File Template and you will be returned to Step 4 of setting up your Export Template.
- Click Save Export Template.
- You're now ready to proceed with generating your privilege log.
Need assistance creating your first privilege log? Contact your Account Director and we will connect you with our Nextpoint Services Team.
How to Create Privilege Logs
Attached below, you will find an index and descriptions of all Fields available in Nextpoint alongside additional details related to each:
Nextpoint System Name: The field name as recognized by the Nextpoint platform.
Column Name in Loadfile: The default name in the load file templates which will be included upon export. These names can be modified to meet with your specific ESI protocol or production specifications.
Searchable Field?: Outlines Yes/No if the field is searchable in Nextpoint.
Export Only?: Outlines if this is a field which can only be exported.
Metadata Priority List: Certain fields have multiple document attributes from which they can pull (e.g. Document Date could pull from last_modified, creation_date, etc...). This column outlines the priority in which we populate a particular field from the various document attributes.
Accepts Loadfile Data?: Outlines if you can import/map to the field.
A preview of the attached index:
Nextpoint Field Index and Descriptions
Exporting Documents from a Folder
Once endorsement is complete and quality control (QC) has been performed, you are ready to generate an export of your documents.
Exports are created at the folder level and include all documents contained in the selected folder.
Create an export
Select the appropriate folder and choose Export from the drop-down menu.
Name your export, select an appropriate export template , and proceed.
Export templates determine how documents, natives, metadata, and load files are formatted in the final export.
Once the export is initiated, Nextpoint will generate ZIP archives in the background. You will be notified when the export is complete and ready for download.
Note: Large exports may take additional time to process.
Exporting A Folder
Exporting as individual PDFs means a PDF will be generated for each selected document and its attachments.
Select the documents for your export.
Select “As Individual PDFs” from the dropdown in the top level "export" menu.
You will need to name your export and select an export template.
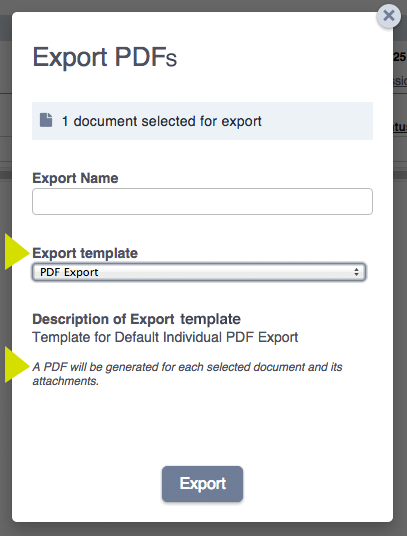
Hit EXPORT, and your export will begin processing. You will be notified when it is completed.
Exporting as Individual PDFs
Exporting a combined PDF is often best practice when the end-goal is to print out an export to be viewed in-hand or shared manually. The difference between an Individual PDF and a Combined PDF is just that a Combined PDF will be one single document made up of all the selected individual documents you chose.
A combined PDF export can be generated from:
1. A folder.
Use the mini hamburger menu to the right of the folder name, and select Assemble as PDF. Name your PDF export and make selections for cover and placeholder images.
2. Individual document selection
Choose the docs for your export from the gridview page. Select the Export menu at the bottom of the page and select As Combined PDF. Name your PDF export and make selections for cover and placeholder images.
Why Are There Multiple Volumes for Download?
Export volumes are divvied up based on the number of pages in the volume, with a maximum of 2500 pages per volume (so if one document has 2500 pages, only that document will be in the export).
Exporting as a Combined PDF
Searching on Exported PDFs
The searchability of exported PDFs depends on your database type. NextGen databases support word-level searching that aligns with modern ESI protocol requirements, while Legacy databases support page-level searching.
Which database should I follow?
If you see the
badge next to your database name, follow the
NextGen Database tab below. Otherwise, switch to the
Legacy Database tab.
PDFs exported from NextGen databases are searchable at the word level.
When you search for a term using Ctrl + F (PC) or Command + F (Mac), the exact word or phrase is highlighted directly on the page image where it appears.
This level of precision aligns with contemporary ESI protocols that require exact term identification rather than page-level approximations, making it easier to locate and verify specific content within exported documents.
PDFs exported from Legacy databases are searchable at the page level.
These PDFs are image-based—each page is effectively a picture rather than selectable text. As a result, searching for a word using Ctrl + F (PC) or Command + F (Mac) will navigate you to the correct page, but may not highlight the specific word on that page.
Suggested Workflow for Legacy Database Exports
To enable word-level search highlighting for Legacy database exports, include text files in your export template.
This provides an alternative search method where searched text will be highlighted when viewed in a text editor.
Note
When configuring your export template, use a unique naming identifier (such as Nextpoint ID or Bates numbers, when applicable) for all exported files—including images, search text, and natives. This ensures files are easy to identify and remain correctly aligned across file types.
Searching on Exported PDFs
From the document viewer in any Nextpoint database, navigate to the three-dot ellipsis menu at the top right of your document.
Select Export This Family from the menu.
Enter an Export name and make your selections for cover pages, highlight inclusion, and more.
Click Export to confirm your export and it will be processed.
How to Export a Document Family
In addition to more comprehensive exports which include images, text, and/or natives, Nextpoint also allows you to generate only a load file for any document set in Nextpoint.
What is a load file?
A load file is essentially an index of information about your documents which can be generated from your Nextpoint database, or imported alongside documents received from an opposing party in production.
Depending on the information selected for inclusion, load files can define document parameters for imaged documents, contain metadata for the documents it relates to, or include work-product applied by user(s).
Exporting a load file is very quick and easy and can be accomplished via the steps outlined below:
1 | Set up your Export Template
Export templates define the formatting of your images, text, and natives during export, but can also define if you only want to include only a load file (index) in your export.
- Navigate to your database SETTINGS > Export/Exchange > Export Templates > click Create New
-
Provide a name for your Index Export Template in Step 1. You may also want to include a description as to the contents of the template for ease of reference later (load file only, email fields with attorney notes, etc.).
- Skip to Step 4 of the Create Export Template sequence > select Include > select CSV for your format/delimiter as this format will ultimately open in excel once exported.
- Next to Load File Template header, click Create New.
- Provide a Name for your Load File Template > select the fields which you would like to include in your load file/index by clicking the check box next to the field name and drag + drop to change the order > Click Save Load File Template
-
Make sure to click the blue Save Export Template button to save your export format and your embedded load file template.
Tips & Tricks
You can make edits to an existing load file via the Load File Templates section of SETTINGS > Export/Exchange.
2 | Export Your Load File / Index
There are two locations in your Nextpoint database from which you can export a load file/index, depending on your case needs.
Export via Search Results
To export a load file only from any set of search results:
- Run a search to generate a Grid View list of all the documents for which you would like a load file exported.
- Above your result list on the left, select all documents from the Grid View via the Actions checkbox.
- At the bottom of the Grid View, hover over Export > select Load File from the drop-down.
-
Name your export > select your export template (set up above in Part 1) that includes the load file only > click EXPORT button.
Why Check Include Family Documents?
Check Include Family Documents if you would like to include email family members (associated emails + attachments) regardless of if they returned in your search results.
In the above example, if an email has an Attorney Note, but the attachment does not, clicking Include Family Documents would still include the attachment without a note in my load file/index export.
Export at the Folder Level
- Navigate to your REVIEW tab (DOCUMENTS tab in Litigation)
- Click the three-dot drop down on any folder > select Export
-
Name your export > select your export template (set up above in Part 1) that includes the load file only > click EXPORT button.
Reminder: this will only export a load file, and NOT the selected documents.
How to Export a Load File / Index
Below will cover how to download the exported results, but further information on how to email an export via a Shared Link can be found here.
Viewing Export Results
All completed exports will be found under DATA. Navigate to the Exports tab in that section to view the status of all exports: completed or in progress.
In Litigation, your exports can be found via MORE > Data > Exports
When an export is complete, it may be downloaded, emailed via a Share Link, added to File Room (if there is a volume included), or deleted from the three-dot menu to the right of the export name.
LOCATING EXPORTS IN REVIEW
LOCATING EXPORTS IN LITIGATION
Downloading Exported Volumes
Exported ZIP files will be available in the exports section when ready for download. To review your export specifications and download the exported volume(s):
- Navigate to DATA > Exports
-
Click on the title/name of the exported volume you would like to download
-
Download the exported volume(s) by either clicking on the name of each zipped volume OR click "Download All Files" to initiate a download of all ZIP files from that particular export.
Download All Files - The Details
"Download All Files" is a great (and recommended) option for when you have a larger export split into multiple volumes like the export illustrated above.
When selected, all zip files from this export will be downloaded to your computer. Please enable "pop-ups" in your browser settings and leave this window open until ALL downloads have started. When processing is complete, please verify all volumes downloaded successfully.
ZIP files that are part of the same export/production are built such that they may be optionally merged together into a single directory after being unzipped. Read how to merge export volumes here >>
Why Are There Multiple Volumes for Download?
Export volumes are divvied up based on the number of pages in the volume, with a maximum of 2500 pages per volume (so if one document has more than 2500, only that document will be in the export).
Return to the Discovery Workflow here.
How to View & Download Export Results
Overview
In addition to downloading an export or copying it to your database, you can generate a secure share link to quickly send documents to external recipients. Share PDFs with experts, productions with opposing counsel, or highlighted documents with partners for deposition preparation.
The video below provides a visual walkthrough of the export sharing process. Written steps and additional details are outlined further below.
Note: This video walkthrough does not include audio.
Sharing the export
From the DATA tab, click Exports to access the Export Status screen. Locate the export you would like to share, click the three-dot menu to the right of the export, and select Share Link.
Working in Litigation? Navigate to MORE > DATA > Exports to access the Export Status screen.
On the next screen, complete the recipient details and add any notes you would like to include for the recipient.
- If you have previously shared exports from this database, you may select one or more saved recipients by checking Select saved recipients who should receive this export link.
- To share with a new recipient, enter their details manually. To add multiple recipients, click Add New Recipient and complete the required fields.
- To reduce the risk of accidental delivery, we recommend manually retyping the recipient’s email address in the Confirm Email field rather than copying and pasting it.
- Set an Expiration Time for recipient access. Available options are 5, 7, 14, or 30 days.
Important: Review all selected recipients carefully before sharing. Nextpoint is not responsible for inadvertent disclosures.
When finished, click Share. A confirmation dialog will appear to verify that you are sending the correct export to the intended recipients. Click Share this export to proceed.
What the Recipient Sees
The recipient will receive an email notifying them that a file has been shared. The email includes the export title, a secure access notice, an acceptance link, and the date on which access will expire.
When the recipient clicks Accept, the following occurs:
- The recipient is directed to a secure landing page containing download links for the export, including any associated load files or volumes.
- A separate email containing a security code is sent to the recipient’s email address.
This two-step authentication process prevents unauthorized access if the original email is forwarded. The recipient must confirm their name, email address, and security code before the download links become active.
After the required information is submitted, the links become active and the export can be downloaded.
Shared Export FAQ
How can I tell if a recipient downloaded my shared export?
- When a recipient downloads an export, the sender receives an email notification indicating which recipient accessed the file.
- You can also view download activity by navigating to DATA > Exports and opening the Recipient Report using either the profile icon or the three-dot menu next to the export.
What if the share links expire before the recipient downloads the export?
- If access expires before download, you can resend the export by repeating the sharing process.
How to Share an Export via Email
- As the recipient, you will receive a secure access email. The email contains:
- The title of the Production
- A list of the materials included in the Production.
- An acceptance link.
- The date the acceptance link expires.
2. Select the Accept button.
- You will be directed to a secure landing page where you will be asked to enter the following information:
- Name
- Security Code (found in a separate email titled Nextpoint: Your Shared Export security code).
3. After entering the requested information, select the Submit button.
4. You now have two options to download the Production:
- Select Download All.
- This will automatically download the load file as well as all document volumes.
- Important Note: Pop-up blockers must be deactivated for this option.
- Click each volume to download individually.
Common Issues:
- Issue: All I received is a load file
- Solution: This means that not all volumes were downloaded. If using the Download All button, be sure that you have pop-up blockers enabled. Otherwise click on each volume individually to download.
- Issue: I received an error message: "The email does not match our records."
- Solution: Confirm that you entered the correct email address.
- Issue: I know my verification information is correct, but I'm not able to access the production.
- Solution: Double check the verification details with the sender. If they confirm your credentials are correct, and you are still having an issue please reach out to support@nextpoint.com.
- Issue: How can I efficiently manage a large number of volumes?
- Solution: If you are running into issues downloading a large number of volumes, ask the sender to consider condensing the volumes into a single deliverable.