Review Your Data / Document Manipulation
- Auto-Redactions
- How to Apply Redactions
- Sharing a Document with Other Users Via Email
- How to Remove a Redaction or Highlight
- Add Page(s)
- Native Spreadsheet Viewer
- Bulk Coding Email Families in Document-Viewer
- Bulk Actions in a Database
- Discovery and Litigation Keyboard Shortcuts
- Adding Documents to a Folder in Discovery
- Using Bulk Actions to Organize or Code Your Documents
- Working with Related Documents (Email Families, Chains, and Duplicates) in Discovery
- How to Reorder Documents in a Folder
- How to Split a Review Folder
- Preview Documents in Grid View
- Using Grid View and Chron View
- Review a Document
- Coding Documents in Discovery
- Review Status
- Marking a Document as Confidential
- Auditing the Review History of a Document
- How to Split a Document
- How to Track Time in Nextpoint
- Highlighting & Redacting Documents
- Using the Share Section
- How to Report an Image Anomaly
- Removing Pages from a Document
- Replacing Individual Pages in a Document
- Exporting or Printing a Single Document
Nextpoint makes it possible to auto-redact (or bulk redact) certain specific terms, phrases and types of data in your Nextpoint database. Auto redactions is offered as a service so that we can assist users to ensure that they redact exactly what they expect to redact.
How to make a bulk redaction request:
From either the image mark-ups dropdown (1) or the image markups page viewer tab (2), select the Bulk Redaction Request. Then download the "CSV Template" (3).
A consultant from Nextpoint's Data Services team will reach out to the requester to support you in completing the request via the template.
Instructions for completing the template:
Review the instructions (4) and examples (5). Then complete the template below the line in the third section (6).
- One term, phrase or PII pattern should entered per row (see the chart below re: PII patterns we support).
- For each term/row, enter a redaction reason for that term in column B of that same row
- For each term/row, enter a redaction style for that term in column C of that same row
Types of data that can be bulk redacted:
| Data Type | Description |
| Terms | Precise terms (no wildcards). Please note that acronyms that may be included in other acronyms would be redacted as a part of an auto-redaction request. |
| Phrases | Precise phrases (no wildcards). Phrases should include quotation marks on both ends of the phrase. |
| PII Patterns: | The PII Patterns we currently support are SSN, TIN, EIN, Phone Number and Email (If you are interested in a specific PII term that you want auto redacted, it may be possible to add it, but it will extend the amount of time it will take to complete your project. |
| SSN: The Social Security number is a nine-digit number in the format AAA-GG-SSSS | |
| TIN: Taxpayer Identification Number is a 9-digit number, beginning with the number "9", formatted like an SSN NNN-NN-NNNN | |
| EIN: An Employer Identification Number (EIN) is a nine-digit number that IRS assigns in the following format: XX-XXXXXXX | |
|
Phone number pattern currently supported is NNN-NNN-NNNN ● Only US Phone numbers are supported right now, but we can incorporate additional patterns as needed. ● Notably, if you want a specific phone number included, we can look for and bulk redact that “term” |
|
| Email: Email PII pattern is all or nothing, not domain specific. So, it will often be best to target specific email addresses, which can be included as precise terms. You can leverage analytics to get that list. |
Results of the Auto Redaction Process:
At the end of the process, you will receive 2 folders in your database:
- The "Bulk Redaction Request_mmddyy" folder contains all documents that received a redaction from this process. We checked this folder of redactions for accuracy, but we recommend that you perform your own quality control messures as well.
- The "Bulk Redaction Errors_mmddyy" folder contains any documents we flagged for a redaction based on the image text, but that could not be redacted due to an error in processing. We strongly recommend you review these for supplemental manual redactions.
Note: We currently cannot bulk redact metadata as a part of our bulk redaction service. We strongly recommend checking your metadata for any terms that might need to be redacted (searching for search_fields:term is helpful for identifying these documents. Please reach out to support@nextpoint.com if you would like support on this as an additional service.
Auto-Redactions
Outlined below are the steps for creating and managing redactions in documents. This article covers both NextGen and Legacy databases.
Which database should I follow?
If you see the badge next to your database name, follow the NextGen steps below. Otherwise, switch to the Legacy tab.
Overview
This guide outlines how to create and manage redactions in NextGen databases. You'll learn how to access redaction tools, customize redaction styles and reasons, apply four different redaction types, manage existing redactions, and add notes to document your decisions.
Accessing Redaction Tools
There are two ways to initiate redactions in NextGen databases:
Click and Drag on Structured Text
- Navigate to the document review page.
- Click and drag directly on structured text embedded within the document (not text within images).
- A pop-up menu appears with annotation options.
Select the Redaction icon from the pop-up menu.
Use the Redaction Icon
- Navigate to the document review page.
- Locate the redaction icon (scalpel/knife shape) in the toolbar.
Click the redaction icon to reveal the redaction submenu.
Customizing Redaction Settings
1. Select Redaction Reason
- PII (Personally Identifiable Information)
- Redacted
- Privileged
- Trade Secret
For styles that display text, the reason appears within the redaction box. You can edit reasons after creation by clicking the redaction and updating the dropdown.
2. Choose Your Redaction Style
| Style | Appearance | Notes |
|---|---|---|
| Black fill, no text | Black box, no visible text | Default for sensitive content |
| Black fill, white text | Black box, white text showing redaction reason | Recommended when reason must be visible |
| White fill, no text | White box, no visible text | Useful for covering annotations or marks |
| White fill, black text | White box, black text showing redaction reason | Alternative to black fill with visible reason |
Redaction Types
Best for: Structured text
- Select Text Redaction.
- Click and drag over text.
- The redaction is applied instantly.
Best for: Images or scanned documents
- Select Area Redaction.
- Draw a box over the content.
- Release to apply.
Best for: Entire pages
- Select Full Page Redaction.
- Enter page numbers or ranges.
- Press Enter.
Best for: Bulk redaction
- Select Auto Redaction.
- Choose a pattern or term.
- Submit to redact all matches.
Managing Redactions
- Click the Layers icon.
- View redactions with creator, timestamp, reason, and notes.
From the Layers panel, click the eyeball icon to toggle redaction visibility on or off:
- Locate the redaction in the Layers panel.
- Click the three-dot menu and select Delete.
- "Are you sure?" dialog appears.
- Enter an explanation (e.g., "Applied in error").
- Click Delete to confirm.
- The redaction is removed instantly without page re-imaging.
- Alternatively, select the redaction in the document view and click the trash can icon.
- Click the Note icon.
- The most recent redaction is selected.
- Type your note.
- Close the dialog to save.
Overview
This guide outlines how to create and manage redactions in Legacy databases. It explains where to find the redaction tool, how to apply different types of redactions, manage existing redactions, and what happens to redacted text.
Accessing Redaction Tools
While viewing a document, click the Markup tool in the Viewer Tools section.
This will open the Markup Tools interface on the right-hand side:
Redaction Types
Best for: Redacting words, phrases, or sections of a document.
- Click and drag to create a redaction box over the information you want to hide.
- Click the Redact button and provide a reason, style, and optional note.
- Repeat to add additional redaction boxes.
Best for: Redacting entire pages.
- By default, this option applies to the Current Page Only.
- To redact multiple pages, select the Range option and enter a comma-delimited list of page numbers (e.g., 1,3,5-9,25).
Best for: Redacting an entire document at once.
Redaction Style
When applying a redaction, you can select from multiple styles that control the fill color, outline, and whether the redaction reason is visible. Choose the style that best fits your needs for readability and compliance.
| Style | Appearance | Notes |
|---|---|---|
| Black fill color, no outline, no text | Solid black box, no visible text or outline | Default for sensitive content |
| Black fill color, no outline, white text | Solid black box with white text showing redaction reason | Use when the reason must be visible |
| White fill color, no outline, no text | White box, no visible text or outline | Useful for covering annotations or marks |
| White fill color, black outline, no text | White box with black border, no text | Alternative for visibility without showing reason |
| White fill color, black outline, black text | White box with black border and black text showing redaction reason | Alternative to black fill with visible reason |
FAQ
When the Markup Tools interface is open, click the Toggle Zoom button above the document to enable a zoom feature for your cursor.
After highlighting or redacting your document, redactions can be found in two locations:
In the Markup Tools interface at the bottom of the panel:
In the history of redactions under the Annotations section on the right-hand side:
Toggle markups on or off via the toggle markups icon in your document Viewer Tools:
Redactions can be removed from the Annotations section or from the Markup Tools interface by selecting the symbol next to the redaction:
Once a redaction markup is applied, the redaction remains in place on the image whenever the document is exported, and the underlying redacted search text is removed from any provided text files.
If you provide a metadata load file with your export, review it carefully for any redacted fields, such as author, recipient, or email subject. Any fields redacted in the images or text must be manually removed from the metadata load file.
How to Apply Redactions
When viewing a single document, click the Share button at the top right of the document preview. A new window will appear allowing you to select Nextpoint users to share the document with.
The Share button looks slightly different depending on the Database type you are in.
Which database should I follow?
If you see the badge next to your database name, follow the NextGen Database tab below. Otherwise, switch to the Legacy Database tab.
After you’ve selected your recipients, you can optionally include a custom message to accompany the secure link they’ll receive by email. When you’re finished, click Send Emails.
Note: Emails are sent immediately, but delivery times may vary depending on recipients’ email servers.
Sharing a Document with Other Users Via Email
Outlined below are the steps for removing redactions and highlights from documents. This article covers both NextGen and Legacy database.
Which database type should I follow?
If you see
next to your database name, follow the NextGen database
tab below. Otherwise, switch to the Legacy database tab.
Removing Annotations in NextGen Databases
For NextGen databases, annotations are managed directly from the Layers panel in the document review interface.
Accessing Your Annotations
Click the Layers icon in the upper-left corner of the document review area to expand the Layers panel.
The Layers panel displays all annotations, including:
- Timestamp of when the annotation was created
- User who created the annotation
- Related issue (for highlights) or redaction reason
- The text or area that was marked
Removing Individual Annotations
- In the Layers panel, locate the annotation you want to remove.
-
Click the three-dot menu next to the annotation
and then
click Delete.
- An "Are you sure?" dialog appears prompting you to provide an explanation for removing the annotation.
- Enter an explanation (for example, "Applied in error" or "No longer applicable").
-
Click Delete to confirm.
The annotation is removed instantly without page re-imaging.
Alternatively, you can select the redaction directly within the document view and then click the trash can icon in the top right:
Audit Trail
All annotation removals are recorded in the document’s Document History, which retains:
- Who removed the annotation
- When it was removed
- The explanation provided
This creates a complete audit trail for all annotation changes.
Removing Annotations in Legacy Databases
To view the image markups made to a document, expand the Annotations section.
The Annotations section will have information on the markups.
-
Click the
 to remove an individual markup, or
- Click "Remove All" to remove them all.
A pop-up window will ask for an explanation for the redaction or highlight removal. Enter the text and click "Remove".
The image will be reprocessed to remove the markup(s), and the document history will retain who removed the markups and when.
Return to Discovery Workflow
How to Remove a Redaction or Highlight
Using a NextGen Database?
This feature is currently available in legacy databases. Support for NextGen databases is coming in a future release.
Sometimes, images of imported documents won't show up in your database. This can happen for a number of reasons, such as a corruption somewhere in the file, encryption, embedded images, an unsupported file type, etc. If you know that this file opens and you can see it in its native format, you can add images yourself. This will not affect any metadata, it simply allows you to view an image within our system.
Note: If you have existing Confidentiality coding on the document(s), you will need to reapply this coding only after the pages are replaced. See below instructions for more details.
First, download the original file by clicking the download button or clicking the three-dot menu and selecting "view original files".
In the application you're using, go to File - Print and choose "Save as PDF" (or other supported image-type).
Please note that you may need to change settings when opening a mailbox file in Outlook or Mail so that no additional information is included in the header/footer (such as your name or today's date) which is shown below.
Once you've chosen "Adobe PDF" as your print option, ensure that the header/footer is blank by following the steps below.
The below fields should all be empty to ensure nothing will be added to your image.
Hit ">>", scroll to print, and hit "save as PDF".
Go back into your document viewer, click the three-dot menu and choose "add page(s)".
This will prompt the "Import Pages" screen, where you can Drag & Drop, Add File from Computer, or Add from File Room (wherever you've saved your image). It also allows you to add-in a note prior to importing.
Wait for the image to finish processing. You will then be able to view the image in a PDF format.
Once the replacement has been imaged, first, reset your confidentiality coding to image on the document by setting the Confidentiality code on that document to a Null value > Update > wait for the Confidential stamps to remove from the image > Refresh your browser > check Confidential again > Update.
Add Page(s)
The native spreadsheet viewer allows users to review spreadsheets directly within the app, without relying on images or downloading files for external review. This feature supports .xls, .xlsx, .xlsm, .xlsb, and .csv files.
To access the spreadsheet viewer, click the View dropdown and select Spreadsheet.
From Spreadsheet view, users can review cells across each worksheet and perform the following actions to support their review:
- Undo or redo actions.
- Sort and filter columns to organize and isolate specific data.
- Search for specific text within the spreadsheet.
- Freeze and unfreeze panes.
- Wrap text within cells.
- View formulas in the formula bar above the worksheet, or view the values returned by formulas directly in the cells.
- Zoom in or out on the worksheet.
Any hidden data is automatically unhidden during import to ensure no content is missed. Users can then hide or unhide columns as needed using the native viewer.
Spreadsheet processing, redaction, endorsement, and production workflows remain unchanged.
Note: When searching within spreadsheets, the default behavior is to search the entire workbook. To search across only a single Worksheet, click Find >> and select Worksheet from the Within dropdown.
Native Spreadsheet Viewer
Bulk Coding Email Families
When in the Document Viewer, enable bulk coding with a quick toggle of the Bulk Code button at the top of Related Documents slider. You have the option to select the current email family, thread, or a custom selection for more consistent coding decisions.
To get started making a bulk coding decision for the current email family, take the following steps:
- Toggle the Bulk Code button at the top left of the related documents slider so it is blue.
- Click Select this family from the Bulk Code drop-down.
- We will confirm how many documents were selected for the bulk coding decision in both the related documents slider and at the top right by the Save / Save & Next buttons.
- Once your documents are selected, make your coding decisions in the coding panel to the right, click Save at the top right of your screen, and the bulk changes will be applied to all selected documents.
It is important to note, when bulk coding an email family, you must change/update the coding for which you would like to impact all selected documents. For example, if a parent email is already coded as "Responsive", but the rest of the family is not - during bulk coding, make sure to change the coding from Responsive to something else, then back to Responsive, in order for that coding to take effect on the entire family.
It's as simple as that!
Bulk Coding Workflow
It is important to note, when bulk coding in the related documents slider, only the Save option will be available and Save & Next will be disabled. This is to prevent unintentional inconsistent coding as you move to the next document in your results, which very well may be the first attachment of the email family you just bulk coded. To move through the next document(s) simply use the arrows in the top navigation.
If you would like to move more fluidly through email families using bulk coding, a workflow solution is to folder only the emails and loose efiles from your review set. In our earlier example, I would search for folder:"BZ and BA Emails" AND (document_type:email OR document_type:efile), folder those emails/efiles, and work through my new folder for review.
As you navigate each email, the full email family (email + attachments) is presented in the related documents slider. Make your bulk coding decision for the first email-family, and when you move to the next email in your results, you will be presented with the next email-family. Once your review is complete, if you access the original folder, the full families and any loose efiles will be coded consistently.
Bulk Coding Email Families in Document-Viewer
With Bulk Actions in Nextpoint, you can efficiently apply coding, tags, and other attributes to multiple documents at once. This allows you to organize and categorize large document sets without having to update each file individually. The video and steps below will walk you through the process of tagging search results and using bulk actions to manage your documents.
Tagging the Results of a Search
- Run a search
- When viewing the search results, check the box next to the document(s) you wish to tag, or check the box in the header row at the top left of your grid view to select all documents returned by the search.
- Then click Bulk Actions.
The Bulk Edit pop-up modal will open, where you can make wholesale changes to your selection:
- Add the documents to a Folder.
- Edit the relevancy coding associated with these documents.
- Edit the privilege coding associated with these documents.
- Edit the confidentiality coding associated with these documents.
- Edit the documents' standard document attributes.
- Add/Remove custom coding fields.
- Add/Remove tags.
- Select if you would like to apply your coding updates to any related documents and/or in which order you would like the documents sorted. Sort order is most applicable when working with emails and their associated attachments. See more here on the varying settings you can employ when organizing your data.
To prevent inadvertently overwriting existing coding, updates to the relevancy (2), privilege (3), and custom picklists (6) are additive. This means that you are able to choose if you want to keep your existing coding, remove it, or update it for these documents. While editing one of these fields, you will see a number in parenthesis next to the update options. This indicates the number of documents with this existing coding:
For documents with existing coding (like aqua, green, or red in the example), you can update the coding by clicking on the checkbox next to it in the following ways:
- The default
option (1) will keep the coding for this selection the same as it existed before updating, and the number in parentheses (A) is the number of documents included in this update that have that option selected.
- The
option (2) will remove coding (if any existed) for this selection. The number in the parentheses next to a selection with the empty checkbox (B) will indicate that zero documents will maintain this selection after the bulk action update.
- The
option (3) will add this coding to all documents included in the bulk action. The number in the parentheses next to a selection with the “checked” checkbox (C) will indicate the total number of documents included in the bulk action update as all of the documents will be updated.
Click the "Update Documents" button, and your changes will be saved.
To Recall Your Search
Select your folder, relevancy, privilege, confidentiality, attribute, field, or tag in the Filter Section, or do an Advanced Search with the appropriate syntax.
Litigation Databases
Bulk actions work similarly in a litigation database, but only picklist fields are additive.
Bulk Actions in a Database
When reviewing and coding documents in Nextpoint Discovery and Litigation, there are a series of Keyboard Shortcuts which you can use to streamline your review workflow. See the listings below for both Discovery and Litigation:
NOTE: If you are working on a Mac, please swap out Alt (PC) for Option (Mac).
DISCOVERY Keyboard Shortcuts
| PC Shortcut | Coding Action |
|---|---|
| Alt + Ctrl + C | Clear Coding |
| Persistence | |
| Alt + Ctrl + U | Save |
|
Alt + Ctrl + Enter |
Save & Next |
| Navigation | |
| Alt + Ctrl + Up Arrow | Previous Page |
| Alt + Ctrl + Down Arrow | Next Page |
| Alt + Ctrl + Left Arrow | Previous Document |
| Alt + Ctrl + Right Arrow | Next Document |
| General | |
| Alt + Ctrl + H | Show Help Menu |
| *Ctrl and Shift are interchangeable | |
| Coding | |
| Alt + Ctrl + R | Responsive |
| Alt + Ctrl + N | Non-Responsive |
| Alt + Ctrl + F | Requires Follow-up |
| Alt + Ctrl + P | Privileged |
LITIGATION Keyboard Shortcuts
| Shortcut | Coding Action |
|---|---|
| Persistence | |
| Alt + Ctrl + U | Update |
| Navigation | |
| Alt + Ctrl + Up Arrow | Previous Page |
| Alt + Ctrl + Down Arrow | Next Page |
| Alt + Ctrl + Left Arrow | Previous Document |
| Alt + Ctrl + Right Arrow | Next Document |
| General | |
| Alt + Ctrl + H | Show Help Menu |
| *Ctrl and Shift are interchangeable | |
FAQ: Can I customize my keyboard shortcuts in Nextpoint?
The short answer is "No", currently, customization of keyboard shortcuts is not an option in Nextpoint.
Discovery and Litigation Keyboard Shortcuts
To add documents to a Folder, follow the directions below:
1 | Access the Grid View
From the top navigation in your Discovery database, navigate to REVIEW and run your applicable search (or Filter).
Once you are on the Grid View select the resulting list of documents click Bulk Actions.
NOTE: With this method, you may choose to include related documents, even if they were not returned in the search.
2 | Select or Create your Folder
The Bulk Action modal will pop-up. Select Add under the Folder action checkbox and select the applicable folder.
If the folder has not yet been created, click Create New Folder enter your Folder Name and validate the auto-populated abbreviation/prefix is what you prefer click Create to finalize the creation of your folder.
3 | Finalize Bulk Action Settings and Update
- Once your folder has been created, verify the folder selection.
- Make your selection as to which related documents should be added to the folder (none, email family, email chain, duplicates). See more details below.
- Make your selection as to the order in which documents should be added to the folder (current sort in the grid view, family order, date and family order). See more details below.
- Lastly, click Update to initiate the Bulk Action to add the documents in your Grid View list to the newly created folder.
4 | Bulk Action Related Document and Order Options
Be sure to make your selection as to which related documents should be added to the folder and also as to the order in which documents should be added to the folder.
Apply update to related documents
None - Only the documents in your current selection will be processed.
Email Family - Add family emails and/or attachments.
- This is the most common selection we see when users are organizing emails as it keeps any directly related emails and attachments together, regardless if all components of the email family hit on your search.
Email Chain - Add family emails, attachments, replies, and/or forwards
Duplicates - Add duplicate email MID and/or MD5 hash
NOTE: This option will only be effective if the selected documents share the same MID and/or MD5 hash values. If your selection includes documents with different MID or MD5 hash values, this function will not work.
Choose Order
Current - Retain order of documents as currently viewed
Family - Reorder to group email families (email + attachments)
Date & Family - Reorder to group email families (email + attachments)
Return to Discovery Workflow
Adding Documents to a Folder in Discovery
What are Bulk Actions?
Nextpoint’s Bulk Actions feature (available to Advanced and Standard Users) lets you edit, organize, and sort documents in bulk. Use it to add multiple documents to folders, update coding, adjust privilege statuses, or modify data fields—all in a single action.
How to Use Bulk Actions
There are four key options available when using Bulk Actions to edit a list of documents:
- Update (only) Selected Documents in their Current Order
- Update (only) Selected Documents in Email Family Order
- Update Selected Documents, their Related Documents, and Sort in Email Family Order
- Update Selected Documents, their Related Documents, and Sort in Chronological Order
Note: All actions illustrated below take place in the Bulk Action pop-up window. You can reach this pop-up by navigating to any Grid View results, selecting some or all of the documents via the top-left drop-down, and clicking Bulk Action.
1. Update (only) Selected Documents in their Current Order
The first option is to apply your Bulk Action edit to your document list without adding related documents, and also without changing their sort order.
This selection will only update documents in your document list, with no regard for associated emails or attachments. Additionally, if you choose to apply a folder in your Bulk Action, the selected documents will be added to the folder in the order in which they appear in your document list.
Below, we've illustrated how you would add (only) your selected documents to a folder and sort in their "Current" order.
Example of Application: Add a Production Set to a Folder and Sort in Bates Order
If you receive a production from an opposing party, you may want to add those documents to a folder sorted in order of their provided Bates numbers.
In this case, you would search for all documents with a the opposing party's Bates prefix (e.g. Bates:Nextpoint*) sort in Bates order from your grid view "Select All" documents in your list via the top-left drop-down click "Bulk Actions" Select "Add" to "Defendant Productions" folder select "Apply update to related documents:none" select in their "Current" order click "Update".
2. Update (only) Selected Documents in Email Family Order
The second option is to apply your Bulk Action to your document list without adding related documents, and changing the sort order to group emails and attachments together.
The selection of "Family" sort order will reorder your selected documents to group email families together (email + attachments).
Below, we've illustrated how you would add (only) your selected documents to a folder and select to sort in "Family" order.
It is important to understand this selection will only consider those documents in your selection.
For example, if you run a search for "flights", and only the parent emails hit on the search term, but some emails have attachments which are not in your search results, those attachments will not be incorporated in your Bulk Action application.
To incorporate all associated family members (emails + attachments), read the next section on how to "Update Selected Documents, their Related Documents, and Sort in Email Family Order".
3. Update Selected Docs, their Related Docs, Sort in Email Family Order
The third option is to apply your Bulk Action to your document list, also update related documents (typically, email family members), and sort all included documents in Email Family order.
The selection of "Apply update to related documents:Email Family" will add related family members to the selected set prior to updating. This means, if an email is included in your selection, all attachments will be added, and if an attachment is included in your selection, the corresponding email will be added. Furthermore, the selection of "Family" sort order will reorder all included documents to group email families together (email + attachments)
Below, we've illustrated how you would add your selected documents to a folder, select which documents you would like to include (email family member, email chain members, or duplicate), and then select the "Family" sort order.
Example of Application: Ensure you Produce Complete Email Families
Oftentimes, when preparing a set of documents for production, users would like to make sure they have coded each part of an email family consistently.
For example, if a parent email has been coded as Responsive/Not Privileged, users may want to ensure the attachments are tagged in the same manner. Utilizing the aforementioned "Update Selected Documents, their Related Documents, and Sort in Email Family Order" option would keep email families together during your Bulk Action update, regardless if the attachment to the Responsive/Not Privileged email happened to be tagged differently (e.g. Non-Responsive).
In this case, you would Filter for all Responsive/Not Privileged documents without Bates numbers already applied (to exclude previously produced documents) > then, select All documents in your list via the top-left drop-down > click "Bulk Actions" > Add to a "Pending Production" folder > select "apply update to related documents:Email Family" > select in "Family" order > click "Update".
4. Update Selected Docs, their Related Docs, Sort in Chronological Order
The fourth and final option is to apply your Bulk Action to your document list, also update related documents (typically, email family members), and sort all included documents in "Date & Family" order.
The selection of "Apply update to related documents:Email Family" will add related family members to the selected set prior to updating. This means, if an email is included in selection, all attachments will be added, and if an attachment included in selection, the corresponding email will be added.
The selection of "Date & Family" sort order will order documents chronologically by their master family date, which is considered to be the date of the parent email. This date will then be assumed by all email family members when sorting, even if that parent email is NOT in your selected document list.
How do I remove my documents from a folder with Bulk Actions?
If you need to remove documents from a folder, first, click into the folder from your REVIEW or DOCUMENTS tab (if you are working in Discovery vs. Litigation, respectively).
Then, select all documents from the grid view and click "Bulk Actions".
Click "Remove" under the "Folder" heading in your Bulk Actions modal. Make sure to select the appropriate folder from which you would like to remove your documents.
Lastly, click the orange "Update" button. No related documents selection is necessary when removing documents from a folder.
If the documents were removed from the folder successfully, the folder should display zero documents from the REVIEW or DOCUMENTS tab.
Note: When removing documents from a folder, the actions you are taking will not remove/trash the documents from your database.
Working with Bulk Actions in Litigation
The above guide is more specific to working with Bulk Actions in Discovery, but it is important to note Bulk Actions are available in Litigation as well.
One important consideration to make in Litigation, is if you would like to apply an Issue to a list of documents via Bulk Actions, you must first set up the Issue. Otherwise, selecting an issue will not be available.
Questions? Contact our product support team at support@nextpoint.com.
Using Bulk Actions to Organize or Code Your Documents
For Discovery database, any existing “email family” (an email and it’s attachments), email thread (conversation), and/or potential duplicates for the document you are currently working with is quickly accessible on the right side of the document viewer next to the "Related Documents" tab.
When more information is desired, links (green arrows) are provided to “pop-out” any of the related documents into a new tab without removing you from your current task.
See the below image which illustrates the location of the Related Documents Viewer:
A Closer Look
When viewing a document in your review:
1) The Related Documents panel on the right side of the page, shows any related emails-attachments to the document you are viewing together with any other components of the conversation thread (chain), and any possible duplicate files.
2) The document you initially navigated to is denoted by a gray background with a teal border.
To preview related documents, e.g. email attachments, emails in the conversation thread:
- To preview the related documents to a particular email, click on the desired document in the related document tree. In the below case, if I want to preview the attachment to the email "Charlie and Annie make a long email thread", I will simply click on "Test Data for Related Documents_AJ.eml".
NOTE: The first indicator in the Related Document viewer that a document is an attachment to an email is the indention of the file below the email. Additionally, any email family (parent + attachments) will be indicated by a purple line - If you decide the attachment "Test Data for Related Documents_AJ.eml" warrants a closer look, you can pop-it-out into a new window via it’s green arrow.

- Doing this will make the attachment the focus of the new window — and thus the “related documents” will now revolve around it.
- To set/alter relevancy, privilege, or confidentiality statuses of an email family in bulk, check the boxes next to any or all of the documents that you would like to modify, then click Bulk Code. Now, the changes you make to the fields on the right-hand side will apply to all selected documents.
- Once you have selected the appropriate documents in Step 4, the changes you apply to the fields on the right-hand side will apply to all selected documents. Note, this will be indicated by red text above the toolbar which will list the number of documents being edited. You can make wholesale changes to all the selected documents, including setting your Privilege Status, Confidentiality, and Review Status. Just make your selections, then click Save.
Note: In each instance, duplicate files will be flagged and displayed to streamline the process of deduplication and ensure that work is not being duplicated across datasets and/or reviewers.
Return to Discovery Workflow
Working with Related Documents (Email Families, Chains, and Duplicates) in Discovery
Note: This feature is only available to Advanced users in Discovery databases.
You may sometimes need to change the order of documents within a folder after it has already been set up (learn about creating folders here). In your Nextpoint database, this process is called "reordering".
Important Note Before You Start:
To reorder documents in a folder, they must already be associated with the folder in which you'd like to reorder.
Example: If you want to insert two documents into the middle of your "Client Production 1" folder to align with other documents chronologically, you must first add those documents to the folder. They will initially be placed at the end of the folder. Then, you can follow the steps below to reorder them into their correct position.
Steps to Reorder Documents in a Folder
-
Access Grid View:
- Open the folder where you want to reorder documents or search using specific criteria to find it.
- In Grid View, select the documents you want to reorder.
- Click on "Bulk Actions".
-
In the Bulk Actions Window:
- Select "Reorder" under the "Folder" section.
- Choose the folder in which you want to reorder the documents.
- Enter a start number (this is the position where you want to move the selected documents within the folder).
-
Select Sort Order:
- Current: This option keeps the documents in their current sort order as displayed in Grid View. For example, if you sorted by "Exhibit Number," selecting "Current" will reorder the folder based on that field.
- Family: This option reorders the documents while keeping parent emails and their attachments together.
- Date and Family: This option reorders the documents chronologically, with attachments placed directly after their parent emails.
-
Complete the Reordering:
- Once you've set your preferences, click "Update Documents." The selected documents will be renumbered, and the entire folder will be updated with the new order.
By following these steps, you can easily reorder documents within your folders to suit your needs.
How to Reorder Documents in a Folder
*This functionality is available for Advanced users only.
When working in any Discovery database, you can take any folder of documents and split into more manageable review sets.
On the REVIEW tab, click three dots and select Split from the dropdown menu.
From the pop-up window, enter the Number of Folders to split the documents into, Folder Name, and Folder Prefix. Note: the inital folder selected will not be impacted by the split.
To include email family members NOT in your initial folder being split, make sure to check "Include Document Families" > "Yes" (e.g. If a parent email is in the Scheduled Emails folder below, but the attachment is not, for whatever reason, then the attachment will be brought into the split folder the email ends up in)
Warning
There is a limit of 50 folders that you can split a single folder into using the folder split tool.
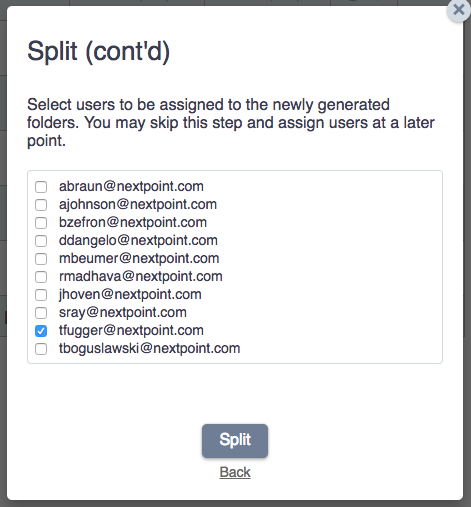
Next, you have the option to select the users to be assigned to the new Folders. If you prefer to assign different folders to unique reviewers, you can do so after the split is complete. Once finished, click Split.
You will see an alert that your split is underway, and you will receive an email notification once it is complete.
How to Split a Review Folder
When examining a population of documents in Grid View, you can quickly access a preview image of any document without navigating to the “breakout” document viewer with the coding panel. This is a real time-saver in many situations.
First, customize any Grid View template to include Document Preview and Theater View columns. (Your default template may already have these selected.)
Your saved Grid View template will now display two columns containing these icons:
 — Document Preview
 — Theater View
From your grid view results, click a document’s Document Preview icon to view the first page of that document in a modal box, or the Theater View icon to view the entire document in a separate theater window.
Document Preview
Theater View
In the Document Preview modal, you can navigate through the documents in your Grid View results using up/down keyboard arrows. The modal window can be resized or moved anywhere within the browser tab.
In Theater View, type “n” for the next page, or “p” for the previous page in your document. Click on the Theater icon of a different document in your Grid View to update the theater display with that new document.
To close the Document Preview modal, press the “escape” key on your keyboard or click anywhere else on the page. Close the Theater window as you would close any browser window. (Shortcut: Ctrl-W Windows, Cmd-W for Mac)
Preview Documents in Grid View
When you initiate a search across documents and/or transcripts, there are two views that you may use for your list results, Chron View and Grid View. Both of these views are available in both Discovery and Litigation databases.
Grid View
Grid View will display the documents in a table, displaying varying fields in columns. You can either view in the default templates, or create as many custom grid views as you need in both Discovery and Litigation.
The Basics
- Coding information for each document row will be displayed in the columns of your grid.
- Click on the triangle next to any file type icon to open the Document Actions popup, where you can Download Original Files, Download PDF, View in Theater, or display in the Document view.
- Infinite scrolling allows you to see more results at once and quickly load more results as you scroll
- Use the "Views" slider at the top right of your screen to select another saved Grid View Template or toggle between Chron View and Grid View.
- For information on how to set up a custom Grid View, click here.
Filters and Sorting
Search broadly, filter deeply to quickly drill into your search results
- Click on a Column Header to change the Sort Criteria
- Filter types based on field type:
- Text, picklist, and locked lists fields include "contains" and "exact" filters
- Mailbox and File Path fields include a custom folder tree filter
- Folders, issues, review and privilege status include a set filter
Grid View Customization
- Rearrange columns with drag and drop
- Pin columns with the hamburger symbol
- Robust column resizing, including auto-resize of all column
- Scroll horizontally when you need to see more information about a document(s) at a glance
For more information on creating Grid Views, click here if you are working in a Discovery database, or here if you are working in a Litigation database.
Chron View
Chron view provides high-level context for your search results via a text view with term-hits bolded. This can be helpful if you like to see the term-hits highlighted alongside document context, or perhaps you are looking to verify if your search is on the right track or needs further refinement to weed out false positives.
A closer look at Chron View and the helpful information and options displayed is outlined below:
- The Document, Review Status, Bates range as well as any associated Folders/Issues.
- If you performed a text search, a summary of the applicable text is shown in context with the surrounding text (in this case "7pm" - "flights" is in the email subject)
- The Author, Document Date and Document Type
- You can also change the sort order by clicking the "Current Sort" value. This will toggle between ascending and descending order.
- You can Change Sort Criteria by opening up the dropdown, and making a selection.
- You can toggle between Chron View and Grid View.
- You can download a PDF of the document.
- You can view the document in Theater to view full screen.
Return to Discovery Workflow
Using Grid View and Chron View
The document detail page allows you to review, code, and take action on individual documents in your database. From this view, you can access document history, related documents, coding fields, metadata, and a variety of tools to help you efficiently review and manage your documents.
Which database type should I follow?
If you see the badge in the top left next to the name of your database, follow the NextGen steps below. Otherwise, switch to the Legacy tab.
After performing a search, click on the document you wish to review to open the document detail page.
1. Click Views/Edits/Markups to view the Review History of the document.
2. Open the Document options dropdown to view in theater, view saved treatments, export the document family, markup the document, view document pages, add pages, view original files, trash the document or split the document.
3. You can Download the Original document, Share, or Print the document.
4. View the document in context of Related Documents, e.g. emails or attachments within an email chain. Emails will be at the top of the tree, with attachments below. Duplicate documents are also accessible. The document you are currently viewing will be indicated by a blue arrow, and the document originally searched will have a red box around it. To view a different document, simply click it. If you wish to view it in a new window, click the green arrow. Select related documents and click Edit to make Bulk Edits to your selected documents.
5. Viewer Tools allow you to Add Image Markups (Image Highlights and Redactions), Rotate the document, or Zoom in.
6. Add or view the Page Notes in a document.
7. View all important Coding Fields and make changes to Review Status, Privilege Status, Confidentiality, and other Hot Coding fields. Just make your changes and click Save, or Save & Next to save and move to the next document.
8 & 9. View or modify the other Coding information. You can also change the Coding fields that are displayed by clicking edit template.
10. View or modify the Custodian(s) which this document belongs to.
11. View or modify the Folder(s) which this document belongs to.
12. View the Metadata that was extracted from the document.
Return to Discovery Workflow
After performing a search, click on the document you wish to review to open the document detail page.
1. Click Views/Edits/Markups to view the Review History of the document.
2. Open the Document options dropdown to view in theater, view saved treatments, export the document family, markup the document, view document pages, add pages, view original files, trash the document or split the document.
3. You can Download the Original document, Share, or Print the document.
4. View the document in context of Related Documents.
5. Viewer Tools allow you to Add Image Markups, Rotate, or Zoom in.
6. Add or view the Page Notes in a document.
7. View and update Coding Fields and other coding information.
8. View or modify the Folder(s) which this document belongs to.
9. View the Metadata extracted from the document.
Return to Discovery Workflow
Review a Document
There are two ways you can add coding to a document when working in Discovery. The first at an individual level and the second en masse via a bulk action. Let's take a closer look at each.
Add Information to One Document
When you are viewing an individual document, coding information is available in two areas:
In the Discovery Fields section, you will find Relevancy Status, Privilege Status, and Confidentiality. You can also find any Hot Coding fields that have been set up in the section below Discovery Fields. Make your changes, then click Update to save.
The rest of the coding fields can be modified by expanding the Additional Fields section. Just make your changes, then click Update to save, or Update & Next to save and move on to the next document in your list.
Add Information to Multiple Documents
Perform a search or click into the folder to select the documents you would like to add. Select the checkboxes to the left of the documents you would like to edit and click "Bulk Actions".
The Bulk Edit window will open, where you can choose which data to edit. If you would like to include documents from email chains, email families or duplicates, click the appropriate checkboxes at the top (more information on these options here).
Click "Update Documents" and the changes will be made.
Your Discovery database should display the following Bulk Edit options (some options may not display if they have not been determined in Settings):
Coding Documents in Discovery
Users can log into Nextpoint Discovery and choose either the ANALYTICS tab or the REVIEW tab to see progress reports for ongoing reviews.
*Basic and Reviewer user levels do not have access to the ANALYTICS tab, and can only see the REVIEW tab.
REVIEW Tab (All Users)
Under the Review tab you can find folders to which you are assigned. On this page, you can click hyperlinks to go to the docs within that Folder that are Not Reviewed for Relevancy or Not Reviewed for Privileged.
ANALYTICS Tab (Standard & Advanced Users only)
The ANALYTICS tab contains graphs of high-level statistics that measure the data within a database and the the overall progress of a document review project. Users can click on any of the graphs and it will take them to a list of the documents that fall into that specific category. Learn more about the Discovery Analytics Page here.
Return to Discovery Workflow
Review Status
To mark a document as Confidential, first create a Confidentiality Code in your Settings, click here to learn how.
Then when reviewing a document go to the Discovery Fields and navigate to the Confidentiality Status box and make your selection. Click Save or Save & Next to save and go to the next document.
You may also add Confidentiality Coding in bulk by using the Bulk Edit feature, click here to learn how.
Any document(s) that has been assigned a Confidentiality stamp will be automatically endorsed at the time of bates stamping. Each page of that document will be designated with the selected confidentiality.
Using a NextGen database?
If you see in the top left next to the name of your database, the Confidentiality stamp will appear on the face of every page of the document at the time the code is applied (it is not tied to Bates stamping)
Marking a Document as Confidential
When viewing the document, check the Review History by clicking the clock icon on the left side of the document review tab.
You will be able to see the Review History of when Responsive Issues, Privilege and/or Confidentiality Status have been changed, the Redaction and Highlight History, when Modifications have been made to coding data, along with Views, showing who has looked at the document and when.
Return to Discovery Workflow
Auditing the Review History of a Document
The document splitting feature allows you to divide multi-page documents into separate individual documents at designated page breaks. This is particularly useful for reviewing large files that contain multiple distinct documents, making it easier to code, review, and prepare materials for production.
Which database type should I follow?
If you see
next to your database name, follow the NextGen database tab below. Otherwise, switch to the Legacy database tab.
Please note:
Document splitting is disabled when:
- The document contains redactions or highlights. This restriction prevents inadvertent disclosure of protected content.
What transfers to split documents:
- ✓ Bates numbers are maintained from the original document
- ✓ Confidentiality designations are preserved
- ✗ Existing coding (folders, issues, subject titles, notes) will not transfer and must be reapplied to split documents
Accessing the Split Document Interface
- Navigate to the document you want to split in your Review or Documents section.
- Click the three-dot menu in the upper right corner of the document viewer.
- Select Split document from the dropdown menu.
Alternatively, you can access splitting functionality through the Document Editor button in the top bar, which opens the same page management modal:
Creating Document Splits
The page management modal displays thumbnail previews of all pages in the document. From this interface, you can rotate pages, delete pages, or add splits.
Method 1: Single Page Splits
- Click on the page after which you want to create a split.
- Click the Add split button.
- A visual indicator appears showing where the document will be divided.
- Repeat for additional splits as needed.
- Click Save to execute the splits.
Tip
The split is created after the selected page. For example, selecting page 3 and clicking "Add split" will create one document containing pages 1–3 and a second document starting with page 4.
Method 2: Batch Splitting Multiple Pages
For documents requiring multiple splits, you can select multiple pages at once before clicking Add split. Two selection methods are available:
- Hold Shift and click to select a continuous range of pages — everything between your first and last click will be included.
- Hold Alt (PC) or Command (Mac) and click to hand-pick individual pages across the document as your split points.
Once you have the pages selected:
- Click the Add split button.
- Visual split indicators appear after each selected page.
- Click Save to execute all splits simultaneously.
Example
To split a 10-page document into four separate documents at pages 3, 5, and 8:
Select page 3, hold Command, select page 5, continue holding Command, select page 8.
- Click "Add split."
- This creates: Document 1 (pages 1–3), Document 2 (pages 4–5), Document 3 (pages 6–8), Document 4 (pages 9–10).
Locating Split Documents
After splitting is complete, the newly created documents appear as a new import batch:
- Navigate to Data > Imports.
- The split documents appear as the most recent batch.
- Click on the batch name to view all documents created from the split operation.
About the Original Document
The original master document remains in your database after splitting. This allows you to:
- Reference the complete original file if needed
- Revert to the unsplit document if the split was performed incorrectly
- Maintain a record of the original structure
If you no longer need the original document, you can trash it from your database after verifying the split documents are correct.
Please note:
When a document is split in Nextpoint any assigned Bates numbers will be maintained from original to the newly split documents, but any existing coding (folders, issues, subject title, notes, etc...) will not be maintained and will need to be reapplied.
Additionally, if a document is redacted and/or highlighted, the splitting feature will be disabled to prevent the inadvertent disclosure of marked up content, particularly redactions.
To start splitting documents, click Review and select the document you would like to view.
On the scissor icon drop-down menu click "Enable Splitting." Once enabled, the system will add a little scissor icon in between pages where users can choose to create breaks.
If turned on, you can simply mark all of the pages you would like broken out from a large file by scrolling to the page(s) and toggling on the scissor icon so it is blue.
Once done applying your splits, click the scissor icon at the top right of your document and choose "Split Documents on Flags" which will prompt a popup for confirmation.
Please note: the metadata & coding will be preserved in the original document but will NOT be applied to the split documents.
The newly split documents can be found via DATA > Imports as the most recent batch after your split.
Important Information about the Original
A master document remains in the system if you choose to keep it or need to revert back to the original, unbroken document for any reason.
How to Split a Document
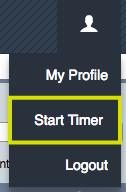
In Nextpoint, productivity for each reviewer can be tracked and included in various reports.
To accurately track productivity, each reviewer will click the "Start Timer" button, located under the "My Profile" icon in the top right corner of the application.
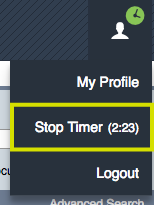
Utilize the "Stop Timer" button at any time to indicate they have finished or paused review work. The timer will continue to run even if you leave Nextpoint at any time, so be sure to stop the timer before leaving the application.
For Reviewer, Basic, Standard users hours can be viewed under the Timekeeping tab. For Advanced users, timekeeping can be viewed under Users > Timekeeping. To view hours logged go to In the hours view, click the time for any day to edit or to account for periods of inactivity while logged in.

In the time edit window you can do the following:

1. Click into any Punch In or Punch Out record to open the edit popup.
2. In the edit popup, use the sliders to adjust the time, and click "Done" when finished.
3. You can have the Day's Review sent to you, or create a New Timecard if you have forgotten to utilize the time tracker.
How to Track Time in Nextpoint
How to work with Image Markups (highlights and redactions):
To make redactions or highlights on an imaged document, click the document you would like to make changes to. Then click on the Image Markup viewer tool icon at the top right of the Document Viewer.

At the top of the next screen, you can toggle the Image Markup tool between two modes:
- Highlight: Locate the page and excerpt which you would like to highlight and ensure the toggle on the right side of your screen is set to Highlight, select an associated issue, and add a note (both optional). Click your cursor where you would like to begin your highlight and simply drag and drop to complete. If you would like to add an additional highlight on the page, repeat the click, drag and drop sequence mentioned above. If you would like to resize the highlight box, click the edge and resize accordingly.
Click the orange Highlight button before moving on to the next page (you will be prompted).
- Redact: To start redacting a document, toggle to Redact mode, select your redaction reason, style, and add a note (optional). Click your cursor where you would like to begin your redaction and simply drag and drop to complete. If you would like to add an additional redaction on the page, repeat the click, drag and drop sequence mentioned above. If you would like to resize the redaction box, click the edge and resize accordingly.
To get started, simply click the Toggle Zoom button at the top right of your document and hover of the document for improved visibility. Once you click to make a highlight or redaction, the zoom will reset slightly to ensure it is zooming on the text as you make your markup.
Once you've highlighted or redacted your document, you can see all highlights and redactions for that particular document listed by corresponding page in the "Annotations" section of the sidebar.
If you need to view a version of your document without image markups, click the Toggle Markups viewer tool icon at the top right of the Document Viewer.
You can use the Filter menu to limit results to documents with highlights:
Or to filter for all documents with redactions:
There are several ways to export image markups in both Discovery and Litigation.
1. Assemble as PDF
In Discovery, select the REVIEW tab and click the  menu. Click "Assemble as PDF" and choose to include highlights, redaction notes or page notes. Nextpoint will notify you once the PDF is assembled and ready for download.
In Litigation, select the DOCUMENTS tab and click the menu. Click "Assemble as PDF" and choose to include highlights, redaction notes or page notes. Nextpoint will notify you once the PDF is assembled and ready for download.
2. At Document-level via Document Options
In either Discovery or Litigation, click into an individual document and open the Document options dropdown.
Select Export Family to export a document's family to a PDF with the option to include any image markups and page notes. Once you have finished making your selections, click Export and your PDF will begin downloading.
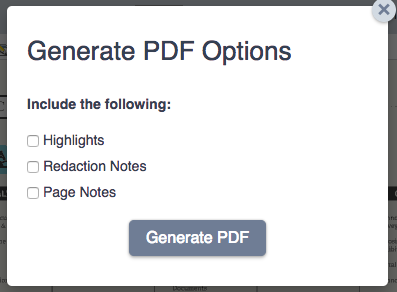
Select Generate PDF and select any image markups or page notes that you would like included in the PDF. Then, click the Generate PDF button and your PDF will begin downloading.
Load file templates are only created as part of the export template process and define which fields are exported and how they are arranged. Once created, the same load file template may be referenced by multiple export templates.
When you click Create New in Step 4 of the export template process, you will be prompted to name your new load file template and select the fields that will be included in the export.


Once your load file and export template are completed, select a folder and choose Export from the drop-down menu.
Name your export, choose an appropriate export template and proceed.
ZIP archives will be generated and Nextpoint will notify you when they are ready for download.
Important Note on Exporting Redactions/Highlights
Once a redaction markup has been applied, anytime that document is exported, the redaction will be in place on the image and the underlying redacted search text redacted from any provided text files. If you are providing a metadata load file with your export, it is recommended you review your export closely for any redacted fields such as author, recipient, email subject, etc.. If those fields have been redacted on the images/text, they will need to be manually removed from your metadata load file.
On the other hand, if highlight markups are made on an image, they WILL NOT be exported on your images unless explicitly selected during the export process as outlined above.
Highlighting & Redacting Documents
Version Control, Best Practices, FAQ's on Uploading Files
Never again question the location or the status of your latest version. Keep your work product in the Share section, accurately identified with the date and time.
Allow members of your team, in any location, to view and comment on presentations while they're working through their iterations.
Old versions are saved in the event you need to reference them again.
Upload your presentation by navigating to SHARE in the navigation bar and click the "Share a File" button.
- Upload your file or choose your file from File Room.
- Give it a Name, Category, Description, any Version Notes you might have.
- If you would like to notify members of your team that a new version is available, click the box under Send An Email Notification, enter Text For Email and Select Recipients if you wish.
- Click "Share a File", and your recipients will receive an email notification with a hyperlink to the new version when it is ready.
When you have the next version ready to share for review, navigate to the SHARE tab and press share a new version. Advanced Users can also Edit the name of the file and Delete them if necessary.
For more information on uploading to Share, click here.
Return to Discovery Workflow
Using the Share Section
Using a NextGen database?
The Image Anomaly feature only applies to legacy databases. If you see in the top left next to the name of your database, you can disregard these steps.
Tagging Documents with Image Anomalies
If you suspect a document may not have been imaged correctly by the software, you can utilize the Image Report option at the far right of the image toolbar.
The pop-up window allows you to report which pages you suspect aren’t displaying correctly and explain what seems wrong with the image (e.g. There is no image, the image is truncated, etc.). Note: These fields are required.
Locating Documents with Image Anomaly Tags
To quickly find all documents that have reported image anomalies:
- From your grid view, click Open Filters at the top right
- Drop down the Work Product section of your Filter interface
- Check the Image Anomaly box
- Click Filter Documents to run your filter selection
When you would like to report these to the Nextpoint Data Strategy Team for assessment, please contact support@nextpoint.com referencing your database ID and any specifications as to the set of image anomalies which need to be addressed.
Removing Image Anomaly Tags
To remove an Image Anomaly tag from a document, simply click Report Image icon (image of icon) and then click Delete Image Report.
How to Report an Image Anomaly
If you need to delete pages from a document to clean up duplicative pages, add replacements, or force the insertion of a native placeholder during the application of Bates endorsements, you can do so on a per-document basis within the document viewer.
To do so, take the following steps:
- When viewing a document, navigate to the to Document options dropdown and select View document pages. In the pop-up you will see the list of pages in that document.
- Click the red delete icon to the left of the pages you want to remove and the document will be automatically updated.
- You can also move pages within a document if necessary by selecting the move icon to the left of the page to drag and drop pages in the order you would like.
Deleting All Pages
To delete all pages from a document, simply select the "Delete ALL Pages" option at the bottom of the "View Document Pages" pop-up. This will allow for the full replacement of the document via Add Pages or Add/Replace native OR if you would like to insert a native placeholder for that document during Bates endorsing on a one-off basis.
IMPORTANT
This is not recommended as a solution for Numbering Exceptions which can be set up in your Endorsement Template(s), but rather as-needed.
Removing Pages from a Document
Using a NextGen Database?
This feature is currently available in legacy databases. Support for NextGen databases is coming in a future release.
If coding has been applied already to existing documents in the database and the volume of documents is relatively small, new document images can be replaced manually without having to re-code.
Note: If you have existing Confidentiality coding on the document(s), you will need to reapply this coding only after the pages are replaced. See below instructions for more details.
To begin this process, click into the document that needs to be replaced. Once inside of the Document View, navigate to the Document options dropdown on the right side of the page and select "View Document Pages".
Once inside of the view either delete the pages you would like to replace or at the bottom of the pop-up select "Delete ALL Pages".
When the pages are deleted you will be redirected to the main page where there will be no image of a document. To add a new document, from the Document options dropdown select "Add Pages".
Add a file(s) to replace the file you deleted. It may take a few minutes to process.
Once the replacement has been imaged, first, reset your confidentiality coding to image on the document by setting the Confidentiality code on that document to a Null value > Update > wait for the Confidential stamps to remove from the image > Refresh your browser > check Confidential again > Update.
After you confirm the image and page count are as expected, return to the Document options dropdown and select "View Original Files". You will notice that both the file that was deleted as well as the newly imported file will be listed. We recommend deleting the file that was deleted from this list, so when exporting the data it does not become confusing on which file is correct.
Return to FAQ Section or Discovery Workflow
Replacing Individual Pages in a Document
Generate a Single Document PDF
You can generate a PDF of a single document directly from the document viewer. Use the Document options menu in the upper right of any document and select Generate PDF.
A PDF file will be generated and you can select to be notified by Nextpoint when it has completed, so you can continue working while it is processed.
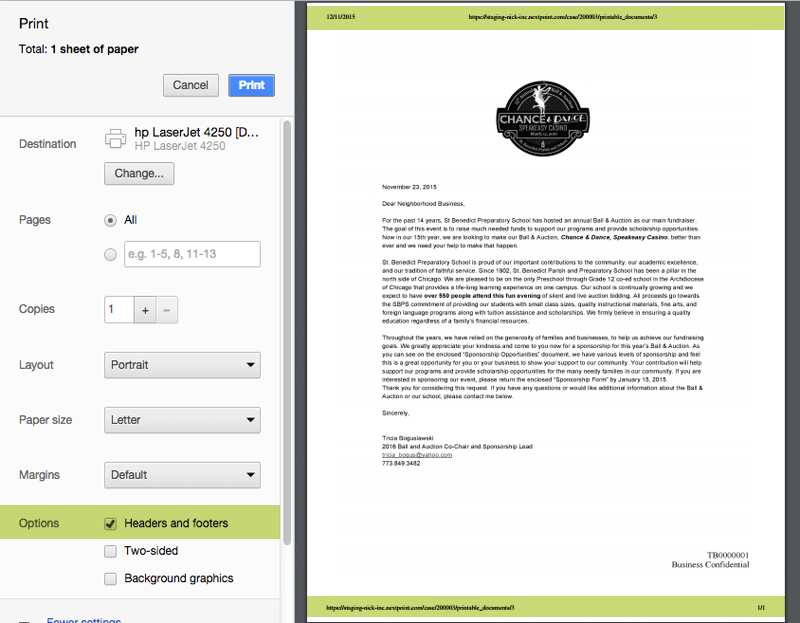
Print to Hardcopy
Quickly print any document you are viewing in Nextpoint to paper on your local printer.
Use the Print button located in the upper right of your document viewer.
Header and Footer Info
The document will be given a Nextpoint header and footer containing the document URL, page count and date printed. This can be valuable and necessary data.
If the document is already stamped/numbered (e.g. Bates), and you would like to remove the default header and footer, simply use your print driver options to exclude that information.
See example below: